Some NVIDIA users are reporting about facing a problem when they are trying to upgrade their NVIDIA driver on their computer. The up-gradation process is not completing, leading to an error message stating- “NVIDIA Installer failed“. This usually happens because of an old/incompatible driver is installed in the user’s computer. If you are facing the same issue, don’t worry. Just attempt these fixes on your device and the problem will solve in no time. But before going for the fixes, attempt these initial workarounds and check if they have solved your problem-
Initial Workarounds–
1. Reboot your computer. Now, try to update the NVIDIA driver again and check if the problem still persists or not.
If you are still facing the error message, go for this fixes-
Fix 1 – Temporarily, disable all antivirus and firewall
Just disable all antivirus and firewall on your system and then try to install again.
Fix-2 End NVIDIA processes and delete NVIDIA folder-
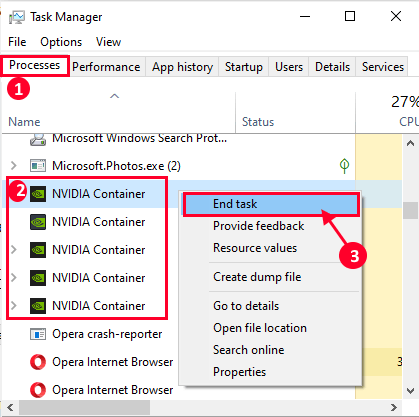
1. Press Ctrl+Shift+Enter to open the Task Manager.
2. Now, in the “Processes” tab and scroll down and you will see NVIDIA processes (like- “NVIDIA Container” process) running on your system.
3. Right-click on each of the processes and click on “End Task” to terminate all of these processes.
You should be seeing these processes running in your system-
NVIDIA Backend (32 bit)
NVIDIA Driver Helper Service
NVIDIA Network service (32 bit)
NVIDIA Settings
NVIDIA User Experience Driver Component

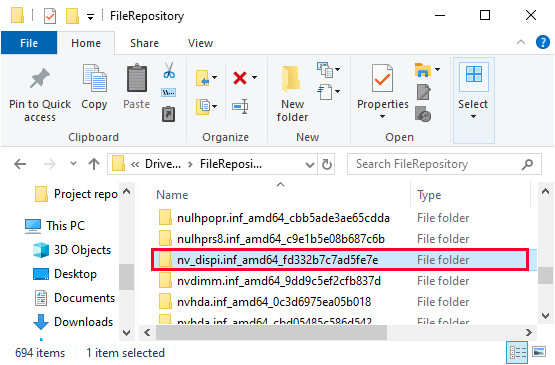
4. Open File Explorer window, and go to this location on your hard drive-
C:\Windows\System32\DriverStore\FileRepository\
Scroll down in the folder and find folders having below given items in the name and delete them-
nvdsp.inf
nv_lh
nvoclock

4. Then, in the File Explorer, navigate to these folders and empty them-
C:\Program Files\NVIDIA Corporation\
C:\Program Files (x86)\NVIDIA Corporation\

5. Reboot your computer and after rebooting follow Fix-6 to install the NVIDIA driver manually on your computer.
Fix 3 – Using command Prompt
1. Open command prompt as admin.
2. Run the command given below one by one in cmd window.
bcdedit -set loadoptions DISABLE_INTEGRITY_CHECKS
bcdedit -set TESTSIGNING ON
3. Now, restart your computer and try again. Your problem will besolved.
4. After that, Open command prompt as admin again and run the commands given below to make things as they were before.
bcdedit -set loadoptions ENABLE_INTEGRITY_CHECKS
bcdedit -set TESTSIGNING OFF
Fix-4 Update the NVIDIA driver from Device Manager-
1. After pressing ‘Windows key+X‘ from your keyboard, click on the “Device Manager“.
Device Manager utility will open.

2. Once the Device Manager window appears, find “Display adapters” section.
3. Now, from the drop-down right-click on the graphics driver you are using. Then, click on “Update driver“.

3. In the next window, choose the option that states, “Search automatically for updated driver software“.

Once the update process is over, close the Device Manager window.
Reboot your computer.
Fix-5 Install the NVIDIA driver manually-
1. At first, launch Google Chrome.
2. Then, search “Nvidia drivers”
3. After that, you have to click on “Download Drivers|NVIDIA“.

4. . Now, in this window, under ‘NVIDIA Driver downloads’ section choose “Product type“, “Product series“, “Product“, “Operating System“, “Windows Driver Type“, “Download Type” according to your driver specifications.
5. Once you have selected your product, click on the “Search“.

6. Then, click on “Download” to download the driver.

Close the browser.
7. Locate the downloaded application on your disk.
8. Then, double click on it to start the installation process of the driver.
![]()
9. Now, in the NVIDIA Graphics Driver window, click on “NVIDIA Graphics Driver and GeForce Experience” and click on “Agree and continue“.

10. Under Installation Options, choose “Express (Recommended)” and click on “Next” to start the installation process.

11. After installation is done, click on “Close” to close the NVIDIA Graphics Driver Installer window.

Restart your computer to finish the installation process.
If you are still facing the problem during the installation, perhaps performing a clean installation of the NVIDIA driver can help you out.
Fix-6 Perform a Clean install
[NOTE– Performing a clean installation will clear any kind of custom settings of the driver on your device. But it will remove any further errors in the NVIDIA installer from your device.]
The NVDIA installer you downloaded during the manual installation (i.e. the Fix-6)will be used in this fix.
1. Go to the location where the installer is located on your computer.
2. When you are in that location, double click on the installer to start the installation.
![]()
3. In the NVIDIA Installer window, choose the option “NVIDIA Graphics Driver and GeForce Experience“.
4. Then, click on “Agree and continue“.

5. Now, choose “Custom installation“.
6. Click on “Next” to start the installation process.

7. Now, check the “Perform a clean installation” option.
8. Finally, click lick on “Next“.

After installation is done, click on “Close” to close the NVIDIA Graphics Driver Installer window.

Restart your computer to finish the installation process.
You should not face any further issues with the installation of the NVIDIA driver.
Fix-7 Use Display Driver Uninstaller-
1. Download the DDU.zip on your device and after downloading it, unzip the folder in a favorable location of your choice.

2. Now, press Windows Key+R to launch Run, and “control printers” and hit Enter to open Device and Printers window in Control Panel.

3. Now, right-click on your computer name and then click on “Device installation settings“.

4. Now, choose “No (your device might not work as“ expected) and click on “Save Changes“.

Close the Devices and Printers window.
5. Then, google “Nvidia drivers” from your browser and click on “Download Drivers|NVIDIA“.

6. Now, in this window, under ‘NVIDIA Driver downloads’ section choose “Product type“, “Product series“, “Product“, “Operating System“, “Windows Driver Type“, “Download Type” according to your driver specifications.
Once you have chosen the right driver for you computer, click on the “Search“.

7. Click on “Download” to start the downloading process.

8. Press Windows Icon+I to open Settings application, now click on “Update and Security“.

9. Now, on the left pane, click on “Recovery“,
Then, on the right-hand side of the screen, click on “Restart Now” under Advanced Startup.

10. Then click on “Advanced options“.

11. Now, within the Advanced options window, click on the “Startup Settings“.

12. Then, click on “Restart”.

13. Now, just press 4 from your keyborad to “Enable Safe Mode“.

In Safe mode, the background of your desktop will be black.
14. Now, navigate to the file location where you have extracted DDU.zip. Double click on “DDU v18.1.0.9” to extract the main files.
Go to the extracted folder, and double click on the “Display Driver Installer” to run it on your device.

15. Now, in the Display Driver Uninstaller window, on the left-hand side, click on the drop-down beside “Select device type” and click “GPU” and finally click on “Clean and Restart“.

16. This will uninstall the NVIDIA driver from your system and you will be booted to normal mode again.
17. Now, you have to boot into safe mode again ( follow the instructions in Step-8 to Step-13 of this fix).
18. After booting into safe mode, locate the downloaded application on your disk.
19. Now, double click on it to start the installation process of the driver.
![]()
20. Once the installation process has finished, click on “Close” to close the NVIDIA Graphics Driver Installer window.

Restart your computer to finish the installation process.
21. After rebooting, press Windows Key+R and write “control printers“.
22. Click on “OK“.

24. Now, right-click on your computer name and then click on “Device installation settings“.

25. Now, choose “Yes (recommended)” and click on “Save Changes“.

You should not face any further issues with the installation of the NVIDIA driver.
Fix-8 Perform Clean Boot-
1. To open the Run terminal on your desktop, press Windows key+R.
2. Then, type “msconfig” and after that, click on “OK“.

3. After that go to the “General” tab
4. In the General tab, uncheck the box beside the “Load startup items“.
5. Finally, you have to make sure the “Load system services” is checked.

6. Now, click on the “Services” tab.
7. Click once beside the option “Hide all Microsoft services” to check it.
8. To disable all these services, click on the “Disable all“.
9. Now, click on “Apply” and “OK“.

Reboot your computer, it will be booted in clean mode.
Fix-9 Rollback the existing display adapter-
1. At first, right-click on the Windows icon and then click on the “Device Manager“.
Device Manager utility will open.

2. In the Device Manager window, find “Display adapters” from the list, click on it to expand it.
3. Now, from the drop-down double click on the NVIDIA graphics driver, you are using. The properties window will open.

3. In the Properties window, go to the “Driver” tab. Click on “Roll Back Driver“. Click on “OK”. This will rollback older updates of your NVIDIA graphics driver and it will be replaced with older version of your driver.

4. Now, when the question “Why are rolling back?” appears, choose “My apps don’t work with this driver“.
5. Now, click on “Yes” to start the rolling back process.

Close Device Manager window.
Reboot your computer. After rebooting, you should be able to update the driver without any error.