Some Windows 10 & 11 users are complaining about an explorer crash issue at the startup time on their system. In case if you are witnessing the same error (blank error message in Explorer.exe) it is happening due to a permission issue on your computer. To solve this problem you need to delete a particular key from Registry Editor. Simply, follow these fixes and the problem will be gone quickly.
NOTE–
Before going ahead to the main fix, you should make a backup of the registry on your computer. Once you have opened the Registry Editor, click on “File” > “Export” to create the backup.
If anything goes wrong you can retrieve your registry by simply importing the backup.
Fix 1 – Delete a key in Registry Editor-
1. Click on Search box beside Windows icon and type “regedit” and then click on “Registry Editor” to open the Registry Editor window.

2. Now you have to expand the left-hand side this way-
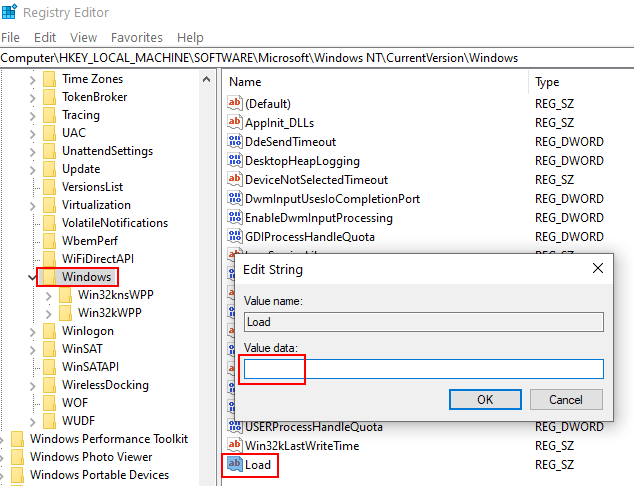
Computer\HKEY_LOCAL_MACHINE\SOFTWARE\Microsoft\Windows NT\CurrentVersion\Windows
On the right-hand side of the window, try to find the “Load ” string value.
4. Just double click on Load and make sure the Value Data is empty.
If not delete anything which is present under value data and click OK.

In case if you can’t make changes in Load value data , then follow these steps
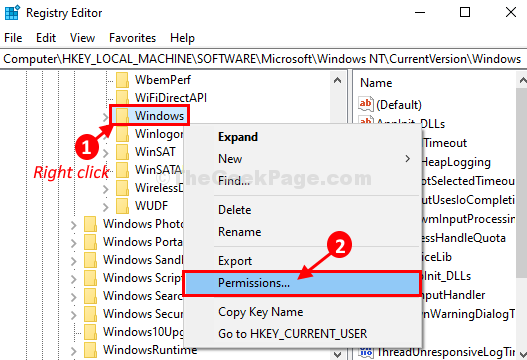
6. Right-click on “Windows” on the right-hand side, and then click on “Permissions“.

7. In Permissions for Windows window, click on “Add“.

8. In Select User or Group window, click on “Advanced” to add your user name.

9. In the next window, you need to click on “Find Now“.
10. Now, from the ‘Search results‘ find your user name and select it.
11. Click on “OK” to save it.

12. Coming back to the Select User or Group window, click on “OK” to complete the change.

13. Again in Permissions for Windows window, click on “Advanced“.

14. In Advanced Security of Settings for Windows window, you have to click on “Add” option.

15. Then, click on “Select a principle” to add your user name and give it full control of the Windows key.

16. In Select User or Group window, click on “Advanced” to add your user name.

17. Just like before you have to click on “Find Now“.
18. In the ‘Search results‘ panel, scroll down and find out your user name and select it.
19. Click on “OK” to save it.

20. In Select User or Group window, click on “OK” to select the user name.

21. Coming back to Permissions Entry for Windows window, check the option of “Full Control“.
22. Then, click on “OK” to save the changes.

23. You have to click on “Apply” and then on “OK” to save the changes on your computer.

23. Same way, again you have to click on “Apply” and then on “OK” to complete the process.

24. In Registry Editor window, right-click on the “Load” key again and then click on “Delete” to delete the key from your computer.

25. If you are asked for confirmation to delete the key, click on “Yes“.

This time you will be able to delete the key from your computer.
Close Registry Editor window.
After closing it, reboot your computer to let the changes take effect.
After rebooting, the issue will be fixed.
That’s it . Your problem will get fixed.