While installing a new app on your Windows machine, it may crash all of a sudden and show up this “The installer has encountered an unexpected error installing this package. This may indicate a problem with this package. The error code is 2502” error message. Though this can be a simple case of lack of enough permissions of the Temp folder, sometimes the Windows Installer can cause this issue as well. We suggest you follow these quick solutions to solve the issue very quickly.
Workarounds –
1. Restart the system and then take another try at the installation process.
2. Check the file integrity of the package once more before you proceed to the main solutions.
Fix 1 – Reregister the Windows Installer
Restarting the Windows Installer should work just fine.
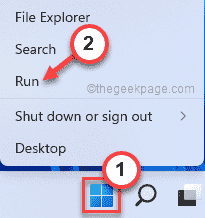
1. At first, right-click on the Windows icon and tap on “Run“.
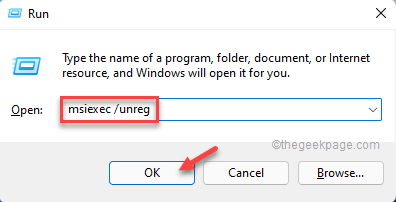
2. In the Run terminal, write this in the terminal and hit Enter.
msiexec /unreg
Windows Installer service will be unregistered.
3. Then, press the Windows key and the R keys together.
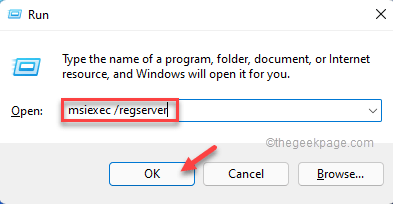
4. After that, type this code and hit Enter.
msiexec /regserver
This will re-register the Windows Installer service.
Fix 2 – Grant full control of Temp folder
Windows Installer uses the Temp folders. So, you have to grant full control to the Temp folder.
1. Launch the File Explorer by pressing the Windows key+E keys together.
2. Then, go here –
C:\Windows\Temp
3. Now, right-tap on the “Temp” folder and tap “Properties“.
4. When the Temp Properties appear, go to the “Security” tab.
5. In the Security tab, tap on “Advanced” to proceed further.
6. You will see the current ‘Owner:’ on the screen. So, tap on “Change” to alter it.
7. Now, click on “Advanced” to proceed further.
8. Next, tap “Find Now” to view the full list of user groups.
9. You will find all the users and groups in the list. Just select your account from the list.
10. After that, click on “OK” to select it.
11. Once you have done that, tap on “OK“.
Now, your account has taken ownership of this folder.
12. Now, check the “Replace owner on subcontainers and objects” box.
13. Then, tap “Add“.
14. On the Permission Entry for Temp page, tap on “Select a principal“.
15. Now, click on “Advanced” to proceed further.
16. Again, tap “Find Now” and select your account name once again.
18. Once you have done that, tap “OK” to select it.
19. Again, tap on “OK” to complete this process.
20. Coming back to the Permission Entry page, check the “Full control” box.
21. Then, click on the “OK” button once to proceed.
22. Finally, coming back to the main page, click “Apply” and “OK” sequentially to apply these changes.
Now, you have to do all these steps for the “Administrator” group also.
Once you have done all these, close the File Explorer.
Then, perform a simple system restart. Once the device boots back in, close the
Fix 3 – Restart Explorer Process
Restarting the File Explorer may fix this problem.
1. Open the File Explorer.
2. At first, right-click on the Windows key and tap on “Task Manager“.
2. When the File Explorer opens up, select the “File Explorer” process and tap “End task“.
The taskbar will be completely blank, and the same goes with the desktop as well.
So, you have to re-launch the File Explorer within the Task Manager.
3. In order to do that, tap on “File” on the menu bar.
4. Next, tap on “Run new task“.
5. After that, type “explorer.exe” in the Run window.
6. Then, click on “OK“.
This will launch the File Explorer. After this, launch the setup file and complete the installation process.
Fix 4 – Restart the Windows Installer Service
Restarting the Windows Installer should help you resolve this issue.
1. Press Windows key+R to launch the Run terminal.
2. To open the Services utility, type this command and click on “OK“.
services. msc
3. In the Services app, find the “Windows Installer” service to access it.
3. If the service is already running, just right-click on the “Windows Installer” and then tap on “Restart“.
4. If it is not already running, click on “Start” to start the service again.
It will be started very quickly.
Close Services window.
Then, retry the installation once again.
Fix 5 – Run an SFC check
The system file corruption can cause this issue as well.
1. Just type “cmd” in the search box.
2. Next, right-click the “Command Prompt” and tap on “Run as administrator“.
3. When the Command Prompt opens up, type this code and hit the Enter key.
sfc /scannow
4. Once you have run the SFC check, you can run the DISM check once again.
Just run these DISM codes one by one in the terminal.
DISM.exe /Online /Cleanup-image /Scanhealth
DISM /Online /Cleanup-Image /RestoreHealth
Let the DISM tool operate and fix any system corruption. Once you are done, close the terminal.
Then, try the installation another try. Your problem should be solved.


