Some users have complained about Docker is taking a very long time to start. This is a well-known issue that has been reported by users for years. So, if you are one of the users who is experiencing this issue, don’t worry. You can easily fix the problem by following these easy steps on your computer.
Workarounds –
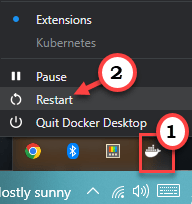
1. Restart the Docker. You will find the Docker Desktop icon in the system tray. So, right-tap the whale icon and click “Restart” to restart the Docker Desktop app.
Fix 1 – Restart the system
Close the Docker application and restart the system. If this is a one-time occurrence, restarting the system should help you fix the problem.
1. Close the Docker Desktop application.
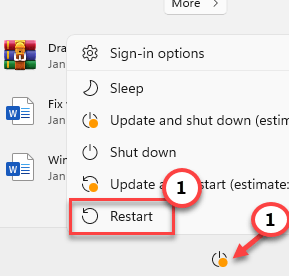
2. Then, press the Win key to open the Start menu.
3. Click the power button there and click the “Restart” option to restart your computer.
Now, after your computer restarts, launch Docker and check. It will start normally.
Fix 2 – Unregister Docker Desktop
This is the most recommended fix where you have nothing but to run two commands in your PowerShell terminal.
1. You have to access PowerShell with administrative support.
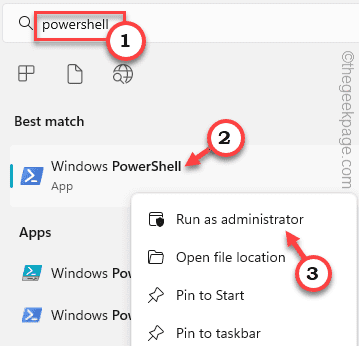
2. So, use the Win key+S keys together. Then, type “powershell” in the command line.
3. You will see the “Windows PowerShell” in the search result. Just, right-click the third option on the list “Run as administrator” to run the PowerShell as an administrator.

4. Now, input these two codes one-by-one and hit Enter to unregister docker desktop.
wsl --unregister docker-desktop
wsl --unregister docker-desktop-data
Exit the PowerShell screen after this. Then, close Docker and relaunch it.
This should definitely solve the Docker issue.
Fix 3 – Switch to the Windows containers
Docker doesn’t verify which OS you are running at the initial startup. So, you can switch the containers to Windows ones.
Step 1 – Launch Docker Desktop, if you have already closed it.
Even if the app is opening or appearing to be stuck, ignore it.
Step 2 – Come down to the system tray icon where you can find the Docker Desktop icon (it is an whale). There, right-click that whale icon and tap “Switch to Windows containers…“.
Docker will close and relaunch while using the Windows containers.
This fix has solved the issue for many users. If this one fails, go for the next one.
Fix 4 – Terminate the docker desktop and restart
Close the Docker Desktop app and restart the app. This should fix the problem.
You have to open a PowerShell instance separately.
Step 1 – You can directly right-tap the Windows icon.
Step 2 – Now, tap the “Terminal(Admin)” in the power user menu to open it.
Step 3 – On the Windows Terminal page, click on the down arrow icon you will find the “Windows PowerShell“.
Step 4 – Now, press & hold the Ctrl key and click “Windows PowerShell” to open the powershell as an administrator.
Step 5 – Now, copy-paste these two termination codes one after another and hit Enter to terminate Docker Desktop.
wsl --terminate docker-desktop
wsl --terminate docker-desktop-data
After passing these two commands, exit the PowerShell interface.
Step 6 – Now, go to the Docker Desktop app. If you can see any error message, close it.
Step 7 – Then, click the cross button to close the app.
Step 8 – In closing the app, if you see any warning/ error message, close that as well.
Step 9 – To make sure Docker isn’t still running, look at the system tray.
Step 10 – If you still can see the whale icon there, right-click the whale icon and click “Quit Docker Desktop“.
Step 11 – Even still Docker can run in the behind your eyes. So, right-click the Windows icon and click “Task Manager“.
Step 12 – Here, go through the Background Tasks list and try to identify any Docker-related app or Docker app processes.
Step 13 – Then, right-tap the app process and tap “End task“.
Make sure there are no Docker app processes still running on the system.
Step 8 – Now, relaunch Docker Desktop from the start menu page.
Wait for Docker Desktop to start. Now, check if this works.
Fix 5 – Disable the Code Flow Guard for vmcompute
If Windows Security has applied exploitation protection on the vmcompute component, Docker will take a long time to start.
Step 1 – Open Windows Security.
Step 2 – Here you will find a settings called “App & browser control“. Open it up.
Step 3 – Go down until you see the Exploit protection settings, and click “Exploit protection settings“.
Step 4 – Inside this particular setting, go to the “Program settings“.
Step 5 – Locate the vmcompute along with its path –
C:\WINDOWS\System32\vmcompute.exe
Step 6 –. Then, click “Edit” so that you can fix it.
Step 7 – Go down until you notice the “Code Flow Guard (CFG)” setting.
Step 8 – Just make definite that the “Override system settings” box is unchecked.
Step 9 – Don’t forget to tap “Apply” to apply this change.
Close the PowerShell terminal.
This change won’t take effect until you restart the vmcompute.exe app.
Step 1 – Open a PowerShell terminal as an administrator.
Step 2 – After this, type this code and hit Enter.
net start vmcompute
Close the PowerShell terminal.
Now, try to run the Docker Desktop app. If that is still appearing to be loading forever, restart your computer and retry.
Fix 6 – Disable and re-enable the WSL feature
Disable the Windows Subsystem Linux (WSL) feature and re-enable that.
Step 1 – Open a Run box. You can easily do it using the Win key+R keys.
Step 2 – You have to type this down or you can just copy-paste it. Click “OK“.
optionalfeatures

Step 3 – Now, uncheck the “Windows Subsystem for Linux” feature.
Step 4 – Tap “OK” to save this.
Let your system remove the feature from your system. A system restart is mandatory and you have to do it.
Step 5 – After restarting the system, write “optional features” in the search box.
Step 6 – Then, click “Optional features” in the settings.
Step 7 – Now, scroll down to find the “More Windows features” to open it.
Step 8 – Finally, check the “Windows Subsystem for Linux” point. Click “OK” to apply this feature change.
Windows will ask your permission to restart the system. So, restart the system.
After the system restarts, relaunch Docker Desktop again. Test if this works.
Fix 7 – Uninstall and perform a fresh install of Docker
If nothing works, you can just uninstall Docker and reinstall it.
Step 1 – All the installed apps are placed inside Programs & Features page.
Step 2 – So, open a Run box. Type this and click “OK“.
appwiz.cpl
Step 3 – Locate “Docker“. Right-click the app and tap “Uninstall“.
Go through the steps of Docker setup window to uninstall the app from your computer.
Restart your computer.
Step 4 – Go to the Docker Desktop. Click “Download Docker Desktop“.
This file is quite large in size. So, allow a while for downloading it.
Step 5 – Now, run the “Docker Desktop Installer” to open it.
You don’t have to do anything else. Docker will automatically install on your computer.

