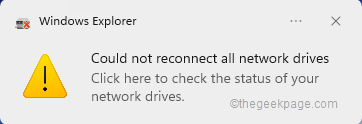
Whenever you plug in a new external device to your system, Windows recognizes it and maps it automatically (or, you can map it manually). This feature ensures that you don’t have to map all the external drives manually during each boot time. In some cases, you may find this error message popping up on the corner of your screen, saying “Could not reconnect all the network drives“. There are some easy solutions for this fix, including remapping the latest external drive once more.
Fix 1 – Ensure Windows does wait for the network drive
Sometimes Windows does boots up so quickly that network drives can’t be mapped correctly in that small time frame.
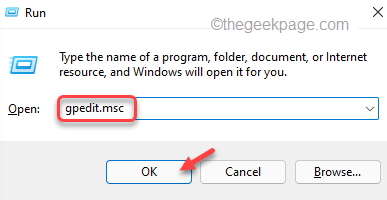
1. So, press the ⊞ Win+R keys together.
2. Then, type “gpedit.msc” and click on “OK“.
This will open up the Local Group Policy Editor.
3. When it does appear, go through this way –
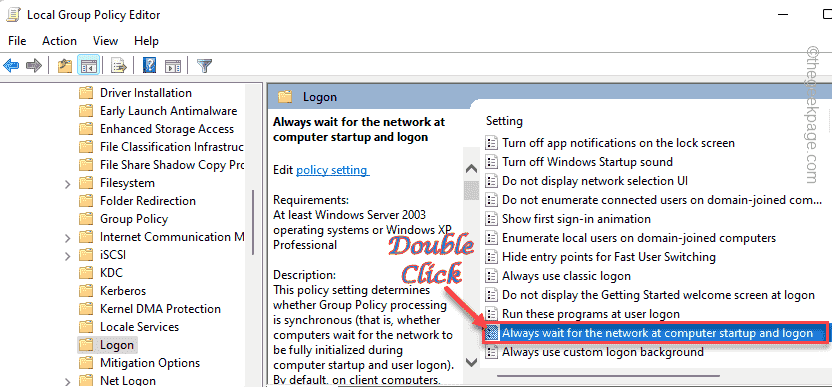
Computer Configuration > Administrative Templates > System > Logon
4. On the right-hand side, you will see a list of policies.
5. Just, look for the “Always wait for the network at computer startup and logon” policy settings.
6. Just double-tap the policy to alter it.
7. Set the policy settings to “Enabled“.
8. After that, tap “Apply” and “OK” to save the changes.
After that, close the Group Policy Editor. Restart the computer once you have done that.
Fix 2 – Use a batch file
You can create a batch file followed by a powershell script to fix this issue.
Step 1 CMD SCRIPT
1. Write “Notepad” in the search box.
2. Then, tap on “Notepad” to access it.

2. Once the Notepad opens up, copy-paste these lines in the Notepad.
PowerShell -Command "Set-ExecutionPolicy -Scope CurrentUser Unrestricted" >> "%TEMP%\StartupLog.txt" 2>&1

PowerShell -File "%SystemDrive%\Scripts\MapDrives.ps1" >> "%TEMP%\StartupLog.txt" 2>&1
3. Once you have pasted the lines in Notepad, tap on the “File” and click on “Save As…“.
4. At the next step, set the file type to “All files“.
7. Then, name the batch file as “batch.cmd”
8. Navigate to the Desktop to save the file. After that, click on “Save” to save the file.
Once you have saved the file, go to the next step.
Step 2 – PowerShell script
Now, you have to make a powershell script.
1. Launch the Notepad once again.
2. Now, copy these line from here and paste it into the terminal.
$i=3

    while($True){

    $error.clear()

    $MappedDrives = Get-SmbMapping |where -property Status -Value Unavailable -EQ | select LocalPath,RemotePath

    foreach( $MappedDrive in $MappedDrives)

    {

        try {

            New-SmbMapping -LocalPath $MappedDrive.LocalPath -RemotePath $MappedDrive.RemotePath -Persistent $True

        } catch {

            Write-Host "There was an error mapping $MappedDrive.RemotePath to $MappedDrive.LocalPath"

        }

    }

    $i = $i - 1

    if($error.Count -eq 0 -Or $i -eq 0) {break}

    Start-Sleep -Seconds 30

}
3. Now, tap on “File” and “Save As…” to proceed.
4. Then, just set the ‘File Type:’ settings to “All files“.
7. Just, set the name of the powershell script to “MapDrives.ps1“.
8. Just like before, save this file in Desktop.
Once you saved these files, go to the next step.
Step 3 – Move these scripts
You can move these scripts to the Startup folder.
1. Go to your desktop where you saved these scripts. Right-tap the “batch.cmd” file and tap on the copy icon to copy it.
2. Now, you have to just move these files to the “Startup” folder on your system.
%ProgramData%\Microsoft\Windows\Start Menu\Programs\StartUp
[
You can also navigate to this folder from Run.
a. Open the Run terminal by pressing the Windows key+R keys together.
b. Paste this address there and click on “OK“.
%ProgramData%\Microsoft\Windows\Start Menu\Programs\StartUp
]
3. Now, just paste the cmd script in the Startup folder.
4. After that, go to the system drive (Usually, it is the C drive).
5. Next, create a new folder named “Scripts“.
6. Now, copy the “MapDrives.ps1” file.
7. Paste the copied powershell file in the Scripts folder.
Once you have done this close every window and restart the system.
Fix 3 – Use the registry to disable notification
Just a simple registry tweak and you can easily get rid of the annoying notification at startup.
1. First of all type “regedit.msc” in the search box.
2. After that, tap on the “Registry Editor” to access it.
Warning – Registry Editor is one of the most sensitive locations on your system. So, before proceeding to the next step, make a new backup of your registry.
When the Registry Editor opens up, tap on “File” and click on the “Export” option to back up the registry.

3. After taking the backup, go this way –
HKEY_LOCAL_MACHINE\SYSTEM\CurrentControlSet\Control\NetworkProvider
4. Now, on the right-hand pane, look for a value named “RestoreConnection“.
5. If you can’t find any such values, just right-tap on the space and tap on “New>” and tap on “DWORD (32-bit) Value“.
6. Now, you name the value as “RestoreConnection“.
7. After that, just double-tap it.
8. Set the value to “0“.
9. After that, tap on “OK” to save the changes.
Close the Registry Editor. After restarting the system, check whether you are facing any such notification issues or not.
Fix 4 – Disconnect the problematic drive
If you are using a misconfigured device, disconnecting it should help you resolve the issue.
1. Just press the Windows key+E keys together.
2. Then, tap on “This PC” on the left-hand side.
Here, you will notice all the drives listed together. Check which of the drives are showing a red cross beside their name. That device is the cause of the error message.
3. Just, right-tap the drive and tap on “Show more options“.
4. tap on “Disconnect” to disconnect the drive from your system.
Once it is disconnected, reboot the device.
Now you will stop receiving the error messages. On the other hand, you can easily re-map it if you need it later.
Fix 5 – Use the Task Scheduler
You can use the Task Scheduler to map drives at the startup of your system.
1. Type “task scheduler” in the search box.
2. Then, tap “Task Scheduler” to access it.
3. Once you have opened the Task Scheduler screen, tap on “Action” and then click the “Create Task” option to create a new task.
4. In the Create Task window, go to the “General” tab.
5. Give this task any name you prefer.
6. Now, you have to change the particular user group. To do that, tap the “Change User or Group...” option.
7. Now, click on “Advanced“.
8. Just, tap “Find now“.
9. After that, look for your account and select it.
10. Next, tap “OK“.
11. Finally, tap “OK” to proceed further.
12. Finally, coming back to the Create Task window, check the “Run with highest privileges“.
13. Then, go to the “Triggers” section.
14. Tap on the “New” option.
15. Next, set the ‘Begin the task:’ settings “At log on“.
16. Then, tap “OK“.
17. Go to the “Actions” area.
18. Finally, tap the “New…” option.
19. In the New Action page, set the “Action:” settings to “Start a program“.
20. After that, tap “Browse…“.
21. Further, navigate to the powershell script that you have saved before (Fix – 2).
22. Then, select the powershell script and tap “Open“.
23. Paste this in the ‘Add arguments‘ box.
-windowsstyle hidden -command .\MapDrives.ps1 >> %TEMP%\StartupLog.txt 2>&1
24. In the ‘Start in‘ box, paste this –
%SystemDrive%\Scripts\
25. Finally, tap “OK“.
26. Go to the “Conditions” tab.
27. Now, just check the last option on the screen, “Start only if the following network is available“.
28. Choose the “Any connection” from the drop-down.
29. At last, tap “OK” to finally create this task.
Close the Task Scheduler and restart the system.
Fix 6 – Reconnect the external device
If this problem is occurring due to an external device, try reconnecting the actual external device.
This should solve the issue you are facing.
Alternative Tips –
Alternatively, you can use any Network Drive Manager to manage the network devices more correctly.


