Whether your PC uses MBR or GPT disk, it depends on how old is your PC and what are its specifications. However, sometimes, you may want to convert your MBR disk to the new and better version – GPT format and what’s interesting is, it can be done without losing any data.
While there are many reasons why you may want to convert from MBT to GPT disk, the usual methods that help you to move from MBR to GPT and from Legacy mode to UEFI, subsequently, deletes all the data on your disk during the process.
Before we show you how to convert MBR to GPT disk on your Windows 11 PC, let’s know more about these disks.
What is MBR?
MBR or Master Boot Record is an older partition that’s seated at the first layer of the hard drive that contains the bootloader and other important details related to your PC and the drive partitions. However, the disk has it’s own downsides, for instance, it’s compatible with drives only upto 2TB and that it can be divided int only 4 partitions.
What is GPT?
GPT or GUID Partition Table is the latest partition with advanced technology that supports the UEFI firmware settings that replaces the older BIOS. As opposed to an MBR disk, GPT is known to work with drives upto 256 TB and can be divided upto 128 partitions. While the MBR disk stores the boot data in a single place, the GPT disk preserves several copies of the boot data in multiple partitions. This helps to recover data more easily.
On the other hand, not all Windows versions support UEFI and hence, such versions cannot boot from a GPT partition. So, even if a computer manufacturer may offer models that support GPI, if it’s not UEFI enabled, even a 64-bit version Windows 10 or a Windows 11 PC will not boot from the GPT drive.
How to Check the Partition Type of your Disk
Having said that, before you proceed with the conversion process, check if your drive is running on MBR or GPT. If it’s already GPT, you need to follow the below methods, however, with an MBR drive, you can follow the below methods. Let’s see how to make sure of the drive partition:
Step 1: Press the Win + R shortcut keys on your keyboard to open the Run command window.
Step 2: In the Run command search bar, type diskmgmt.msc and hit Enter to open the Disk Management window.
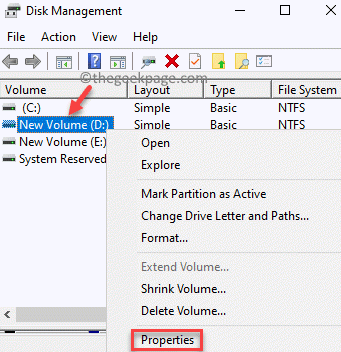
Step 3: In the Disk Management window, go to the bottom end, right-click on the Disk 0 and select Properties.
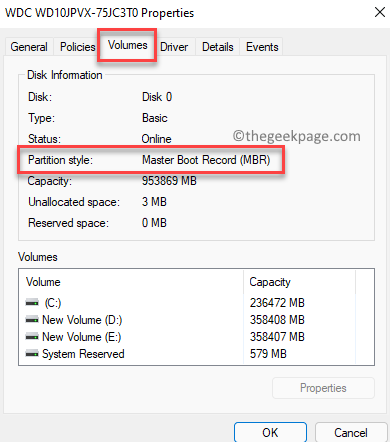
Step 4: In the Properties window, select the Volumes tab and check for the Partition type field.
If it shows GPT, then you need not do anything, but if it shows MBR then, you can proceed with the conversion process.
Method 1: Using MBR2GPT to Convert from MBR to GPT
The MBR2GPT tool was introduced with the Creators Update for Windows 10 and hence, it’s a reasonably new tool. Therefore, if your Windows 10 PC is already equipped with the Creators Update or if you are running the Windows 11 OS, you can run the built-in MBR2GPT tool to convert the MBR drive to GPT in just a matter of minutes. Best of all, without losing any data during the process. This tool adds the components of the GPT drive to the current MBR drive on your PC with no effect on data in the current partition.
Let’s see how to use the MBR2GPT tool to convert from MBR to GPT drive:
Step 1: Firstly, you would need to obtain the disk number. For this, press the Win + R keys together on your keyboard together to open the Run command window.
Step 2: In the Run command window, type diskmgmt.msc and hit Enter to open the Disk Management window.
Step 3: In the Disk Management window, look for the disk you want to convert to GPT and take a note of the disk number, for instance, in my case, it shows as Disk 0.
Step 4: Now, go to Start, right-click on it and select Run.
Step 5: This will open the Run command window.
Here, type cmd in the search bar and press the Ctrl + Shift + Enter keys together to launch the Command Prompt window with admin rights.
Step 6: In the elevated Command prompt, run the below command and hit Enter to verify the disk:
mbr2gpt /validate /disk:*enter previously noted disk number here* /allowFullOS
This command should ensure that your disk meets the requirements for the conversion. But if the disk turns out to be not in a state to be converted to GPT drive, it will show an error – Disk layout validation failed for disk:*your disk number*.
*Note – However, if you want to run the MBR2GPT.exe tool from the Windows Preinstallation environment, you can simply run mbr2gpt /validate and that should suffice.
Also, you can run the above command in the elevated command prompt opened through Advanced recovery.
Open Settings app (Win + I) > Update & security > Recovery > Advanced startup > Restart now > Choose an option > Troubleshoot > Advanced options > Command Prompt.
Step 7: If the disk is successfully validated, run the below command to proceed with the disk conversion process and press Enter:
mbr2gpt /convert /disk:*enter previously noted disk number here* /allowFullOS
*Note – However, if you are running the conversion process from the Windows Preinstallation environment, run this command instead – mbr2gpt /convert and that should suffice.
Wait till its complete as the process takes sometime and this should not take more than a minute.
Step 8: Once you receive the success message, you would now need to set your firmware to boot from UEFI instead of BIOS.
While this process depends on your motherboard manufacturer, the usual process would be to hit the BIOS key just before your Windows OS starts up and wait for the screen that allows you to set the boot mode to UEFI.
Once done with the above steps, your motherboard is now converted to GPT disk and UEFI mode.
Method 2: Using the Gptgen Tool through Command Prompt
However, if you want to make it a tad bit simpler, you can try this command line tool called Gptgen, to convert from MBR to GPT disk without losing any data. Let’s see how:
Step 1: Press the Win + R keys simultaneously to open the Run command window.
Step 2: In the Run command search box, type cmd and press the Ctrl + Shift + Enter shortcut keys to launch the elevated Command Prompt window.
Step 3: In the Command Prompt (admin) window, run the below commands one after another and press Enter after each one:
gptgen.exe \.\physicaldriveX
gptgen.exe .physicaldriveX
gptgen.exe -w \.\physicaldriveX
gptgen.exe -w .physicaldriveX
Here, X is your disk number, so, find out your disk number as shown above and replace X with the same. For example, in my case, my disk number is Disk 0, and hence, I replaced it with “Disk 0“.
Once the commands are done executing, the MBR disk on your PC is successfully converted to GPT.
*Note – Make sure that you are running the UEFI startup mode. To change to UEFI mode, enter BIOS mode and change the Legacy mode to UEFI mode.
Method 3: Using a Free Third Party Application
Alternatively, you can walk the easiest path by using a free 3rd party program, called the Minitool Partition wizard, that can help you convert from MBR to GPT drive using a graphical interface. Let’s see how:
Step 1: Click on the link below to visit the official website and download the link:
Step 2: Once downloaded, open the setup file and follow the instructions as shown to finish installing the MiniTool Partition wizard.
Step 3: After the successful installation of the tool, open the program.
Now, go to your disk that you wish to change to GPT and select Convert MBR disk to GPT disk from the context menu.
Step 4: Once you reach the final pop up, press the Apply button to continue with the conversion.
Once the process is complete, reboot your PC manually (if not asked).
Step 5: If your PC fails to boot up on restart, enter BIOS and change from Legacy mode to UEFI manually.
Now, the MBR disk on your PC is successfully converted to GPT disk and to the UEFI mode.


