Many PowerPoint users have noticed that when their presentation is opened in the Slideshow mode, the images in the presentation look blurry. The most common reason to see blurry images is that one has used a very small image in their presentation and expanded or scaled it to a larger size. In cases like this, blurry images cannot be avoided.
There are cases when one uses good-quality images in their presentation and the images look fine initially. However, the next time one opens PowerPoint, the same images look blurry. Potential causes for this issue are :
- By default, Powerpoint compresses the images in the file every time you save it. Yes! you read it right.
- This can also happen when someone editing the presentation has the option set to change the resolution of the images.
In this article, let us discuss different ways to fix the blurry images in the Powerpoint.
Fix 1: Disable the Do not compress images
Step 1: Open the PowerPoint Presentation file
Step 2: Click on the File tab
Step 3: Click on More and then click on Options
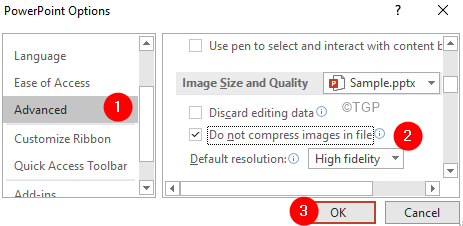
Step 4: PowerPoint Options window that opens.
Step 5: From the left-hand side, click on Advanced
Step 6: Scroll down to the Image Size and Quality section
Step 7: Tick on Do not compress images in the file option
Step 8: Finally, click the OK button
NOTE: This setting will be applicable only for the current file. In case, you open a new PPT file, Powerpoint will continue to compress the images.
Fix 2: Enable compression with Good resolution
Step 1: Open the PowerPoint Options window. (Refer Steps 1-6 from the previous fix)
Step 2: Click on Advanced from the left-hand side
Step 3: Scroll down to the Image Size and Quality section
Step 4: Make sure Do not compress images in the file option is not ticked.
Step 5: From the Default resolution dro-down, choose High Fidelity or a larger PPI value. The larger the PPI, the better is the resolution of the image.
NOTE: This setting will be applicable only to the current file.
Fix 3: Disable Compression for all the PPT files using Registry Editor
Please note that after this change in the registry, hte images will not be compressed for new PPT file only.
Step 1: Open the Run window by pressing the buttons Win Key+r from your keyboard
Step 2: Type regedit and press OK

Step 3: In the User Account Control window that opens asking for permissions, click on Yes
NOTE: Registry editing can have an adverse effect on the system even with the slightest mistake. It is advised to take the backup of the registry before proceeding. To take a backup, In the Registry Editor–> Go to File –> Export –> Save your Backup file.
Step 4: In the Registry Editor window, in the search bar at the top, copy-paste the following location
HKEY_CURRENT_USER\SOFTWARE\Microsoft\Office.0\PowerPoint\Options
Note that 16.0 is the folder corresponding to Office 2016. This would change depending on your Office. For example, for Office 2015, the folder will be 15.0
Step 5: On the right-hand side, right-click and New> DWORD(32-bit) Value
Step 6: Name the newly created key as AutomaticPictureCompressionDefault
Step 7: Ensure the value is set to 0
That’s All.
We hope this article has been informative.
Thanks for Reading.


