Spotify is the music streaming provider which gives access to millions of songs. While logging into the Spotify account, few users face the error ‘A firewall may be blocking Spotify’ which appears as a red alert, and sometimes it does not even allow you to log in, though the username and password are appropriate. Do not worry, in this article we will discuss how to solve this issue. There are various reasons why this happens, check the below methods for a solution and see which solves your problem.
Method 1: Change The Proxy Setting
We will change the proxy settings of the Spotify app and check if the problem is resolved.
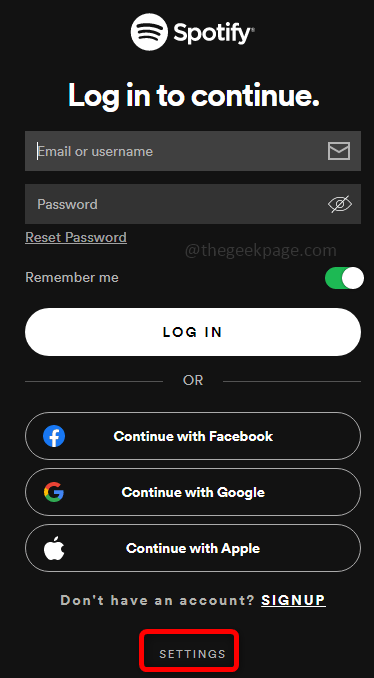
Step 1: Open Spotify App by typing Spotify in the search bar and clicking on the app to open. Click on Login.
Step 2: Once the login page is opened, click on Settings at the bottom of the login page.
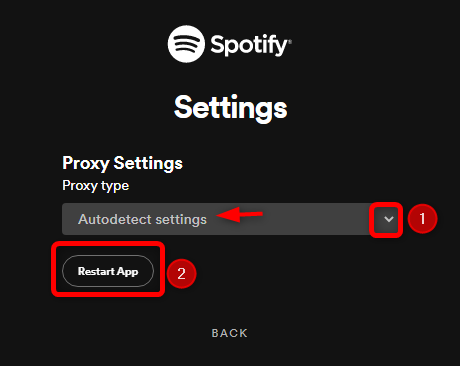
Step 3: In the proxy setting, select Autodetect settings and Restart App.
Step 4: Now you will be able to log in to the Spotify app.
Method 2: Use Command Prompt Commands
Sometimes the improper cache might create a problem, so we will use a few commands in order to clear the DNS records from the cache.
Step 1: Open the command prompt in administrator mode by typing cmd in the search bar and pressing ctrl + shift + enter keys together.
Step 2: Execute the below commands one by one which flushes the IP addresses or DNS records from the cache and resets the configuration.
ipconfig /flushdns
netsh winsock reset
Step 3: Exit from the command prompt by typing exit on the command prompt and hitting enter or just closing the window.
Method 3: Change DNS Server Address From Control Panel
Specify the preferred and alternate DNS server address instead of obtaining it automatically.
Step 1: Open Control Panel, type the control panel in the search bar and hit enter.
Step 2: In the control panel, click on Network and Internet and click on Network and Sharing Center option.
Step 3: On the left pane click on Change adapter settings and right click on the Wi-Fi option and click on Properties.
Step 4: In the Wi-Fi properties click on Internet Protocol Version 4, and then click on Properties.
Step 5: In the internet protocol version 4 properties, click on Use the following DNS server addresses and enter 1 1 1 1 as the preferred DNS server address. Then type 1001 as the alternate DNS server and click OK.
Step 6: Close all the settings tab and restart your system.
Method 4: Allow The Spotify App Through The Firewall
Check if the windows firewall allows the app, if not update it to allow the Spotify app.
Step 1: Open the Run prompt using Windows + R keys simultaneously. Type control firewall.cpl in the prompt and hit enter.
Step 2: In the Windows Defender Firewall, on the left pane click on Allow an app or feature through Windows Defender Firewall.
Step 3: In the allowed apps and features window, scroll down and find Spotify. Check if it ticked else click on Change Settings and select both Private and Public checkboxes and click on OK. By doing so you are passing the Spotify app through the firewall which should solve the problem.
Method 5: Change The Country Name In Spotify Account
Step 1: Log in to the Spotify account with the correct username and password or choose to continue to log in with your Facebook, or Google account.
Step 2: Click on the Profile dropdown which is on the right side. Then click on Account.
Step 3: You will find the Account overview on the left pane click on Edit profile.
Step 4: Change the country name on the right side by clicking on the drop-down. Select any country and click on Save profile. Restart your app.
That’s it! Hope this article helped to solve the issue. Thank you and Happy Reading!!!


