Live Tiles are one of the coolest features in Windows OS where the application icons in the Start menu shows traits of the application. Live Tiles is the coolest customization option available for the Start menu. If you are seeing that Live Tiles are not working whenever you are opening the Start menu, this article is just for you. Follow these easy fixes to solve the problem in no time at all.
NOTE–
Live Tile feature works with only a select variety of applications (like- Spotify, Mail, Weather, etc.) in Windows 10. So, if all the app tiles are not ‘live’, that is not an anomaly.
Fix 1 – Run the Store Apps troubleshooter
Store Apps Troubleshooter can fix this Live Tile issue that you are facing.
1. Just open up the Settings on your computer.
2. Once it is opened, click on the “Update & Security” settings.

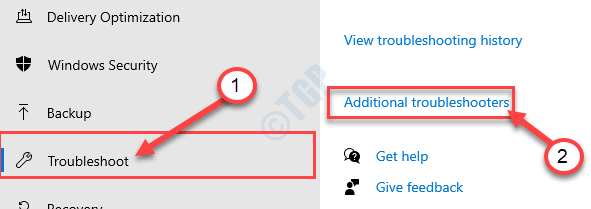
3. Here, you have to click on the “Troubleshoot“.
4. Thereafter, click on the “Additional Troubleshooters“.

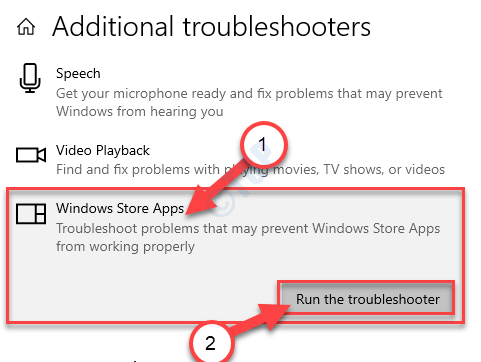
5. Next to that, click on “Windows Store Apps“.
6. Then, click on “Run the Troubleshooter“.

Windows Store Apps troubleshooter will now detect if there is any problem with the MS Store.

Once the Troubleshooter fixes the issue on your computer, reboot your computer to apply the fix.
Fix 2 – Run a Powershell script
You have to run the PowerShell script on your computer to fix the issue.
1. Type “cmd” in the search box.
2. After that, right-click on the “Command Prompt” and click on “Run as administrator“.

3. When the terminal appears, write this code and hit Enter.
shutdown -r

Your computer will shut down completely and restart after it shuts down.
Now, you have to re-register the feature package.
1. Press the Windows key+X keys together.
2. After that, click on the “Task Manager“.

3. Then, click on the “Run” and click on “New Task“.

4. Type “powershell” in the box.
5. Check the box “Create this task with administrative privileges“. Click on “OK“.

6. When the PowerShell window opens up in administrative mode, paste this simple code, and hit Enter.
Get-appxpackage -all *shellexperience* -packagetype bundle |% {add-appxpackage -register -disabledevelopmentmode ($_.installlocation + "\appxmetadata\appxbundlemanifest.xml")}

Once you execute this command and close the PowerShell window.
Restart your computer. Once you have restarted your device, the Live Tile feature will start to work again.
Fix 3 – Try to log with a new user account
Try logging in with a new user account.
1. At first, press the Windows key+I keys together.
2. Then, click on the “Accounts” settings to access it.

3. In the Settings window, click on “Family & other users“.
4.You have to click on the “Add a family member” to start the process of creating a new account.*

* NOTE- In case if you want to include any other account type simply scroll down in the same window and, click on “Add someone else to this pc” under ‘Other users‘.
5. When you the Microsoft account window, enter an Email address.
6. After that, click on “Next” to proceed to the next step.

Now, follow on-screen instructions to complete the account creation process.
7. To sign out from your current account, right-click on the “Windows icon“.
8. After that, click on the “Shut down or sign out“. Then click on “Sign out“.

9. At the Sign-In screen, you will see your accounts available.
10. Click on your new account to sign in with it.
(The new account is named ‘Administrator’ for us.)

11. After that, click on “Sign in” to sign in to the account.
Once you have signed in using your new account, check out if you can see the Live Tiles or not.
Fix 4 – Enable Live Tile settings for individual app tiles
You can try enabling the live tiles settings for individual app tiles.
1. Press the Windows key once.
2. Right-click on any App tiles (like Mail, Weather) and click on “More>“.
3. After that, click on “Turn Live Tile on” to enable the feature.

This way you can enable the Live Tile feature for any application tile present in the Start screen.
Fix 5 – Disable custom font scaling
Some users have notified that the issue is occurring because of the font scaling.
1. Press the Windows key along with the ‘I‘ key.
2. When the Settings window appears, click on the “System” settings.

3. Once System settings opens, on the left-hand side, choose the “Display” settings.
4. After that, scroll down to find the ‘Scale and layout’. Set the “Change the size of text, apps, and other items” to “100% (Recommended)“.

Try to check the live tile feature again.
Fix 6 – Uninstall and re-install the app
If you see that only one or two app tiles are not showing up Live tile feature, try uninstalling them and re-installing them again.
1. Click on the Windows icon to open up the Start menu.
2. After that, right-click on the problematic app and click on “Uninstall” to uninstall it.

3. After uninstalling the application, open the Microsoft Store.
4. After that, install the latest build of the application.
Check out the live tile is working or not.
Fix 7 – Empty the Temp folder
Clearing the Temp folder may solve this issue.
1. Right-click on the Windows icon.
2. Then, click on “Run“.
3. When the Run terminal pops up, type “%temp%“. As soon as you click on “OK“, the Temp folder will appear.

4. When the Temp folder opens up, press ‘Ctrl+A‘.
All the folders and files inside the Temp folder will be selected.
5. After that, press the ‘Delete‘ key to clear everything from the Temp folder.

Your problem should be solved for sure.
Fix 8 – Run a disk cleanup
Sometimes if you have a large number of cache files, temporary files, this problem may occur.
1. Press Windows+R keys together.
2. After that, paste this command and hit Enter.
cleanmgr /low disk

The Disk Cleanup window will be opened.
3. When the Disk Cleanup: Drive Selection window appears, click on the “Drives:” and choose your Windows 10 drive (normally, it is the “C:” drive).
4. Now, click on “OK“.

Allow a while to calculate the number of trash files on the drive.
5. Now, in the “Files to delete:” section, tick all the boxes one-by-one.
6. After that, click on “OK” to start the cleanup process.

Disk Cleanup will clear out all the junk files from the C: drive. Reboot the system, if required.
After doing this, check the Live Tiles once more. Your problem should be solved.