When using Windows 10, the user account managed by your PC is set as the default user. This automatically takes into place as you start your Windows 10 PC. While this is normal, many times you may set up a separate user profile and for some reason, your PC now, starts up with this new profile automatically.
This can be annoying since, you did not want it to be the default user account at the 1st place. And, you now want to change the default user at startup in your Windows 10 PC to the original one. Alternatively, you may also want to change your system to boot with your Local account instead of Admin account.
The good thing is, it can be done pretty easily. Let’s see how to change the default user at startup in Windows 10 or windows 11.
Solution 1 : Through Control Panel
First of all Check password settings in netplwiz
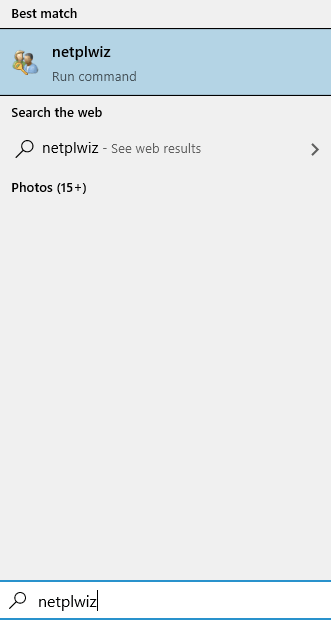
1. Search netplwiz in windows 10 search box.
2. Click on netplwiz to open it.

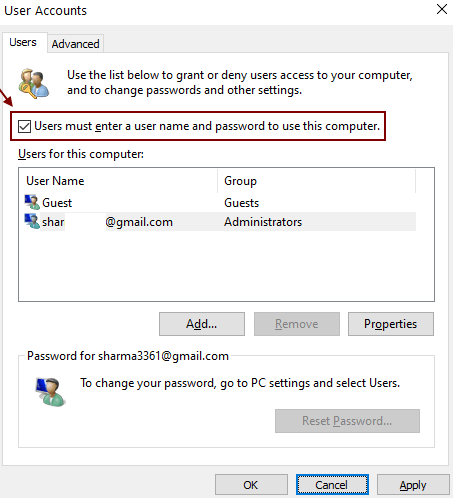
3. Now, make sure that User must enter username and password to use this computer is checked.
If not then select it.
Note that if its already selected , then just uncheck it once and then check it again and enter password if prompted.

4. Now, switch back to the user by clicking on start button and then clicking on the user profile icon which you want to make default.
5. Log in with the password of that account on the login screen.

6. Now, Open netplwiz again by searching in windows 10 search box.
7. Now, uncheck User must enter username and password to use this computer.

Now, go on and shutdown your PC normally. Now, whenever you will start your PC again it will by default start with this account.
By default windows will remember the last logon user and will make it a default user at startup.
One more thing is that you must have a local account or more than one account for changing default user at startup. If you have only one user , then go to Settings > Accounts > Family & Other users and add a local account there first.
However, you must remember that when signing in with a local account, you won’t see the personalized settings you had in the Microsoft account.
Note: – You can turn on password login again by signing to the local account and checking the option user must enter option.
” you must have a local account or more than one account for changing default user at startup.”
THANKS!!!
re: sean
if ur login scr shows accts u’ve deleted, u can create a new acct w/ the same name, restart, then “disable” it. that’d remove the obsolete acct! (worked for me 🙂 )
The option ‘user must enter a user name…’ is not visible to me even while i have multiple users on the system who can login.
netwplwiz opens nothing on my Win10 laptop!
Thanks for the info, but I still have problem 🙂
I don’t see any additional account on my Windows 10 Manage Accounts or on My Settings/Users and accounts, but when I start my computer on my Log in page i have two accounts and very often my computer try to log in on this strange account that don’t exist on my computer??!!
How to remove that??
Thanks for your help 🙂
Sean
I do not have an account like that one you showed above. I have default and public only in the list view of the users in windows explorer. I use on local account Admin and one Microsoft Account, but I don’t know where the heck the Default came from. It does not show as a choice to login, but I am having trouble getting a program to work properly and I wonder if that default account is causing the problems. Can I delete it from the Windows explorer list? There is really not much in it.