Seeing a Direct 3d Output window when you run certain videos in the VLC Media Player is a very common issue in Windows 10. When the user opens the video file, instead of one window, the user sees two windows. In one window the video file plays and the other window will be named as Direct 3d Output. In this window, some text or at times the logo is seen.
Potential reasons for this issue are –
- In certain video file types like .mov, the logo is added as another layer to the video file. Hence, within the video, there will be two tracks and both the tracks are shown resulting in two windows.
- Audio Visualization is enabled.
- Certain Preferences in the VLC were changed.
Although there is no impact on the video file that is played, it becomes quite annoying to see and manage the extra window always. In this article, we have segregated some fixes that will help you get rid of the Direct 3d output window in the VLC player.
Fix 1: Reset all the Preferences
For some users, this fix has helped to get rid of the extra window
Step 1: Open VLC player
Step 2: From the top menu, click on Tools
Step 3: Then choose Preferences

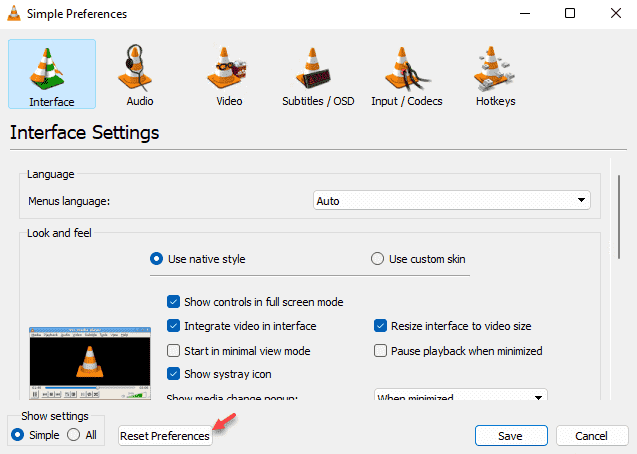
Step 4: Then press on Reset Preference

Step 5: Finally click on the Save button
Check if this helps. If not try the below fix.
Fix 2: Disable Audio Visualization
Step 1: Open VLC player
Step 2: From the top menu, click on Tools
Step 3: Then choose Preferences

Step 4: From the top menu, click on Audio as shown below

Step 5: From the Show Settings section in the bottom-left corner, click on All
Step 6: From the left-hand side, click on Audio
Step 7: Then click on Visualizations
Step 8: On the right-hand side, you will see a drop-down. Select Disable from the drop-down
Step 9: Finally, click on Save

Check if this fix helps. If not, then try the next fix.
Fix 3: Ensure Integrate Video in the interface is Selected
Step 1: Open VLC player
Step 2: From the top menu, click on Tools
Step 3: Then choose Preferences

Step 4: Make sure Interface is selected at the top
Step 5: Under the Look and Feel section, check the Integrate video in the interface

Step 6: Finally, click on the Save button.
Hope this helps.
Fix 4: Disable Video Track and choose Track 1
NOTE: This is a temporary solution and must be repeated for all the tracks having the issue.
Step 1: Run the video in the VLC player
Step 2: From the top menu options, click on Video
Step 3: Then click on Video Track
Step 4: Finally choose Disable

Step 5: Now, again Click on Video > Video Track > Track 1
With this, you can see that the Direct 3d output window is disabled.
Fix 5: Use an Alternate Media Player
Well, if nothing works, try using some other Media Player to view the file. If you are not sure, which one to use, then read the below article.
Top 14 Best Free Media Players for Windows PC
That’s All
We hope this article has been informative. Thank you for Reading
Kindly comment and let us know which of the above fixes helped you solve the issue.
Also, let us know if you run into any issues, we will be glad to assist you.