Multiple Windows users have reported an issue with the free native Video Editor, the video-editing app on Windows 11. According to these users, while importing a bunch of images or videos, Video Editor has spewed up this irritating error message “Choose some other files. These files have properties that can’t be read, so we couldn’t add them:“. Either the video files are corrupted or there is some problem with the Photos app. So, if you are facing this problem, just try these solutions to fix the problem manually.
Workarounds –
1. There are some file types that are not supported by the Video Editor. Such as HEIF and HEVC formats, Video Editor cannot read. So, if you try to import those files, you may see the error message.
Fix 1 – Repair/Reset the Photos app
You can repair/reset the Video Editor app.
[If you are facing this problem in the Photos app, you have to repair/reset it. ]
1. If you tap the Windows key+X keys together, right-click context menu would appear.
2. Then, tap “Apps and Features” to open it.
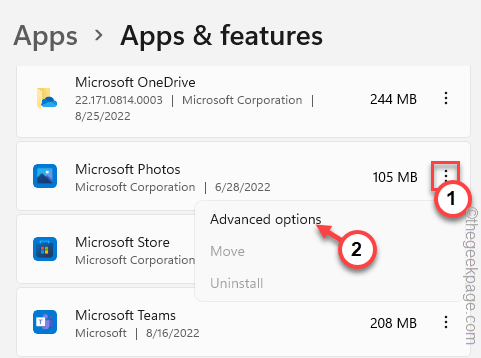
3. When you have opened the Apps and Features page, scroll down and look for the “Microsoft Photos” app.
4. Then, click the three-dot menu and tap “Advanced options“.
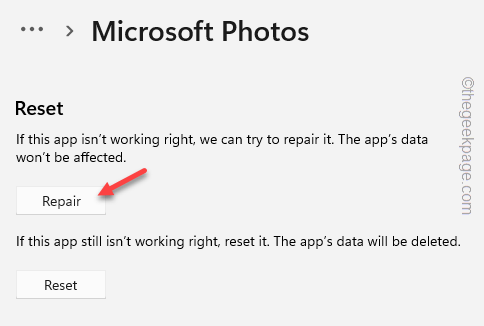
5. Now, coming on to the next page, click on “Repair” to repair the app.
Windows repairs the app in a few moments. Once it is repaired, you can minimize the Settings page and try to import those files once again.
Check if this works.
6. If you still can’t import those items, come back to the Settings page.
7. Then, click on the “Reset” option to reset the app.
8. You have to confirm this. Tap “Reset” to reset it.
After you have reset the app, you can import those files once again.
Fix 2 – Add the source folder manually
You can add the source folder manually to the app.
1. Launch the Video Editor app.
2. When the app opens up, click on the three-dot menu and tap “Settings“.
3. In the ‘Sources’ section, click “Add a folder“.
4. Now, select the folder that contains all those images and videos.
5. Then, click “Add this folder to“.
Photos will now import all those files inside the folder.
This should solve the problem.
Fix 3 – Check the files
There is a chance the files you are trying to import are corrupted. You should check the file integrity of the imported files as well.
There is an online website available, called Fix.video where you can directly upload the video files and check whether they are corrupted or not.
1. Open the Fix.video website.
2. Once you have opened the website, click on the “+” sign to select the video from your computer.
3. Now, just navigate to the location of the video files and select the video file you want to check. [You can check and repair only one file at a time.]
4. Then, tap “Open” to upload that file.
Just wait until the file is completely uploaded. It depends upon the network bandwidth and the file size.
5. Once the file is uploaded, it will automatically scan and fix the video.
6. After the video is fixed, click “DOWNLOAD FULL VIDEO” to download the fixed video.
Once the video file is downloaded, you can directly import this video to your project in Video Editor.
Fix 4 – Delete the corrupted project
If you are working on an old project, there is a chance that the whole project has become corrupted.
NOTE –
Deleting the corrupted project means you will lose access to the project. It will be deleted and you can’t recover it.
1. Open the Video Editor app.
2. When you have opened the app, look in the “My Video Projects” to view the current projects you are working on.
3. Now, just select the current project and click on the bin icon to remove the project.
4. Next, click on “Delete” to remove the project completely.
This way, you can remove the video project from your computer. But, to complete the removal process, close Video Editor and restart your computer.
This way, the cache gets removed.
You can start afresh to create a new project.
Fix 5 – Re-register the app
Try re-registering the Photos app.
1. You have to use the PowerShell terminal with administrative rights.
2. So, press the Win key from the keyboard and write “powershell“.
3. Then, right-click the “Windows PowerShell” and tap “Run as administrator“.
4. When the Windows PowerShell opens up, copy-paste this code and hit Enter.
Get-AppxPackage -allusers Microsoft.Windows.Photos | Foreach {Add-AppxPackage -DisableDevelopmentMode -Register “$($_.InstallLocation)\AppXManifest.xml”}
This way, the Photos app will be re-registered on your system. After that, close the PowerShell terminal. Then, restart the computer.
Once you are back on your computer, launch the Video Editor app and try to import those photos and videos once again.
This time, you won’t see that ‘These files have properties that can’t be read’ error message.


