Inserting page numbers on a Word document or on a Powerpoint document could be a very easy task. But what about an Excel document? When there are reports having a huge number of pages, it is very important that you have the page numbers printed on each page to have everything sorted at all times. So, is there a way how you can add page numbers to your Excel document as headers/footers? Well, we are here with 2 solutions today, you can pick your favorite.
Read on, to learn how you can easily insert page numbers into your Excel document as a header or footer.
Note: Please note that under Normal view mode, you cannot view page numbers in Excel even if you insert them successfully. To view the page numbers, you have to exit the Normal mode and choose the Page Layout mode. You also have the option to go to the Print Setup page to view the page numbers.
Solution 1: Through View Options
Step 1: Open the Excel document in which you want the page numbers to be inserted as headers or footers.
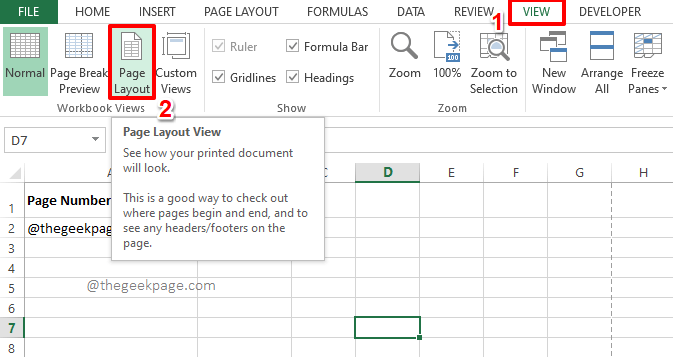
Click on the VIEW tab at the top. Under the VIEW options, click on the button named Page Layout.
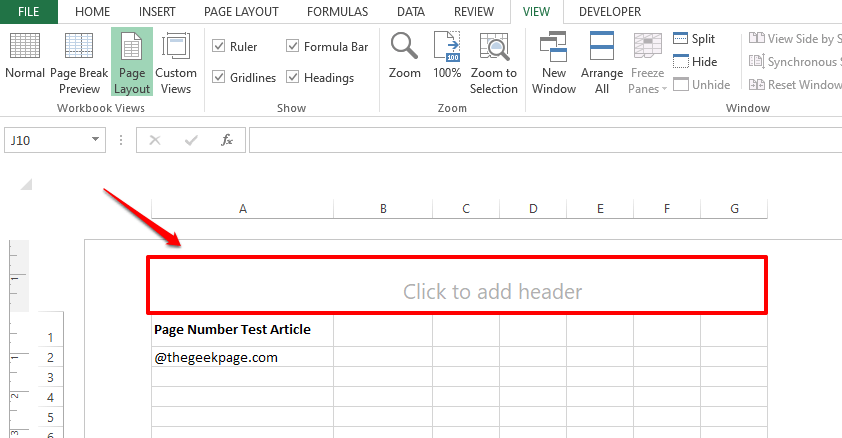
Step 2: Now the view would change to Page Layout mode and you will be able to see a section named Click to add header at the top.
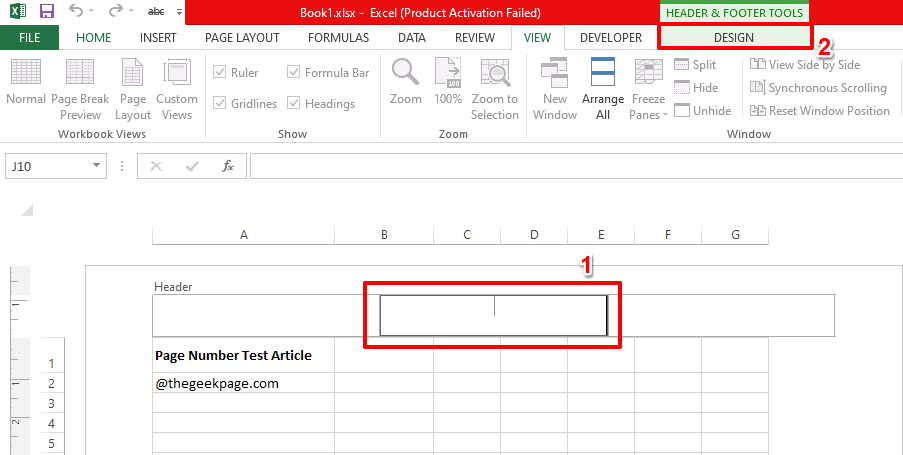
Step 3: The section is divided into 3, with a left part, a center part, and a right part. If you want the page number to be added on the left/right part, click on the left/right division as per your choice. Since I want my page number to be inserted at the center, I have clicked on the center part.
Once you have chosen the section, click on the DESIGN tab at the top. Remember, this is a contextual tab. This tab will be visible only once you click somewhere on the Click to add header section.
Step 4: As next, click on the Page Number button under the DESIGN tab.
Step 5: Now, if you look at the section you selected, you can see that the code &[Page] is successfully inserted. &[Page] corresponds to the current page number.
Step 6: And if you click somewhere else, you can see that the page numbers are now successfully added to your Excel document as headers!
Step 7: Now if you would like to display the page number in Page Number of Total Number of Pages format, you need to get a bit more things done.
For that, click on the header section once again and then type in of after &[Page] as shown in the screenshot below. Then click on the DESIGN tab that comes visible at the top.
Step 8: Now, simply click on the Number of Pages button. This will add the code &[Pages] to your header. Perfect!
Note: The code &[Pages] corresponds to the total number of pages.
Step 9: That’s it, click somewhere outside the header region to view the magic you created!
Just like how there is a section for the header, there is a section for the footer as well, if you scroll down the page a bit. You can do the same steps as detailed in the steps above, to insert page numbers in the footer too.
Solution 2: Through Page Layout Options
This method is also straightforward forward just like the first one.
Step 1: Firstly, click on the PAGE LAYOUT tab at the top. Now, under the PAGE LAYOUT options, there will be a small expand icon present in the same section as that of options like Margins, Orientation, Size, etc. Click on this expand icon to open the Page Setup options.
Step 2: On the Page Setup window, click on the Header/Footer tab.
There will be dropdowns for both header and footer. If you want the page number to be inserted as a header, click on the dropdown associated with the Header option, else click on the dropdown associated with the Footer option.
Since I would like to add my page numbers as a header, I have clicked on the dropdown associated with the Header option.
From the dropdown menu options, choose the page number format as per your choice. I have chosen the Page 1 of ? format. This will give me the current page number and the total number of pages in the document.
Step 3: Once you have selected the format, you will be able to see a preview of your page number. Hit the OK button to proceed.
Step 4: Once you are back at the document, you can see that the page boundaries are now in place. This shows the Print area.
We cannot see page numbers on normal view mode on Excel. So press the keys CTRL + P together to open the Print setup page and to verify your changes.
Step 5: On the Print settings page, you can see that the page numbers are now successfully coming on your Excel document. Enjoy!
Please don’t forget to tell us in the comments section which method is your favorite.
Stay tuned for more amazing tricks, tips, and how-to articles.


