You must be seeing the trending ghost image effect in social media. You want to make one as well, but don’t know where to begin? Are you sad because you don’t have Photoshop or don’t know how to use it? Don’t be concerned. PowerPoint also can be used to produce a ghost image effect. It’s straightforward. Let’s look at how we may make photographs with ghost image effects in PowerPoint.

Steps to create the ghost image effect in PowerPoint
Step 1: Insert the image into the slide by going to the Insert menu, selecting Pictures from the Images tab, and selecting This Device from the drop-down menu.

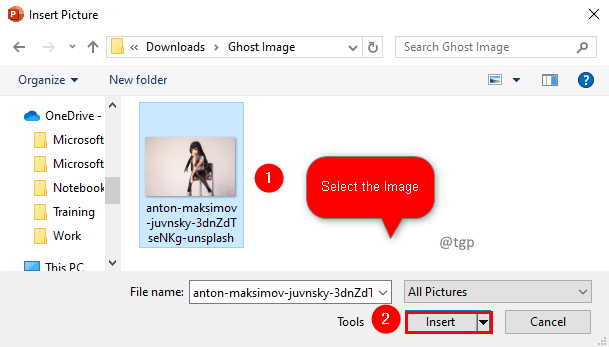
Step 2: Select the image you wanted to from the Insert Picture window and click Insert.

Step 3: Select the image and click the Picture Format menu. Click on the Remove Background option in Adjust tab.

Step 4: Once you select Remove Background, the background which will be auto-detected for removal will be Violet in color. You can use Mark Areas to Keep or Mark Areas to Remove from Refine tab of Background removal to modify the auto-detected background area.

Tip: It will be complicated to remove the background if the background color merges strongly with an image. Try using an image with a different background color.
Step 5: Once you finalize changes, click on Keep Changes in the close tab of the Background Removal menu.

Step 6: Now Insert one more image which you want to merge to create the ghost effect. Click on the Insert menu, in the Images tab, select Pictures, and in the drop-down menu select This Device.

Step 7: In the Insert Picture window, select the image and click Insert.

Step 8: Select the image, and in the Picture Format menu, click on Transparency. In the drop-down select Picture Transparency Options.

Step 9: In the Format Picture tab, select Picture and then click on Picture Transparency. Adjust the transparency of the image so that you can see the other image through it.

Step 10: You can move the image back or front and adjust its transparency to get the effect you wish to have.

We hope this article has been informative. Thank you for Reading. Kindly comment and let us know if you found this helpful. Also, let us know if you are facing any issues. We will be glad to help you out.