The search bar on Windows 10/11 is an essential feature of Windows, which helps users to search for specific items in a few seconds. But what if you try to search something using the search bar, but it doesn’t work/lag? There is nothing to worry about. This problem is related to faulty search indexing and easily solvable with a few quick tricks.
Workarounds –
1. Sometimes a simple restart may do the trick.
2. Check the amount of free space available in the Local Disk (C:). If the amount of space is less than 30 GB, then that is the reason you are facing this issue.
Fix 1 – Restart the SearchIndexer.exe
If automating the Windows Search doesn’t work for you, you can restart the SearchIndexer.exe process from the Task Manager.
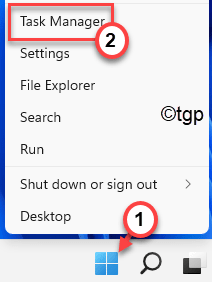
1. Just right-click on the Windows key and click on “Task Manager“.

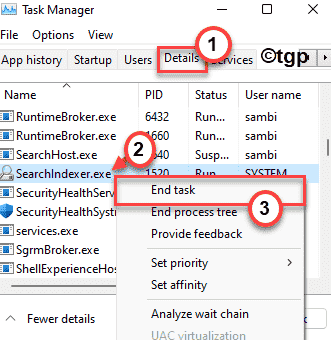
2. Then, just go to the “Details” tab.
3. Here, locate the “SearchIndexer.exe” in the list of the detailed processes.
4. Just right-click on the process and click on “End task” to kill it.

This will kill the SearchIndexer.exe process. You don’t have to start the process as it should auto-start on your system.
If it doesn’t start up automatically, just restart the system.
Fix 2 – Reset Windows search
If the above methods do not work, you can reset windows search using free Microsoft Search reset tool.
1 – Search Powershell in Search box and Then do a right click on Powershell icon and click run as admin
2 -Now, Run the command given below in Powershell
Get-ExecutionPolicy
3 -If the result comes out as restricted, then copy and paste the command given below to make it unrestricted
Set-ExecutionPolicy -Scope CurrentUser -ExecutionPolicy Unrestricted
4 – Now, Go to this official Microsoft link and download Search reset script
2 – Now, Click on Download to download it
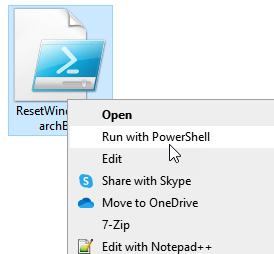
3 – Now, right click on the downloaded script and click on Run with Powershell

Note: – Its recommended that, Once you are done with resetting search, you can make the policy restricted again by running the powershell command given below
Set-ExecutionPolicy -Scope CurrentUser -ExecutionPolicy Restricted
Fix 3 – Troubleshoot the search and indexing
If even rebuilding the search index doesn’t work, try troubleshooting the search and indexing operation.
1. At first, press the Windows key+I keys together to open the Settings.
2. Next, on the left-hand side, tap on the “System“.
3. Now, tap on the “Troubleshoot” on the left-hand side.

4. You will appear on the ‘Troubleshooter’ page.
5. On the right-hand side, click on “Other troubleshooters“.

5. In the list of troubleshooters, scroll down and find the “Search and indexing” troubleshooter.
6. After that, tap on “Run” to run the troubleshooter.

7. Now, wait for the troubleshooter to fix Windows Search and indexing. Just check the problem you are facing and click on “Next“.
Follow the on-screen steps mentioned in the troubleshooter to solve the problem.

Close the Settings. Test the searching operation again.
This should solve your problem with the Windows Search.
Fix 4 – Set Windows Search service as automatic
At first, you have to look out for the Windows Search service status. Windows 10 Search options won’t work without it.
1. At first, press the Windows key+R keys together.
2. Then, type “services.msc” and hit Enter.

3. In the Services section, look for the “Windows Search” service.
4. Just double-click on it to modify it.

5. Then, set the ‘Startup status:’ to “Automatic” from the drop-down options.
6. Tap on “Start” if it isn’t started yet.

7. Finally, click on “Apply” and “OK” to save this new change.

Close the Services window. Now, try to search for anything using the search bar. Check if this is working or not.
Fix 5 – Rebuild the Index
There is a chance that the search index has gone corrupt. So, rebuilding the same should fix the issue.
[
NOTE – This search index rebuilding takes a lot of amount of time to complete. This process also depends upon the number of files on your system. So, we suggest you do attempt this fix at night. Just set your computer to rebuild the search index before you go to bed and in the morning, it will be done.
]
1. At first, press the Windows key+R keys to open the Run window.
2. Then, paste the following command in the Run and hit Enter.
control.exe srchadmin.dll

3. When the ‘Indexing Options’ window opens up, tap on “Advanced“.

4. In the ‘Troubleshooting’ pane, click on “Rebuild“.

5. You will see a message about rebuilding the index. Just tap on “OK“.

This will start the rebuilding process. This process consumes a significant amount of time and until the process is complete, you won’t notice any improvements in the search results.
Once the process completes, try to search for anything using the search bar.
Fix 6 – Remove Bing from Windows 10 search
Some of the users have reported that removing Bing from the Windows 11 default search has solved the problem. But, following this way, web results won’t appear in the search results as you are going to disable Bing.
1. At first, press the Windows key+R keys together.
2. Then, type “regedit” and click on “OK“.

IMPORTANT–
Before you make any certain changes in the Registry Editor, we recommend you back up the registry keys.
a. Once you have opened the Registry Editor, you will need to click on the “File” and then click on “Export“.
b. Save the backup in a secure place.

If anything goes wrong, you can easily restore the registry to its original state.
3. When the Registry Editor opens up, navigate this way-
Computer\HKEY_CURRENT_USER\Software\Microsoft\Windows\CurrentVersion\Search
4. Now, on the right-hand side, right-click on the space and click on “New>“,
5. Then, click on “DWORD (32-bit) Value“.

5. Set the name of the new key as “BingSearchEnabled“.
6. Then, double-click on it to edit it.

7. Set the value of the key to “0” if it isn’t already set to.
8. Then, click on “OK” to save it.

9. Now, on the same side, try to locate the “CortanaConsent” key.
(If you can’t find it, just create a new DWORD value following the steps mentioned above and name it as “CortanaConsent”. )
10. Then, double click on it to edit it.

11. Just like before, type “0” in the ‘Value data:’ box.
12. Then, tap on “OK“. This will save the change.

Once you have done this, close the Registry Editor page and restart your computer to complete these changes.
After restarting your computer, try to search any files or documents present on your system.
[
NOTE – If you want to re-enable the Bing and Cortana search results back, just set both values of the keys to “1“. Then, close the Registry Editor and restart your computer.
You will have your Bing and Cortana search results back.
]
Fix 7 – Reset Cortana settings
You can reset the Cortana to fix this search issue.
1. At first, click on the Windows icon and start to type “Cortana” in the search box.
2. Then, right-click on “Cortana” and click on “More>“.
3. Further, tap on the “App settings” to access the app settings.

3. On the Cortana settings page, scroll down and click on “Reset” to reset the app.
4. Further, click on “Reset” if you are prompted for further confirmation.

Upon resetting the Cortana, close the Settings app. Try to search for anything using the search bar. Check if this actually helps.