Let’s say you have an Excel sheet and it is shared with so many people. Obviously, there are going to be a 1000 edits and at the end of the day, it’s your job to validate which one is a valid edit and which one is not. How about you have some magical power using which you can see who made which edit and at what time? Also, to make it even sweeter, how about you can decide whether the respective edit is to be accepted or rejected? Well, today we are here to grant you that wish of yours.
Read on, to learn how you can easily track the changes made on an Excel sheet, view them on a separate sheet or on the same sheet itself, and finally accept or reject the changes after reviewing them. Also, it is very easy to disable the tracking functionality as well, oh yes, we are going to cover that topic too. Hope you enjoy!
Section 1: How to Enable Track Changes Functionality
Step 1: Open the Excel sheet that you want to track changes.
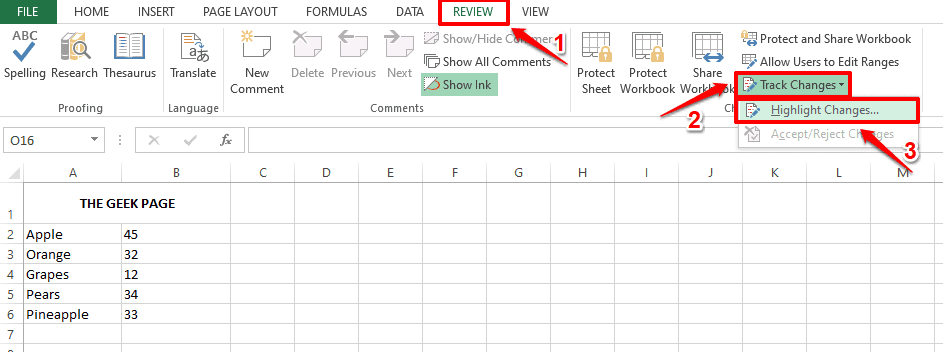
Hit the REVIEW tab at the top of the window.
Under the REVIEW tab, click on the Track Changes dropdown and then click on the Highlight Changes option.
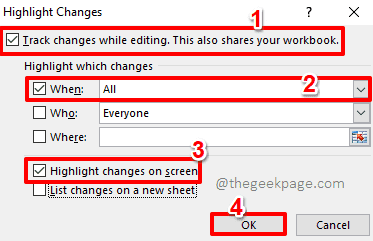
Step 2: On the Highlight Changes window, check the checkbox corresponding to the option Track changes while editing. This also shares your workbook.
Now, under the Highlight which changes section, check the checkbox corresponding to When and then choose the All option.
Finally, check the checkbox corresponding to Highlight changes on screen and then hit the OK button.
That’s it. Track changes functionality is now successfully enabled for your Excel sheet.
Section 2: How to View the Tracked Changes on the Same Excel Sheet
Section 1 enables Track Changes functionality. If you would like to view the changes tracked from the same sheet itself, you can refer to the steps below.
Step 1: Double click on any cell to edit its contents.
Step 2: You can change the value in the selected cell. After the edit is made, the edited cell will be highlighted in blue color, also a blue arrow will be added to the top left corner of the cell, indicating the change.
Step 3: If you hover over the edited cell, you can view the details of the edit, including who edited the cell, at what time the edit was made, and the before and after values of the cell.
Section 3: How to View the Tracked Changes on a Separate Worksheet
If you would like to view all the tracked changes in a separate worksheet instead of on the original one, then you have the option to do so as well.
Step 1: Hit the REVIEW tab at the top, click on the Track Changes dropdown and then click on the Highlight Changes option.
Step 2: Now under the Highlight Changes window, check the checkbox corresponding to the option List changes on a new sheet and hit the OK button.
Step 3: A new sheet named History will be open before you now, which has all the details of all the edits made by all the users.
Section 4: How to Accept / Reject the Tracked Changes
You also have the option to individually review all the tracked changes, and accept or reject them individually or all at once.
Step 1: Just like in the previous sections, hit the REVIEW tab at the top first, then hit the Track Changes dropdown, and then click on the Accept/Reject Changes option.
Step 2: If your workbook is not saved, you will get a warning message saying your workbook will now be saved. Hit the OK button to save your workbook and proceed.
Step 3: A new window will now open before you, by the name Select Changes to Accept or Reject.
Check the checkbox corresponding to the option When and choose Not yet reviewed from the dropdown menu associated. You can change these options according to your preferences as well.
Hit the OK button once done.
Step 4: Now each tracked change will be shown to you with all the details, you can accept or reject each one of them by clicking on the Accept or Reject button.
If you want to accept all the tracked changes at once, click on Accept All button and if you want to reject all the tracked changes at once, then click on the Reject All button.
Section 5: How to Disable Track Changes Functionality
If you would like to disable the track changes functionality altogether, it’s very simple.
Step 1: Once again, click on the REVIEW tab at the top of the window, click on the Track Changes dropdown and then click on the Highlight Changes option.
Step 2: On the Highlight Changes window, uncheck the checkbox corresponding to the option Track changes while editing. This also shares your workbook.
Hit the OK button once done. That’s it. This will disable the Track Changes functionality for you.
Hope you found the article useful. Stay tuned for more amazing Excel articles and for many more.


