Tables are most common when it comes to Microsoft Excel. Thus everyone is well aware of how to sort data inside a table in Microsoft Excel. But when it comes to Word, tables are rare and the need to sort the data inside a table in Word is even rarer. But definitely, there could be requirements that you have a table inside your Word document and sometimes you might even need to sort the data inside it.
One way of sorting the data inside a Word table would be to take the data to Excel, do the sorting from Excel, and then bring the sorted table back to Word. Well, don’t even think about resorting to that way! When Word itself has an inbuilt functionality to sort its tables, why do you have to rely on Excel to get the Word sorting done?
Read on, to learn how you can easily sort the data inside tables in Microsoft Word with some quick and simple steps. Hope you enjoy reading the article!
Section 1: How to Sort the Whole Table Based on a Single Column
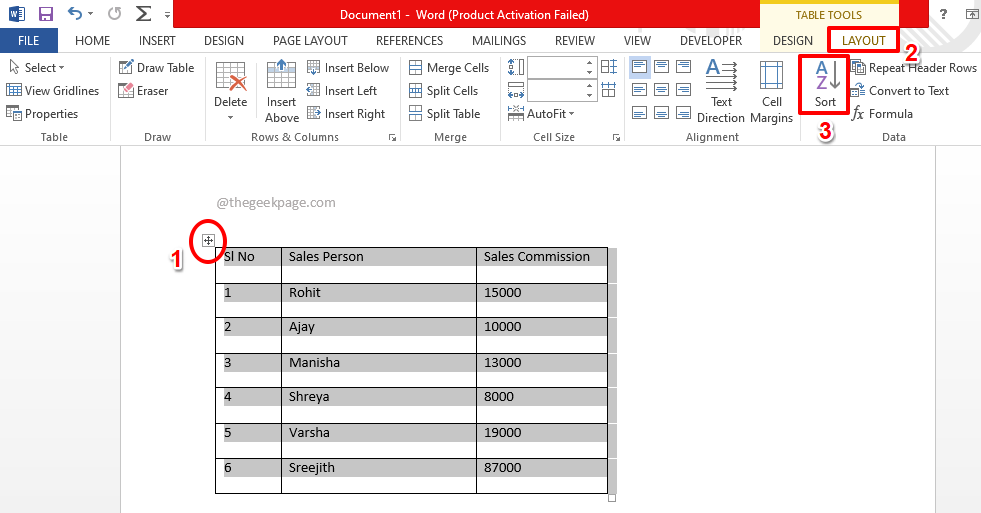
Let’s say you have the following table and you need to sort the table based on the Sales Commission column, in descending order such that the person who earned the highest commission should come first in the table. Let’s see how this can be done.
Step 1: Firstly hover over the table to find the Table Selector icon at the top left corner of the table. Once located, click on the table selector icon to select the whole table.
Once you select the table, at the top ribbon, a contextual tab named Table Tools will become visible. Under the Table Tools tab, there will be 2 sub-tabs namely DESIGN and LAYOUT. Click on the LAYOUT tab. Now under the Data section of the LAYOUT tab, click on the button named Sort.
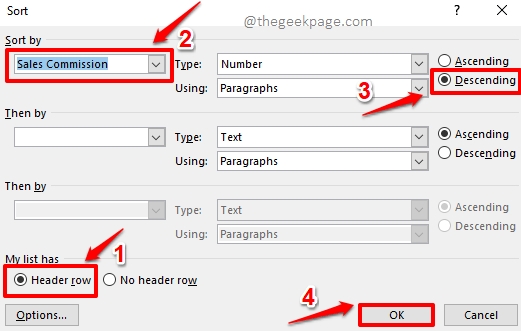
Step 2: On the Sort window, firstly you need to specify that your table has a header row. For that, at the bottom of the Sort window, choose the radio button corresponding to the option Header row under the section My list has. Now that you have mentioned that there is a header row in your table, the header row will not be touched when the sorting happens.
As next, under the Sort by section, firstly choose the column based on which you want the sorting to happen. Here, in the example, I want the Sales Commission column to be my sorting criterion. Hence I have chosen the same from the Sort by dropdown menu.
By default, the type of the column would be selected from the Type dropdown menu. Now, choose the radio button corresponding to the Ascending or Descending order sorting.
Once you are all done, hit the OK button.
Step 3: Viola! You now have your desired results, you can easily analyse the data from now on.
Section 2: How to Sort Only a Single Column in a Table
If you look at the resultant table in the section above, you can see that even though the table was sorted perfectly based on the Sales Commission column, the Sl No column also got sorted, which is not desirable. So, let’s see how we can sort the Sl No column alone in ascending order, keeping the other 2 columns intact.
Step 1: Click and select the column that you want to be sorted. In the example below, the Sl No column.
Once you have selected the column, click on the LAYOUT contextual tab at the top and then click on the Sort button.
Step 2: Now in the Sort window, under the section My list has, choose the radio button associated with the option Header row. This will leave the first row of the table untouched, when the sorting happens.
Now, choose the column, Sl No in this example, you want to be sorted from the Sort by dropdown menu.
On the right side of the window, choose Ascending order.
Now, at the very bottom of the Sort window, click on the button named Options.
Step 3: Now you will have the Sort Options window open before you.
Under the section Sort options, check the checkbox corresponding to the option Sort column only.
Hit the OK button once you are ready to proceed.
Step 4: You will now be back at the Sort window. Simply hit the OK button.
Step 5: That’s it. Your Word table is now sorted perfectly, looking great from every angle. Enjoy!
Please tell us in the comments section if you could successfully sort your Microsoft Word table following the steps in our article.
Please do come back for more amazing tricks, tips, and how-to articles.


