Whenever you go to Properties window of a file or folder, the dialogue box shows different tabs, one of which is the Security tab. The Security tab in the File Explorer Properties, helps you to set various permissions for various users and groups for a specified file or a folder.
However, some times the Security tab is missing from the Properties window and you may want to add it. Alternatively, you may also want to remove the Security tab for some reason. So, whether you want to add /remove the Security tab from File Explore in Windows 10, you can do it using the below method.
Let’s see how.
Solution: Using Registry Editor
Before you proceed to make any changes to the Registry Editor, make sure that you create a backup of all the Registry data, so that any lost data can be recovered later.
Step 1: Press the Win + R keys together on your keyboard to open the Run command.
Step 2: Type Regedit in the Run command search box and press OK to open the Registry Editor window.

Step 3: In the Registry Editor window, navigate to the below path:
Computer\HKEY_CURRENT_USER\Software\Microsoft\Windows\CurrentVersion\Policies\Explorer
Now, go to the right side of the pane and right-click on an empty area. Select New from the menu and then select DWORD (32-bit) Value from the sub-menu to create a new DWORD Value.

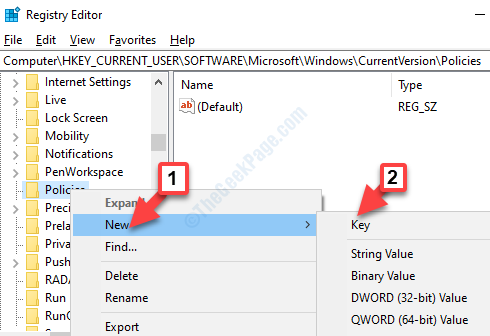
*Note – If the Explorer key is missing under the Policies folder, then right-click on Policies, then select New and then Key from the menu.

Then, rename the new Key as Explorer.

Step 4: Rename the new DWORD Value as NoSecurityTab.

Step 5: Now, double-click on the new DWORD Value (NoSecurityTab).
In the Edit DWORD (32-bit) Value dialogue box, go to the Value Data field and set the Value to 1.
Press OK to save the changes and exit.

This will remove the Security tab from the File Explorer Properties window, but if you want to add the Security tab, set the Value to 0 or just delete the DWORd Value – NoSecurityTab.
Now, restart your PC for the changes to be effective.