Windows updates are essential to improve your overall PC performance, security patches, upgrades features, and also offers fixes for many errors. While the updates are downloaded straight to your PC, the installation is done by some components that come integrated with the OS. One of the components include the Modern Setup Host that’s supposed to run in the background whenever the update is getting installed.
However, some users have been experiencing this problem where they see “Modern Setup Host causing high CPU usage” error in Windows 10 or another error message “Modern Setup Host has Stopped Working“. Fortunately, there are a couple of ways to fix this issue. Let’s see how.
Method 1: Through the Settings App
Step 1: Go to Start, click on it and select Settings from the menu.

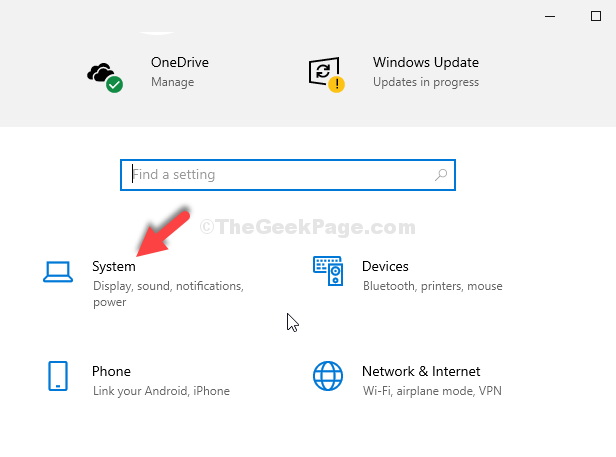
Step 2: In the Settings window, click on System.

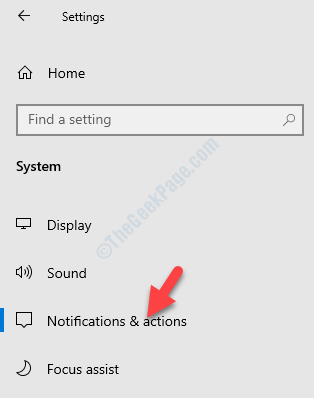
Step 3: In the System settings, on the left side of the pane, click on Notifications & actions.

Step 4: Now, go to the right side of the pane, and under Notifications, uncheck the box next to Get tips, tricks, and suggestions as you use Windows.

Step 5: Go back to Settings home and click on Personalisation.

Step 6: Next, on the left side of the screen, select Start.

Step 7: Then navigate to the right side of the screen and go to Show suggestions occasionally in Start option. Turn it off.

Step 8: Now, go back to the Settings home again and select Privacy.

Step 9: In the next window, on the left side of the pane, scroll down and click on Background apps.

Step 10: Then, go to the right side of the pane, and under Select which apps can run in the background, turn off any of the apps that you do not want to keep running in the background.

Now, you can restart your PC and you should not see the “Modern Setup Host causing high CPU usage” error in your Windows 10 PC again.
But, if you are still experiencing the error, follow the 2nd method.
Method 2: Using Indexing Options
Step 1: Right-click on Start and select run from the menu.

Step 2: In the Run command box, type control.exe srchadmin.dll and hit Enter.

Step 3: It opens the Indexing Options window. Click on Modify.

Step 4: Next, in the Indexed Locations dialogue box, under the Change selected locations, uncheck all the options to disable the files.
Press OK to save the changes and exit.

*Note – Make a note a of what you unchecked, so that if required, you can enable them back again at a later date.
That’s all. You can reboot your PC and you should not encounter the error anymore.