Is all the games are crashing down at startup on your new Windows computer bearing this error message “The description for Event ID 0 from source nvlddmkm cannot be found“? The “nvlddmkm” component is associated with the NVIDIA GPU installed on your system. If you are using an old, corrupted card, you should update it or, uninstall and reinstall the latest GPU driver to fix the issue.
Fix 1 – Check the PSU unit
In the majority of the cases around “nvlddmkm“, a faulty main Power Supply Unit is responsible. So, we recommend you follow these steps to check the condition of the PSU.
Step 1 – Shut down your PC.
Step 2 – Disconnect it from all the power sources. Then, wait for a few minutes.
Step 3 – After this, open the cabinet carefully. Do not touch or open the PSU unit as, even if the power unit is disconnected, it still has some unit that holds residual current.
Step 4 – Observe the PSU unit.
Step 5 – Now, plug in the system to the power source while the cabinet is open. Run a test game and observe the PSU. If the PSU stops supplying current suddenly after the game starts, you can deduce that the PSU unit has gone out of order and needs a replacement.
There are other reasons behind this problem as well. Like, if you are using an under-powered PSU with the system, the games are bound to crash with the error message.
Fix 2 – Turn off the HAGS feature in Windows 11
On Windows 11 machines, there is a feature called Hardware-accelerated GPU scheduling (HAGS) that may be responsible for this problem. It is turned ON by default.
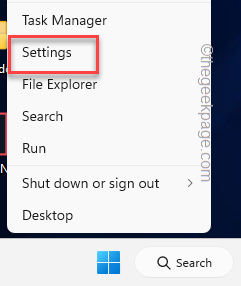
Step 1 – If you hit the Win+X keys together an elevated power menu opens up.
Step 2 – There, tap “Settings“.

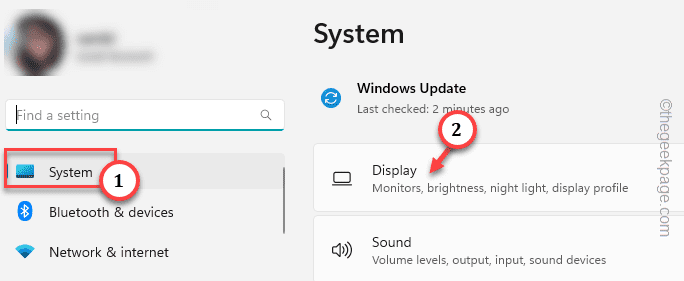
Step 3 – On the Settings page, click “System” settings.
Step 4 – There on the other side of the page, tap “Display” to open it.
Step 5 – Click the “Graphics” settings.
Step 6 – Now, slowly go down through the same pane to find “Change default graphics“. Open that up.
[If you are using Windows 10, you can skip this step.]
Step 7 – Just toggle the “Hardware-accelerated GPU scheduling” to “Off” mode.
Immediately, you will notice this message has appeared below the toggle –
Restart your PC to apply your changes.
Exit Settings and reboot the system. Check if this fixes the issue.
Fix 2 – Remove the faulty RAM stick
If you are using dual-channel RAM on your system, there is a chance that one of the RAM sticks has gone out of order and is the main culprit.
Step 1 – Shut down the system. Disconnect it from the power source.
Step 2 – Wait for a minute. Then, loosen up the cabinet. If you are using a laptop, unscrew the back panel and lift it up carefully.
Step 3 – Now, take a look at the RAM sticks plugged into the RAM channels. Slowly and carefully, gently pull the clips on either side of the channel to remove the RAM stick from there.
Step 4 – Next, plug in the computer to the power source and switch it ON.
Now, wait for a while until the desktop loads up completely and then, try running a few games. Don’t worry, the games will run with even a single RAM.
If the games don’t crash anymore or the error message doesn’t resurface, then deduce that the RAM stick you pulled out is faulty and needs a replacement.
Additionally, if the games still crash, then do this –
1. Shut down your computer completely.
2. Plug in the removed RAM stick in between the RAM clips.
3. Now, pull the clips of the second RAM slot and pull out the second RAM stick.
Now, restart your computer and test the games again.
This way, you can point out which RAM stick is responsible for this issue. Go to the next one if this one doesn’t help you.
Fix 4 – Use DDU and reinstall graphic driver
There is a tool named Display Driver Uninstaller that you can use to uninstall the graphics driver and reinstall it.
Step 1 – Download the NVIDIA driver and DDU
You have to use the DDU in Safe Mode. So, you have to download both the DDU and the graphics driver package beforehand.
Step 1 – Head on to the NVIDIA Driver downloads website or AMD Driver website.
Step 2 – Here, input the graphics card specifications.
Step 3 – After putting all the specifications correctly, tap “Search” to find the latest driver for your system.
Step 4 – On the following page, tap the “Download” icon to start downloading the driver.
You may leave the driver downloading process in the background.
Step 5 – Just click the Display Driver Uninstaller.
It will automatically start downloading the Display Driver Uninstaller program.
Once you have finished downloading both files, exit the browser.
Step 6 – Using Win+E keys, open File Explorer and head on to the directory where you have downloaded the files.
Do nothing to the NVIDIA/AMD package.
Step 7 – After this, extract the “DDU v18.0.4.7” zip file somewhere you can easily extract it.
Do remember where exactly you are extracting the package. You will need it later.
Step 2 – Go to Safe Mode
Now, it is time to boot the system into Safe Mode.
Step 1 – So, Open Settings. There, click on “System“.
Step 2 – If you head down through the opposite side of the page, find “Recovery“. Open it up.
Step 3 – When you are at the Recovery options tab, tap “Restart now“.
Step 4 – A prompt will appear. Tap “Restart now” once more.
Wait until the system restarts.
Step 4 – When you reach that place, “Troubleshoot” to go forward.
Step 5 – Just tap “Advanced options” to go to the next page.
Step 6 – Now, here, select “Startup Settings“.
Step 7 – Now, click “Restart” to restart the system.
This will restart your system and show you all the Startup Settings.
Step 8 – Use the F4 key to choose the “Enable Safe Mode” option.
Just wait for your system to boot into safe mode.
Step 3 – Use DDU
Once you are in Safe mode, you can use DDU to clean up graphics driver files.
Step 1 – Once you are in Safe Mode, open the File Explorer.
Step 2 – Navigate to the folder where you have extracted DDU files.
Step 3 – Just, double-click on the “DDU v18.0.4.7” to open the folder.
Step 4 – Then, double-click the “Display Driver Uninstaller” to access it.
Wait until Display Driver Uninstaller loads up.
Step 5 – Just set the Select device type to “GPU“. After this, fix it to “NVIDIA” or “AMD“(which GPU you have) .
Step 6 – Just, tap “Clean and Restart” to clean the GPU and restart the system.
This process requires some time and your system will restart automatically during the process.
Step 4 – Run the graphics installer
Finally, when DDU has done its job of wiping all the GPU files, finally, it is time to run the graphics standalone installer file to install the latest driver on your system.
Step 1 – Simply, double-tap on the installer to launch it.
Now, just follow the steps on your screen and complete the installation procedure. This graphics driver installation takes quite a while (around 3-5 minutes). So, patiently wait.
After installing the graphics card driver, try playing the games once more and notice whether there are any crash issues.
Fix 3 – Don’t overclock the GPU, CPU
Prolonged usage of overclocked GPU on the system may cause this issue. So, we recommend you turn off the overclocking setting of the GPU in BIOS and fix the problem.
Step 1 – Restart the system. While the system is starting up, press the correct key (usually, F2, F10, or Delete) to open the BIOS page.

Step 2 – Switch to the “Advanced” or “Performance” section. Find the “Overclocking” or “OC” feature.
Step 3 – Set it to “Off” mode.
Then, save the changes. Your computer will automatically restart once.
After rebooting, test by playing some random games and check whether the “for Event ID 0 from source nvlddmkm cannot be found” error message appears in Event Logs.
Fix 5 – It is time to upgrade the GPU/RAM
You have checked the RAM, PSU, and other components of the system. You have cleanly installed the graphics driver and done everything else mentioned in this article. Is the system still crashing? Sadly, this means there is an issue with the GPU or the RAM units, which may not be a hardware issue. If you are using a GPU for more than 5-7 years, you should think to upgrade it or get a new one. The same goes for the older RAM sticks also.

