In case if you notice your laptop screen went dim and despite trying to brighten the screen it still offers the same lower level of brightness, then, in this article we have discussed some methods, following them you will be able to solve your issue. Before jumping into the main solution, here are some simpler workarounds to try out first-
Workarounds–
1. Restart your computer. When your computer is booting up, try to brighten the screen up by pressing the brightness key of your keyboard.
2. Try to change the brightness on your computer by simply clicking on the “Action Center” icon on the right bottom corner of the taskbar and then adjusting the brightness level.
3. Some users have solved the issue in this way-
a. Restart your computer while pressing the brightness increasing key (generally it is “F12” key or “Fn+F12” keys).
b. Keep it pressed till Windows boots up.
The usual level of brightness will be back on your computer.
If any of these workarounds didn’t work, try this fix on your computer-
Fix-1 Disable Adaptive Brightness option
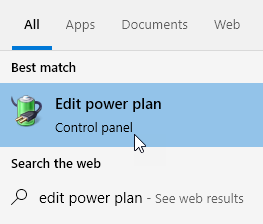
1 – Search edit power plan and click on it

2 – Click on Change advanced power settings

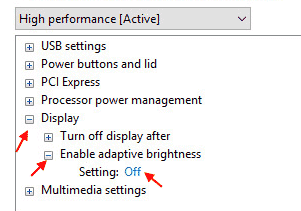
3 – Expand Display
4 – Turn off Enable adaptive brightness option
5 – Click OK

Note: –If adaptive brightness option is missing then you can turn it off via Registry editor also
1 – Search Registry editor in search box of Windows PC and click on it

2 – Go to the path given below
HKEY_LOCAL_MACHINE\SOFTWARE\Intel\Display\igfxcui\profiles\Media\Brighten Movie
In the right side Double-click on the ProcAmpBrightness key and set its value data as 0.
Now, Go to the path below
HKEY_LOCAL_MACHINE\SOFTWARE\Intel\Display\igfxcui\profiles\Media\Darken Movie
In the right side , Double-click on ProcAmpBrightness to set its value data to 0.
Fix 2 – Turn Off Night Light
1 – Search Night light and click on it

2 -Now, Turn off Night light
Also, Turn off its schedule if any exists on this screen.

Fix 3 – Screen dimming when unplugged
Fix-4 Adjust screen brightness from Settings
Adjust screen brightness from the Settings window may solve the issue.
1. Press Windows key+I to open the Settings window.
2. Now, click on “System“.

3. Now, on the left-hand side, click on “Display“.
4. On the right-hand side, under ‘Brightness and color‘ adjust the slider to the right-most position(maximum).

This should fix the brightness issue on your computer.
Fix-5 Calibrate display settings-
Calibrating a display driver may solve the problem on your computer.
1. Click on the Search box beside the Windows icon and type “calibrate display color”.
2. Click on the “Calibrate display color“.

3. Now, click on “Next“.

4. Again, click on “Next“.

5. In the Adjust gamma screen, adjust the slider to adjust gamma so that visibility of the small dots in the middle of the circles (in the picture beside the slider) gets minimized.
6. Now, click on “Next“.

7. In the Find the brightness and contrast controls for your display window, click on “Skip brightness and contrast adjustments“.

8. Again, click on “Next“.

9. Finally, in the Adjust color balance window, there are three sliders(R, G, B).
10. Adjust these sliders until you reach the color balance you prefer.
11. Now, click on “Next“.

12. Finally, click on “Finish” to save the changes on your computer.

This should fix the screen dimming issue.
Fix-6 Modify Registry on your computer
1. Press Windows key+S and begin to type “regedit” in the search box and hit Enter.

2. In the Registry Editor window, first what you need to click on the “File” and then on “Export“.

3. Now, choose a suitable location on your hard drive to store the backup. Name it as “Original Registry“.
4. Then, simply click on “Save” to save the registry backup on your computer.

5. In Registry Editor window, navigate to this location on the left side-
HKEY_LOCAL_MACHINE\SYSTEM\ControlSet001\Control\Class\{4d36e968-e325-11ce-bfc1-08002be10318}\0000
In case if you don’t find this location, try to navigate to this location instead-
HKEY_LOCAL_MACHINE\SYSTEM\ControlSet001\Control\Class\{4d36e968-e325-11ce-bfc1-08002be10318}\0001
6. Now, double click on “FeatureTestControl” on the right-hand side of the window.
![Fix: Dimming issue in Laptop in Windows 10 20 Featuretestcontrol Double Click ]](https://thegeekpage.com/wp-content/plugins/wp-fastest-cache-premium/pro/images/blank.gif)
7. In Edit D-WORD (32-bit) Value window set the ‘Value Data‘ to “f048” and then click on “OK” to save the changes.

Close Registry Editor window on your computer.
Reboot your computer to save the changes on your computer.
Fix-7 Uninstalling and reinstalling display driver-
Uninstalling and installing the display driver should fix this issue.
1. Press Windows key+X and click on “Device Manager“.

2. Once the Device Manager window prevails, expand “Display adapters“.
3. Simply right-click on the graphics driver your computer is using “Uninstall device“.

4. Now, click on “Yes” to uninstall the driver from your computer.

To install the graphics driver again on your computer, try out these methods-
Method 1-
Close the Device Manager window. Restart your computer.
Method 2–
If rebooting your computer didn’t install the driver then you have to install the driver yourself. Follow to install the driver manually-
1. In the Device Manager window, click on “Action” and then click on “Scan for hardware changes“.

Check if this helps or not.