Is the Camera appearing pitch black while you are trying to speak in your office meeting over a zoom call? This is a very annoying issue and can give you a headache until you manually solve the problem. Usually, this problem involves insufficient permission of the camera for that particular app that you are using. So, just by tweaking the camera settings, you can easily fix your camera to rejoin the meeting.
Workarounds
You should definitely try out these quick workarounds to find a quick fix.
1. Check whether something is obstructing the camera if you use a privacy shade over the webcam, check if it is there. Otherwise, take a clean cloth and gently remove any dirt, or stains from the camera.
2. On some laptops, there is a certain function key that can turn the camera off and on. It is usually the F9 key.
3. Restart your computer once. Restarting the system does have worked out for many users.
4. If you are using an external webcam, disconnect all the external USB connections that you are using. Then, connect the camera USB to another port on your system.
Fix 1 – Check app permissions
Check whether you have allowed Camera access to apps and to that particular app that you’re facing this problem.
1. Open the Settings just by pressing the Windows key+I keys together.
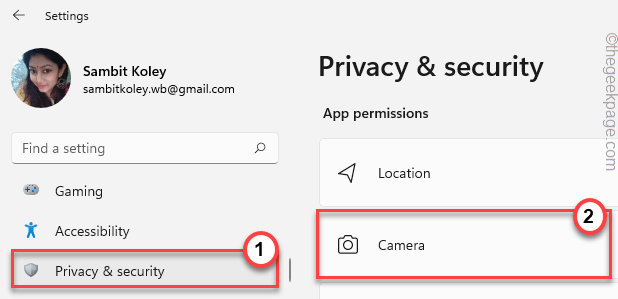
2. Then, tap “Privacy & Security” on the left-hand side of the window.
3. Just scroll down through the extensive list of settings on the right-hand pane and choose “Camera” settings.
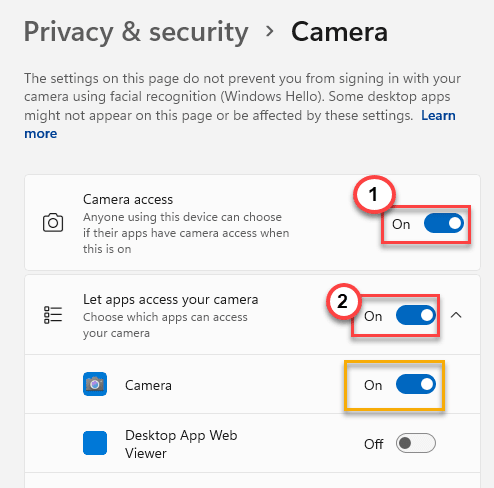
4. At first, set the “Camera access” settings to “On“.
5. Next, just click on the “Let apps access your camera” and set it to “On“.
In the list of apps beneath this option, you can turn on the camera access for the apps that you want.
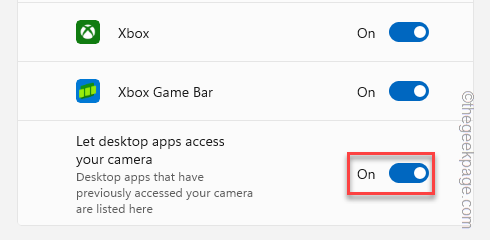
6. If you use your webcam for desktop apps (like any browser), you have to tweak the “Let desktop apps access your camera” setting to “On“.
After that, close the Settings. Now, run a webcam test to check if it is working or not.
Fix 2 – Use the Registry Editor
You can use the Registry Editor to create a new value that can help you resolve the webcam issue.
1. Just press the Windows key+R keys together.
2. Then, type “regedit” and hit Enter to access the Registry Editor window.
Warning –You will create a new value to remove the black screen effect on the camera. It usually doesn’t lead you to any issues. But, in some cases, it may lead to further complications. So, before you do anything else, you should create a new registry backup.
a. Once you have opened the Registry Editor screen up, tap on “File” from the menu bar.
b. Then tap “Export” to make a new registry backup.

Just store this backup in a discrete location.
3. On the left-hand side, go here –
Computer\HKEY_LOCAL_MACHINE\SOFTWARE\Microsoft\Windows Media Foundation\Platform
4. Now, on the right-hand side, right-tap on the space and tap “New>” and tap “DWORD (32-bit) Value” to create a new value.
5. Next, rename the key as “EnableFrameServerMode“.
6. Now, just double-tap the item to edit it.
7. After that, set this value to “1“.
8. Finally, click “OK” to save this change.
After this, close the Registry Editor window.
After closing that screen, reboot your PC/ laptop. After rebooting it, open the webcam and test if that works.
Fix 3 – Check for optional updates
Windows delivers these webcam driver updates as an optional and you have to manually download and install the update.
1. Open the Settings window on your system.
2. Now, just click on the “Windows Update” section on the left pane.
3. You will see many options on the right-hand pane. Just, click on the “Advanced options” menu to access it.
4. Now, just check the updates associated with your webcam device of yours. (Like in my case, it is the Logitech updates.)
5. Next, just click “Download & install” to install those updates.
This will finally install the optional webcam drivers on your system.
6. Usually, these driver updates don’t need any system. But, in some cases, you may need to restart your system.
7. Just come back to the Windows Update home page and tap the “Restart now” option to restart the system.
Once you have restarted the system, the webcam device will start to work normally.
Fix 4 – Update the camera drivers
You can update the camera drivers from the Device Manager.
1. At first, press the Windows key+X keys together.
2. Just tap “Device Manager” to access it.
3. Once you reach the Device Manager page, you will see the “Camera” section. Just, expand it to see your camera device.
2. Just, right-tap the camera driver and tap “Update driver“.
3. In the next step, just click on “Search automatically for drivers“.
Windows will search for the best driver for your camera device, and download and install it on your system.
If you receive the “The best drivers for your device are already installed” message on your screen, go for the next fix to solve this issue.
You can download and install the latest version of the webcam driver directly from the manufacturer’s website.
1. Search for the latest webcam driver.
2. Download the latest driver package and install it on your system.
After installing the driver, close everything and restart the system to complete the driver installation process.
NOTE –
If you are using a Logitech webcam, you can download and use their dedicated apps to control the webcam driver.
1. Go to the Logitech webcam page.
2. Then, tap on the particular webcam that you are using.
3. Now, scroll down to the “Supports” section. Tap on the “VIEW ALL DOWNLOADS“.
4. Now, just download the software from here. Tap “Download” to download it.
5. Then, run it on your system.
Now, using this app, you can download-install the latest webcam driver directly.
Fix 5 – Disable and enable the Camera
Try to disable and re-enable the camera device.
1. You have to press the Windows key once and write “device“.
2. Once you have seen “Device Manager” in the search results, tap it.
3. When the Device Manager screen opens up, click on the “Camera“.
4. After that, right-tap your webcam driver and tap “Disable device“.
5. Now, confirm your action with a tap “Yes“.
This will disable the webcam driver.
6. Now it is time to enable the webcam driver once again. So, just right-tap the disabled webcam driver and tap “Enable device” to re-enable it.
After that, close the Device Manager. Now, check if the webcam is still appearing to be pitch black or not.
Fix 6 – Uninstall the camera driver
If nothing else has worked, just uninstall the camera driver and restart the system.
1. Press the ⊞ Win key+R keys together.
2. Then, type “devmgmt.msc” there and hit Enter to access it.
3. Just click once on the “Camera” device.
4. You need to right-tap the webcam driver and click on “Uninstall driver” to uninstall it.
5. You will receive a warning message. Tap “Uninstall” to finish the process.
6. Now, once you have uninstalled the webcam driver, you can just tap “Action” from the menu bar.
7. After that, click “Scan for hardware changes“.
Windows will scan your system and install the missing webcam driver once more. Check if this works out for you.
Fix 7 – Use an extra light source
If you are in a low-light environment and if the webcam doesn’t support the Night Mode feature, you should consider using some extra light source. You may sit near the window in the daytime or use a well-lit room. This can affect the camera output significantly and fix the black screen issue that you are currently facing.
Fix 8 – Change the Exposure settings
Some webcams support further tweaks of the camera picture qualities like – Brightness, Saturation, Contrast, and Exposure. You can use either the dedicated webcam app (like Logitech Options, Logitech G hub, etc.) to control these settings. Try to go for the “Default settings” to solve this issue.
Check whether this helps solve the webcam issue on your system.
Fix 9 – Remove the laptop battery
This is a quick workaround that may work out for you.
1. At first, turn off the laptop.
2. Detach the power cable from it, if it is connected.
3. Now, pull out the laptop battery from the device carefully.
4. Next, just press and hold the laptop power button for at least 20 seconds to start it up. But, it won’t start up due to the absence of any power source.
5. Repeat this step a couple of times more.
6. Now, put the laptop battery back in its place carefully.
Test if the webcam is working properly or not.
Fix 10 – Check if the camera is compatible
If you are using an older webcam, it may not be compatible with the current system you are using. Try to test the webcam with another PC/laptop.
If the webcam appears to be black on that system also, it might not be fully compatible with Windows 11. So, that is the reason you are facing this problem.
Alternative Tips –
1. If you are using the Windows Powertoys, pressing the Windows+Shift+A turns off the camera and microphone. Try pressing the keys again to turn on the camera.
2. It is possible the webcam isn’t working properly. Try reconnecting the webcam to another device and test.


