PowerPoint transitions are always fun. When you apply a music effect to a transition, it makes the transition even more interesting. But what if you are trying to add a music file to your transition and PowerPoint is telling you that it cannot play the audio file that you uploaded? Well, that definitely is going to kill all the fun! Most of the time, the issue leaves no clues for beginner users. But if you read the error message closely, you will definitely get some clues on how to tackle this super simple issue.
In this article, we have got 2 sections, the first section covering the issue in detail and the second section telling you how you can resolve the issue by following the fastest way possible. Hope you enjoy reading!
Issue Scenario
In this section, we explain in detail when we get the PowerPoint Can’t Play the Audio File issue.
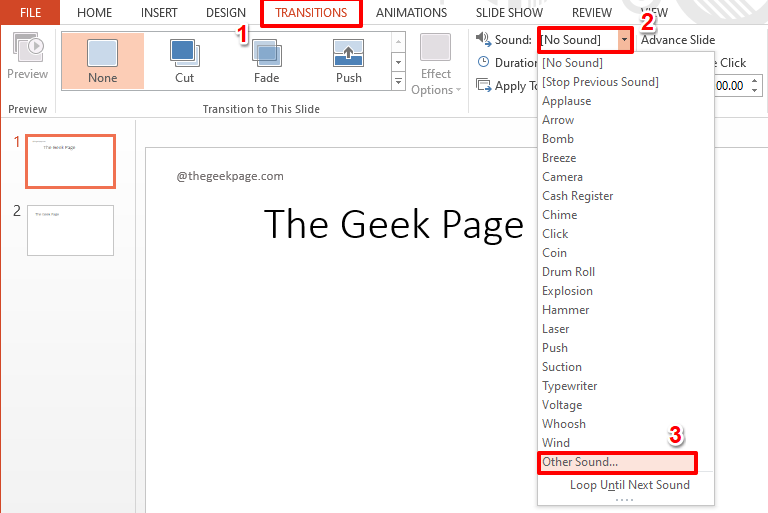
Step 1: Click on any slide and click on the TRANSITIONS tab at the top.
Now, click on the dropdown menu associated with the Sound option and choose Other Sound from the list of options available.
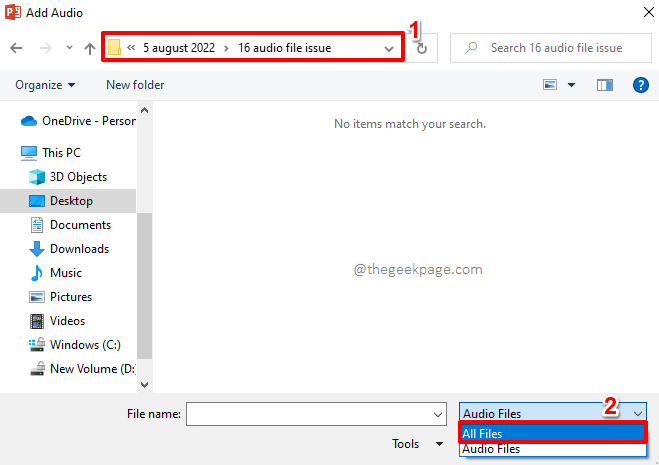
Step 2: Navigate to the location where your audio file is present. If you can’t find the file at its location, then click on the Audio Files dropdown button and choose All Files instead.
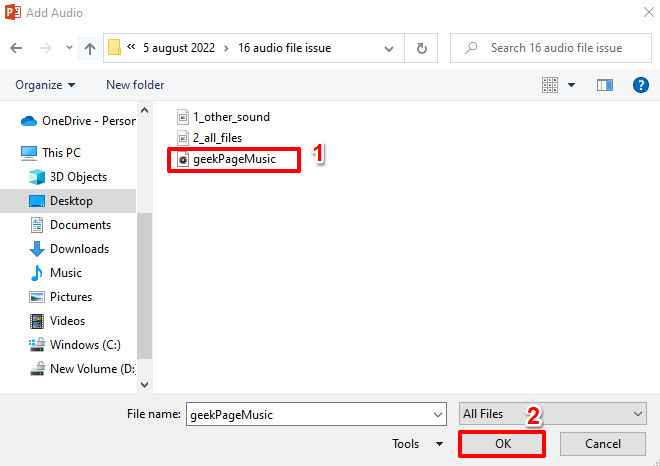
Step 3: Now you will be able to see your audio file. Click on the file to select it and then hit the OK button.
Step 4: PowerPoint will now give you a warning message saying that it cannot play the audio file you selected. It also gives you a tip that the file you select should be in .wav format.
Solution
The solution for the above problem lies in converting your audio file, be it in any format, to .wav format so that it can be loaded by PowerPoint into your presentation.
In this method, we would be using an online converter to perform our conversion from .mp3 file to .wav file.
Step 1: Launch any web browser and search for online .wav converter.
You can choose any website as per your preference. We have clicked on the first search result.
Step 2: Now the conversion window would open up.
You will have a button to choose the audio file, to be converted, from your machine. Or you can enter the URL if it’s an online resource. You can also get the file from Dropbox or from Google Drive as per your preference.
Once the file is selected, it will be uploaded and you have to click on the START button to start the conversion.
Step 3: Once the file is converted to wave format, you will have the option to download it by clicking on the Download button.
Step 4: You will now have the Save As window before you.
Navigate to the location where you want to save the file. You can give a name to your file under the File name field.
The Save as type field will automatically be set to Wave Sound. There is nothing to change there.
Once you are all done, hit the Save button.
Step 5: Now, let’s get back to PowerPoint once again.
Hit the TRANSITIONS tab at the top of the ribbon.
Now, click on the dropdown button associated with the Sound option and choose Other Sound from the list of options available.
Step 6: Navigate to the location where you saved your converted wave file in Step 4.
The file would now be visible without any difficulties as it is in wave format.
Hit the OK button.
Step 7: That’s it. The file now loads and the music gets played during the transition.
Please tell us in the comments section whether you could successfully fix the issue of PowerPoint being unable to play the audio file, by following the solution mentioned in our article.
There are many more tricks, tips, how-tos, and hacks on the way! Stay tuned!


