One of the many issues Microsoft Office 365 users face is the 0x8004FC12 error. This issue usually shows up while users try to activate Office 365 on their Windows 10 PC. The error is usually associated with 2013 and 2016 Office 365 builds. Users reported that the following error was displayed along with the 0x8004FC12 error while they tried to activate Office 365 after recently updating it: We’re sorry, something went wrong and we can’t do this for you right now. Please try again later.”
In this article, we take a look at the solutions that were reported by the users helped them get rid of the issue. But first, let us take a look at the reasons that could be causing the Office 365 0x8004FC12 error troubling you.
Busy Servers: It might be possible that the Microsoft activation servers are busy. If that is the case, you will not be able to activate Office 365 on your PC immediately. The only solution for that is to wait it out till the activation servers are back up. This usually wouldn’t take much time. If you are getting the same error message even after waiting for a couple of hours, go ahead with the solutions mentioned below.
Internet Issues: You must check if your PC is connected to the internet. And if it already is connected, make sure that the internet is working by trying to access a couple of websites on an internet browser.
Compatibility Issues: It also could be the case that the updates on your PC are not compatible with the current version of Office 365 installed on your PC. It is important to keep your Windows Operating System updated.
Other issues: There are various other issues that could lead to the 0x8004FC12 error occurring on your PC, preventing Office 365 from activating. It could be improper internet settings, Firewall issues, or even some fault with Office 365.
Let us checkout the solution that will help you fix 0x8004FC12 error in Windows 10.
Solution 1: Add Net Local Group in Windows 10
In order to fix this issue on your PC, you can begin with adding Net Local Group using the Command Prompt tool. It is a simple fix that can be executed by following the steps given below:
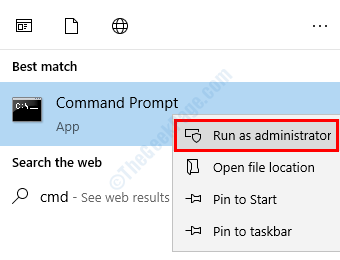
Step 1: Press Win + S on your keyboard to open the Start search panel. Here, type cmd, then from the serach results, right-click on Command Prompt option and select the Run as Administrator option.

When the Command Prompt window opens, you will need to type the following commands in it. Begin with entering the first command given below and pressing Enter. After the first command executes, type the second command, press Enter, and repeat the same with the third command.
net localgroup Administrators localservice /add
fsutil resource setautoreset true C:\
netsh int ip reset resetlog.txt
Once all these commands have run successfully in Command Prompt, close down CMD and restart your PC. After restarting try to activate Office 365 again. If this didn’t help with fixing Office 365 0x8004FC12 error , try the next solution.
Solution 2: By Disabling Windows Firewall
Here’s another solution that has worked for many users to fix 0x8004FC12 error in Windows 10. You can temporarily disable Windows Firewall on your PC to make sure that the Firewall is not hindering the activation process. Once you have tried this solution, you can reactivate the Firewall to ensure your PC’s security.
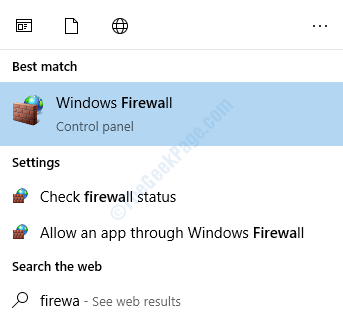
Step 1: Open the Start Search Panel on your PC by pressing the Win + S keys simultaneously. In the panel, type firewall. Now, from the search results, open the Windows Firewall option.

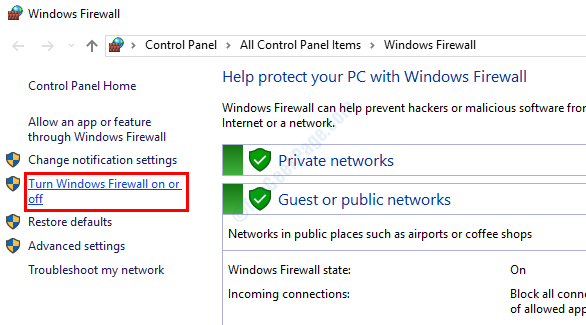
Step 2: The home window of the Windows Firewall will open. Here, go to the options panel on the left and select the Turn Windows Firewall on or off option.

Step 3: From the next screen that opens, select the Turn off Windows Firewall option under both the sections as shown below. After selecting the options, press Ok.

After deactivating the Firewall, go ahead and try to activate Office 365.
Irrespective of whether this method helped you fix the issue or not, you should activate the Firewall back. It is highly recommended to keep the Firewall on in order to make sure your PC is protected from external threats.
Solution 3: By Resetting TCP/IP in CMD
You can also try to rest TCP/IP on your Windows 10 PC in order to fix 0x8004FC12 Office 365 error in Windows 10. To carry out the reset, you will need to open Command Prompt with Administrator privileges. Here’s how to do it:
Step 1: Follow Step 1 of Solution 1 to open CMD in Admin mode.
Once the CMD is up and running, type the following command and press the Enter key:
netsh int ip reset
The NETSH utility will reset the TCP/IP on your PC. After the command has run successfully, restart your PC and try to activate Office 365. If this did not help, try the next solution.
Solution 4: By Updating Windows 10 in your PC
If the Windows 10 in your PC is not up to date, it may lead to a couple of issues. One of such issues is the 0x8004FC12 error that shows up while activating Office 365. Make sure that the Windows 10 in your PC is upgraded to the latest update. Here’s how to do it:
Step 1: Press Win + I keys on your keyboard. This will open the Settings app. In the Settings app, scroll down and select the Update & Security option.

Step 2: The Update & Security settings window will open. Here, you will have to go to the left panel, and select the option named Windows Update. On the right pane, you will find the Check for Updates button. Click on it.

Your PC will commence the process of searching whether a new update is available for your PC. If there is, you will be prompted about the same and asked for your permission to carry out the update process. Follow the on-screen instruction to proceed with the update. After the Windows 10 is updated, give activating Office 365 a try.
Solution 5: Make Sure to Enable TLS 1.2
By Enabling TLS or Transport Layer Security Protocol on your Windows 10 PC, you can get rid of the Office 365 activation issue. In order to make this happen, follow the steps given below:
Step 1: Open the Run box by pressing the Win + R keys together. In the Run box, type inetcpl.cpl and press the Enter key.

Step 2: The Internet Properties window will open. Here, go to the Advanced tab. In the Advanced tab, go to the Settings section and scroll down till you find the Use TLS 1.2 option. Make sure if the Use TLS 1.2 option has been selected. After selecting the option, click on Ok and close down the Internet Properties the window.

Now, try to activate Office 365 and see if this worked.
Solution 6: Perform a MS Office Suite Repair
It could be the case that the Office 365 files on your PC is broken. To make sure that there isn’t any issue with the Office 365 suite, you can go ahead and carry out a software repair. Pretty simple steps are involved in this process that are mentioned below:
Step 1: Press Win + S keys to open the Start search panel. There, type programs and from the search results, click on the Programs and Features option.

Step 2: The Programs & Features window will open now with a list of Programs / Software installed on your PC. Here, look for the Office 365 program. When found, make a right click on it and from the options, select Change.

Step 3: The Office 365 Diagnostics Tool will open. Here, select the Quick Repair option, then click on the Repair button. You can also try selecting the Online Repair option to commence the repair process.

When the repair is complete, you can give your PC a restart and then try to activate Office 365 and see if the 0x8004FC12 error is still showing up.
Solution 7: Disable Auto Detect Settings in Internet Properties
Here is another setting in the Internet Properties that you can fiddle with in order to make sure that Office 365 gets activated. By disabling the auto-detect settings in the LAN settings you can get rid of this error. Here’s how to do it:
Step 1: Follow the Step 1 of Solution 5 to open the Internet Properties window.
Step 2: In the Internet Properties window, go to the Connections tab. When there, click on the LAN Settings button.

Step 3: Here, check for the Automatically Detect Settings option. If it selected, deselect it and click on the Ok option.

Now, close down all the windows and restart your PC. After restarting, try to activate Office 365. You will be able to get rid of the issue.
So these were the solutions that have helped users fix Office 365 0x8004FC12 error in Windows 10. If any of these solutions helped you, make sure to let us know in the comments section so that other users can benefit from it.
You can also let us know if you were not able to get rid of the issue, and we will get back to your on this.