Windows Search works quite well in Windows machines, but just like in other sections of Windows, it is not completely error-free. If you are running the Search troubleshooter in Windows, you may see this error message –
“Incorrect permissions on Windows Search directories” on the diagnostics panel. As you can presume this error is associated with the improper permission of the Windows Search directories. Altering the permission settings should solve this problem.
Fix 1 – Own the Data folder
You have to take ownership of the Data folder in the Windows Search directory.
Step 1 –
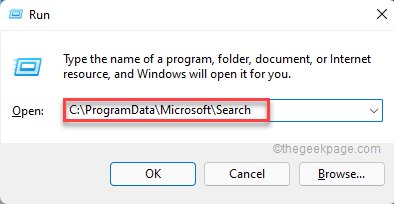
1. At first, press the Windows key+R keys together.
2. Then, type this address in the terminal and hit Enter.
C:\ProgramData\Microsoft\Search
3. When the Search folder opens up, right-click on the “Data” folder and tap on “Properties“.
4. When the Properties opens up, go to the “Security” settings.
5. After that, tap on “Advanced” to proceed further.
6. In the next window, click on “Change” in the ‘Owner‘ option.
7. Now, tap on the “Advanced“.

8. At the next step, tap on the “Find Now” to view the full list of user groups.
9. Now, scroll down and select your account name from the list.
10. After that, click on “OK” to select it.
11. To save this setting, tap on “OK“.
Now, your account has taken ownership of this folder.
12. Now, tick mark the “Replace owner on subcontainers and objects” option.
13. Finally, tap on “Apply” and “OK” to save these changes.
Step 2 –
1. Coming back to the Properties window, again, tap on the “Advanced” option.
2. In the Permissions tab, tap on “Add“.
3. Now, tap on “Select a principal“.
3. Then, click on the “Advanced” option.

4. Again, use the “Find now” option to view the list of users groups.
5. Next, choose the account name that you have chosen before (In our case, it is “Sambit Koley“.)
6. After that, click on “OK” to select it.
7. Finally, click on “OK” to proceed further.
8. Next, check the “Full Control‘.
9. Finally, click on “Apply” and “OK” to save the settings.
10. Now, it is time to tap on the “Enable inheritance” button.
11. Then, check the “Replace all child object permission entries with inheritable permission entries from this object” option.
12. Finally, tap on “OK” to save this setting.
Now, close all the windows and restart your system.
Once you restart it, Windows will rebuild the search index. You won’t face this problem again.
Fix 2 – Disable and Enable Windows search
1 -Search cmd in Windows taskbar search.
2 – Do a right click on the command prompt icon and then select run as administrator

3 – Now, Run the commands given below One By One and the execute them by pressing enter key each time
dism /Online /Disable-Feature /FeatureName:"SearchEngine-Client-Package"
dism /Online /Enable-Feature /FeatureName:"SearchEngine-Client-Package"
4 -Now, close the cmd window , once both commands get executed fully
Fix 3 – Run an SFC, DISM scan
Running an SFC, DISM scan has solved this issue for many users.
1. At first, press the Windows key and type “cmd“.
2. Then, right-click on the “Command Prompt” and then tap on “Run as administrator“.
3. Now, just type this code in the terminal and hit Enter to initiate an SFC scan.
sfc /scannow
Let Windows scan for any system file corruption and fix it in the process.
4. Once the SFC scan is complete, paste this command and hit Enter to run a DISM scan.
DISM /Online /Cleanup-Image /RestoreHealth
Let this DISM scan complete. Then, reboot your system. See if the ‘Incorrect permissions on Windows Search directories’ is still appearing or not.
Fix 3 – Reset Cortana
Resetting Cortana may offer a useful solution.
1. At first, press the Windows key+S keys together and type “powershell“.
2. Then, right-click on the “Windows PowerShell” and tap on the “Run as administrator“.
3. When PowerShell opens up with administrative rights, copy-paste this command and hit Enter.
Get-AppXPackage -Name Microsoft.Windows.Cortana |
Foreach {Add-AppxPackage -DisableDevelopmentMode -Register
"$($_.InstallLocation)\AppXManifest.xml"}
After passing this resetting this command, close the PowerShell window. Then, reboot your system.
After the system startup, run the Search and Indexing troubleshooter and check whether you are still seeing the same error message.
Fix 4 – Create and use a new account
You have to create a new user account and use it to fix the issue.
1. At first, press the Windows key+R keys together.
2. Then, type this code and click on “OK“.
ms-settings:otherusers
3. When the Settings window appears, on the right-hand side, tap on “Add account” in the ‘Other users’ section.
4. After that, tap on the “I don’t have this person’s sign-in information“.
5. Now, click on the “Add a user without a Microsoft account“.
6. Then, write down a username you want to use.
7. After that, fill up the password and security questions as you prefer.
8. Finally, tap on “Next” to proceed further.
9. After doing this, press the Ctrl+Alt+Delete all three keys together.
10. Then, tap on “Sign out“.
11. You will be back at the lock screen.
12. Now, on the bottom-left corner, choose the new account.
13. Put the account password and hit Enter.
Once you have logged into your system using the new account, run the Search and Indexing troubleshooter once more.
This time, your issue will be solved.
Fix 5 – Automate Windows Search service
You have to check whether the Windows Search service is running or not.
1. At first, press the Windows key+R keys together.
2. Then, write this line and hit Enter.
services.msc
This will open up the Services.
3. When the Services window appears, look for the “Windows Search” service.
4. Then, just double-click on it to access it.
5. At first, set the ‘Startup type:’ to “Automatic“.
6. Later, tap on “Start” to start the service, if it isn’t running already.
7. Finally, tap on “Apply” and “OK” to save the changes.
Then, close the Services. Now, try to run the troubleshooter again. It will solve all the search-related problems.

