Windows don’t allow all levels of users to operate on the same level of security. While the administrators enjoy all the accessibility permission with a just click, it doesn’t hold true in the case of a standard/guest account on the system. But, sometimes even while using an administrative account, a user may see this “This app can’t be activated by the built-in Administrator” error message. Don’t worry. This is nothing but a simple misconfigured policy issue. Follow these steps.
Fix 1 – Make sure that you are using an administrative account
If you are using a standard account, you may feel this issue. You can change the account type or log in using an administrator account.
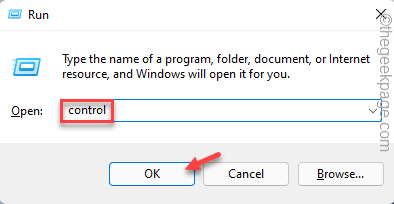
1. At first, press the Windows key+R keys together.
2. Then, type “control” in the Run and click on “OK“.
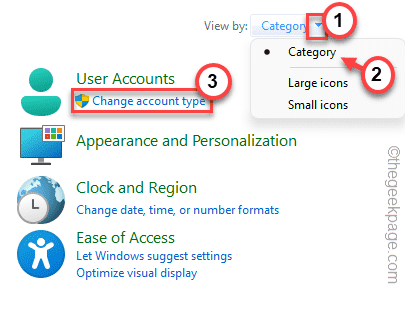
3. When the Control Panel opens up, tap on the drop-down beside the ‘View by:’ and set it to “Category“.
4. After that, click on the “Change account type” to alter the account type.
5. Now, you will see the list of accounts on your system.
6. After that, tap on the account you are using now.
7. Now, tap on “Change account type“.
7. Then, set the account type to “Administrator“.
8. After that, click on “Change account type” to set the new account type as ‘Administrator’.
After that, close the Control Panel.
Now, restart your computer once. Once you have logged in, try to open the file you were facing the problem with. This should fix the issue that you are facing.
Fix 2 – Modify the policy
[FOR WINDOWS PRO & ENTERPRISE EDITION ONLY]
Misconfigured policy settings can cause this issue on your system.
Step 1
1. At first, press the Windows key+R keys together.
2. Then, type “gpedit.msc” and click on “OK“.
3. When the Local Group Policy Editor opens up, expand the left-hand side this way –
Computer Configuration > Windows Settings > Security Settings > Local Policy > Security Options
4. Then, on the right-hand side, double click on the “User Account Control: Admin Approval Mode for the Built-in Administrator Account“.
5. Choose the policy settings to “Enabled” to enable the policy.
6. After that, tap on “Apply” and “OK” to save the changes.
Once you are done, close the Local Group Policy Editor settings. Then, restart your system to let this change take effect.
After that, check by opening the problematic files on your system.
Step 2
Now, you have to modify the registry.
1. At first, tap on the search button on the taskbar and type “regedit” in the search box.
2. Then, tap on “Registry Editor” from the search results to access it.
NOTE–
Once you have opened up the Registry Editor window, click on “File” > “Export” to create a backup of your registry. Name the backup anything suitable and store it in a secure location.
If something wrong happens, you can easily import this backup.
3. Now, on the left-hand side, go this way-
Computer\HKEY_LOCAL_MACHINE\SOFTWARE\Microsoft\Windows\CurrentVersion\Policies\System\UIPI
4. Then, double click on the “(Default)” value to edit it.
5. Now, copy-paste the value in this box.
0x00000001(1)
6. Then, tap on “OK” to save these changes.
After that, close the Registry Editor. Restart the system and check if this works.
After rebooting the system, try to open the app once more.
Fix 3 – Change the level of UAC
If altering the policy settings doesn’t work, you have to alter the level of User Account Control (UAC).
1. At first, press the Windows key and type “UAC“.
2. Then, tap on the “Change User account control settings“.
This will open up the User Account Control settings.
3. When the UAC settings open up, take any of the following steps according to the requirement.
If UAC was disabled – move up the slider one level.
If UAC is already enabled – higher the slider by one level further.
4. Then, tap on “OK” to save the changes.
After doing this, close the Control Panel. Then, restart your system.
After restarting the system, you should be able to solve the problem.
Fix 4 – Empty the Store cache
Some users have solved the issue simply by emptying the Store cache on your system.
1 – Search cmd in Windows search box. Right click and choose run as administrator

2 – Type wsreset in command prompt window and hit Enter key

This will reset the Store cache on your system. Check if this solves the issue.
Fix 5 – Run SFC commands
Running a simple system file checker scan can fix this issue if the problem is occurring due to a corrupt file.
1. At first, press the Windows key and type “cmd“.
2. Then, right-click on the “Command Prompt” and tap on “Run as administrator“.
3. When the Command Prompt appears, type this command and hit Enter to start an SFC scan.
sfc /scannow
Once the scanning process is complete, close the Command Prompt. After that, restart your system. Check if this solves the issue.


