Copy-pasting process and speed have improved dramatically over the years. But some of the issues with this copy-pasting process are yet to found a permanent resolution. One such issue is an error prompt “A device attached to the system is not functioning” which shows up in case of an interruption in the file transfer process. Usually, if the storage device gets disconnected or lacks enough free space this error message shows up.
Initial Workarounds
1. Plug the USB device into another port. If it shows the same results with the front ports, try the rear ones.
2. Restarting the system and reattempting the file transfer may solve this issue.
Fix 1 – Make sure the external storage is connected
Sometimes the USB drive you are using may get disconnected from your system. Before you proceed, make sure the external storage is connected correctly or not.
1. Make sure there is no file transfer process ongoing.
2. Next, just disconnect it from your system.
3. Wait for a few seconds and plug it back in. This time, you may also consider plugging it into another port.
4. Once it is plugged in, open the File Explorer and check whether it has appeared there or not.
Now, try to transfer the files that you were facing the problem with.
Fix 2 – Enough free space
The USB drive needs some space to operate smoothly. Check if it does have enough space.
1. While the USB is plugged in, press the Windows key+E keys together.
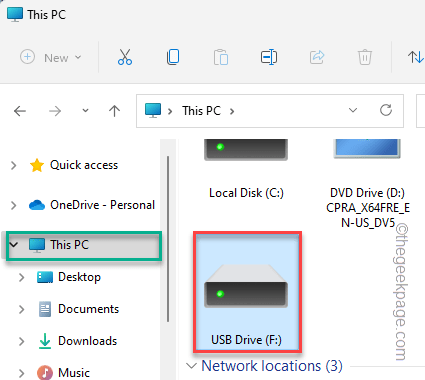
2. In the File Explorer, go to “This PC“. Check if the storage drive has enough free space.
If you notice there is not enough free space, you have to free it. Just open the drive and remove any unnecessary items from your system and then, retry the file transfer process again.
Fix 3 – Format the drive
If the drive is corrupted or of the wrong format, try formatting it.
NOTE –
Before formatting the drive, make sure that there are no important files in the drive. You can backup your important files before you format the drive.
1. Open the File Explorer and tap “This PC“.
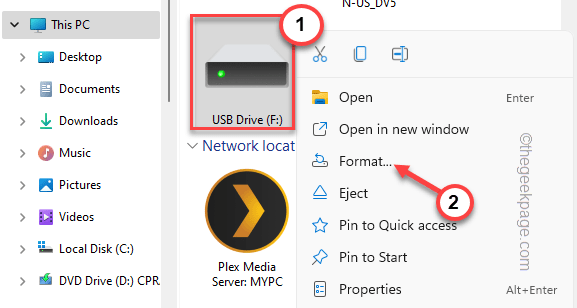
2. Here, you will find all the drives attached to your system. Just right-click on the USB drive and tap “Format“.
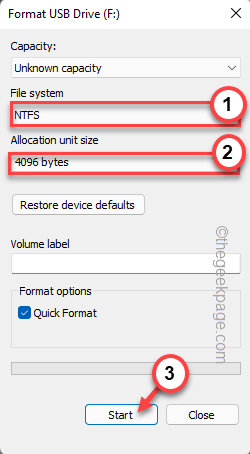
3. You may choose any desirable format for your drive from the ‘File System:’ drop-down menu.
[ It is usually any of these formats NTFS, FAT32, EXT2, EXT3, EXT4, exFAT. ]
4. Additionally, you can adjust the allocation unit size from the ‘Allocation unit size:’ drop-down option.
5. To start the formatting process, tap “Start“.
This will start the formatting process.
Fix 4 – Run an SFC and DISM scan check
Run the SFC and DISM to check and fix crucial system files.
1. At first, right-click on the Windows key and the S key. Just, tap on the “cmd“.
2. Now, just right-tap the “Command Prompt” and tap on “Run as administrator“.
3. At first, you have to perform the DISM scan. So, paste this code and hit Enter.
DISM.exe /Online /Cleanup-image /Restorehealth
Let Windows complete the process.
4. Once you have completed the DISM tool, write this command and hit Enter to run an SFC scan.
sfc /scannow
Close the Command Prompt window. Then, restart the system to complete both the scans.
Again try to transfer the files once more. This time it will be done without any further issues.


