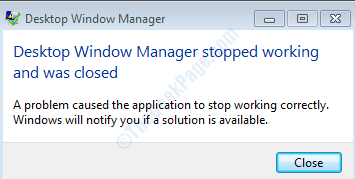
While performing certain tasks like playing a video, or while running a program or even when you do something with your windows explorer, you might have got this dialog box saying Desktop Window Manager stopped working and was closed. You might be clueless about what happened, even choosing the option to fix the issue online wouldn’t have done any good. Of course it is frustrating to get these sort of dialog boxes as it severely tampers the user experience.
This problem mainly occurs because of some corrupt files. Other reasons vary. Read on, to learn how you can fix this problem using some very simple methods.
Method 1: Try Rotating the Second Screen
If you are using 2 monitors and if you tried changing some settings in your graphics card like rotating your second screen, then you should try rotating your second screen back to landscape mode. Once you are done with rotating the screen, please restart your machine and check if the issue persists. If you’re confused about how to rotate your second screen, please follow the steps below:
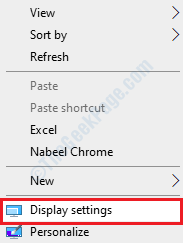
1. Right click on an empty spot in your Windows Desktop and click on the option that says Display settings.
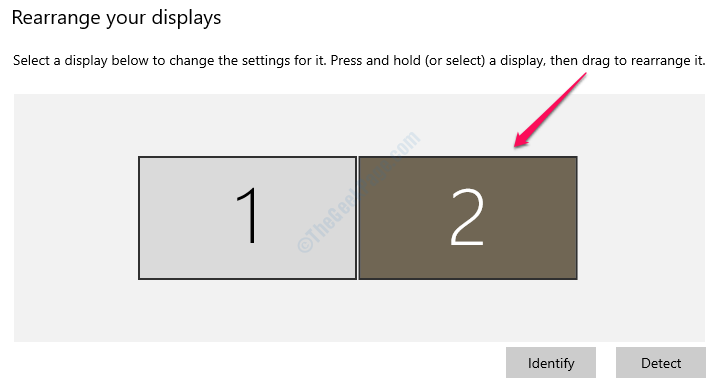
2. Now, under the section Rearrange your displays, you will get the option to choose the Display that you want to make changes to. Click on the tab named 2 to rotate the second screen.
3. Now scroll all the way down until you find the dropdown menu by the name Display orientation. Click on the arrow associated with it and choose the option Landscape.
4. You will now be shown an alert asking whether to keep the changes or to revert them. Choose Keep changes in this step.
Method 2: Repair Damaged Windows Files by Running System Scan
One of the reasons why we get the Desktop Window Manager Stopped Working problem is because of corrupt system files. We can try repairing these damaged files by running the System File Checker (SFC) command utility. If SFC finds some issues with Windows system files, then it will try to repair these files. Follow the steps below to try this method:
1. Type in cmd in Windows Start menu search bar and from the results that appear, right click on Command Prompt and then choose the Run as administrator option.
2. When the Command Prompt opens up in administrator mode, copy paste the command sfc /scannow and hit Enter key. Please make sure that you don’t abort the process. Wait for it to finish.
sfc /scannow
After SFC scan is complete, if you get the message Windows Resource Protection found corrupt files and successfully repaired them. Details are included in the CBS.Log %WinDir%\Logs\CBS\CBS.log, that means your issue is most probably found and fixed by SFC scan. Please verify.
Method 3: Defragment Hard Disk
Using your machine over a long period of time causes the files to get fragmented which in turn results in slower system and in many other issues as well. There is one easy solution that you can try to defragment your hard disk using the Optimize Drives feature. Please try out the steps below to defragment your hard disk in a simple way and this could fix your issue of Desktop Window Manager.
1. Bring up the Run window by pressing the keys WIN + R together. Once it is up, type in dfrgui and press the Enter key to open the Optimize Drives window.
2. All the drives listed under Optimize Drives can be optimized / defragmented. Choose the drives one by one and then click on the Optimize button.
Wait till the optimization is done. Once the process is over, restart your machine and check if your issue is resolved or not.
Method 4: Perform Windows Clean Boot
If your issue is still not resolved even after following the above 2 methods, then you can try performing a Windows clean boot. This will fix any potential issues and will even make your system run faster. To clean boot your Windows, please follow the clearly stated steps in our article How to Restart PC in Clean Boot Mode in Windows 10. After the clean boot, your system will load only with the most essential components. Check if your issue is resolved or not when your PC is in the clean boot state.
STEP 1 – Initially, you will have to type msconfig in the Search bar . Click on msconfig

STEP 2 – On the window that pops up, click on the radio button just before Selective Start up below the tab Startup Selection. Also make sure that only “Load system services” option is checked in selective startup.

Hit the OK button once you are done.
STEP 3 – Now from the menu at top, you will have to choose the Services tab. This includes all the services that is provided by Microsoft on your Windows system.
STEP 4 – Now, check the option that says Hide all Microsoft Services. . Now choose the option Disable All.

Hit the Apply button and then OK.
Method 5: Rollback Graphics Card Driver
Sometimes new updates to graphics card driver can cause the Window Manager stopped working and was closed error. If a recent update has been done, following the steps below might fix your issue.
1. Press WIN + R keys together and bring up the Run window. Once it opens up, type in devmgmt.msc and then hit Enter key.
2. When the Device Manager window opens up, find the section named Display adapters. Once you do, click on the arrow associated with it to expand it. Your graphics card will be listed underneath. Double click on your graphics card entry to launch its Properties window.
3. Now under the Driver tab in the graphics card Properties windows, you will find a button named Roll Back Driver. If there are any recent updates that can be rolled back, then this button will be active. If the button is not active, please head on to the next method. If the button is active, then click on it and follow the instructions that you receive.
That’s it. Once the driver is successfully rolled back, check if your issue is still present or not.
Method 6: Update Graphics Card Driver
Another solution would be to update your graphics card driver so that any potential bugs could be fixed in the latest release. To update your graphics card driver, follow the steps below:
1. Open Run window by pressing the keys WIN + R together. Once it comes up, enter devmgmt.msc in the run command box and hit the OK button.
2. Just like in the previous method, once the Device Manager window launches, expand the Display adapters section by clicking on the arrow associated with it and double click on your graphics card listing to open its Properties window.
3. Now, under the Driver tab, click on the button Update Driver.
4. When you get the prompt How do you want to search for drivers?, click on the option Search automatically for updated driver software. Windows will now search online whether any new releases are available for your graphics card driver. If available, the new updates will be installed.
Your driver would now be updated to the latest version. Check if your issue is resolved.
Method 7: Turn Off Aero Peek
At the far right corner of your taskbar, you will find a small vertical bar. If you hover your mouse over this vertical bar, you will be able to see your desktop temporarily. This is Aero Peek feature that lets you view your desktop temporarily without having to minimize all your open windows.
This very feature is quite helpful, but could be the reason why you are getting the issue of Window Manager stopped working and was closed as well. Let’s try turning Aero Peek off and see if that resolves your problem.
1. Right click on an empty space on the taskbar and then click on the option Taskbar settings.
2. Now under Taskbar settings in the right window pane, turn off the toggle button Use Peek to preview the desktop when you move your mouse to the Show desktop button at the end of the taskbar.
That’s it. This should disable the Aero Peek feature for you. Verify whether your issue is still present or not.
Method 8: Update Your Windows Operating System
It is very important to keep your operating system up-to-date. Lots of issues can be resolved just by updating your Windows. Please follow the steps below on how to update your Windows OS.
1. Press WIN + I keys together and bring up the windows Settings app. When it opens up, click on the tab that says Update & Security.
2. Now in the left window pane, click on Windows Update section under Update & Security. As next, in the right window pane, click on the button Check for updates.
If there are any updates available, Windows will now start downloading these updates and installing them.
3. If some new updates are found and installed, you will now be able to see a button that says Restart now. Click on this button and restart your machine. Check if your issue has been resolved once the system boots up.
Method 9: Run Check Disk
Check Desk utility can be used to find any bad sectors in your hard disks and fix them if it’s possible.
1. Open Command Prompt in admin mode. For that, type in cmd in Windows Start Menu Search bar and from the results that come up, right click on the Command Prompt option and click on Run as administrator.
2. When Command Prompt launches in the elevated mode, type in chkdsk C: /f /r /x and hit Enter key.
chkdsk C: /f /r /x
Parameters:
- C: – The Drive that is to be scanned
- /f – This option will attempt to fix any errors that are found
- /r – This option will locate for bad sectors and recovers any readable information
- /x – This option will forcefully dismount the volume you are about to check before the scan begins
3. As next, when you get the prompt Would you like to schedule this volume to be checked the next time the system restarts? (Y/N), press Y and then hit Enter key. On next restart, your drive will be scanned and errors will be fixed. After that, check if your issue is gone or not.
Method 10: Run an Antivirus Scan
Sometimes the issue could be caused because of a malicious attack as well. In that case, a thorough antivirus scan using your antivirus software can find and fix the problem.
Method 11: Restore Your Windows to an Earlier Restore point.
If none of the above methods works and if you have system restoration enabled in your machine, then you can try restoring your Windows to an earlier restore point to fix the issue. Remember that if System Restore feature is turned off in your machine, then you cannot try this method.
You can easily perform a system restore on your machine following the steps mentioned in our article How to perform System Restore on Windows 10. Also, if you would like to know how to create a system restore point, please refer How to Create System Restore Point using Command Prompt / Powershell.


