While trying to configure the port of your printer you may witness a rare error message “An error occurred during port configuration.” As your system can’t configure the port it is showing the error message. Hard resetting your printer or manually configuring the printer port may actually work out.

Fix 1 – Hard Reset your printer
As we have already discussed, hard resetting the printer will reset the port configuration.
Shutdown process-
1. At first, you need to switch On your printer.
2. While the printer has turned on, simply take out the ink cartridges.
3. After that, switch OFF your printer manually
4. Unplug the printer cables from your system.
4. Then, shut down your computer.
5. Finally, switch off the WiFi router.
Wait for a minute.
Startup procedure-
7. After waiting for a minute, switch on the printer.
8. Put the cartridge back in your printer.
9. Now, it is time to switch ON your computer.
10. Finally, all it is left to turn on the WiFi router.
Check if you are still facing the port configuration error.
Fix 2 – Manually configure printer port
If the automatic configuration of the printer port is not working follow these easy steps to manually configure it.
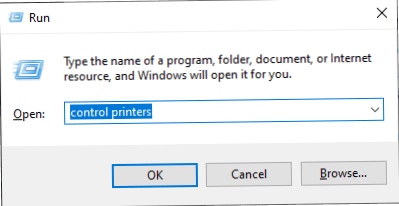
1. Press Windows key+R. This will open up a Run terminal.
2. To access printer settings, type this code and click on “OK“.
control printers

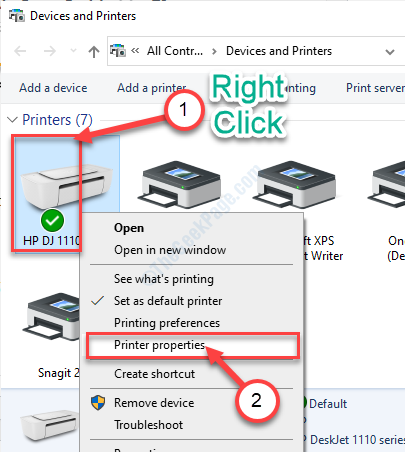
3. As the Devices and Printers window appears, right-click on the problematic printer. Then click on “Printer Properties“.

4. At first, you need to click on the “Ports” tab.
5. Simply, choose your problematic printer from the list.
6. After that, click on “Configure Port…“.

7. Once you have configured the port, click on “Apply” and then click on “OK“.

Close the Control Panel window.
Fix 3 – Change your account type
Sometimes this error may also occur if you try to configure the printing port from a non-administrative account.
1. Open Windows Settings simply by pressing Windows key+I.
2. Click on the “Accounts” to access it.

3. When the Account settings appear, click on “Family & other users“.
4. Then you need to click on your non-admin account.
5. After that, click on “Change account type“.

6. When the Change account type window appears, click on the drop-down beside “Account type“.
7. Select “Administrator“.
8. Finally, a simple click on “OK” and the account type will change.

Once that is done, restart your pc to save the changes.
After restarting your pc, this problem should be solved.
Fix 4 – Empty printer queue
Sometimes the spooled files in the printer settings may cause this issue.
1. Search “Services” from the search box.
2. After that, you need to hit Enter to access the Services utility.

3. Scroll down through the list of services and double click on the “Print Spooler” service.

4. You need to set up the startup type of Printer Spooler to “Automatic“.
5. To stop the service, you need to click on “Stop“.

6. Then, click on “Apply” and “OK” to save the settings.

Now, minimize the Services utility.
7. Press Windows key+R to open the Run window.
8. In the Run window, copy-paste this location and then hit Enter.
C:\WINDOWS\system32\spool\PRINTERS

9. If you see a prompt has appeared, click on “Continue“.

10. When the PRINTERS folder opens, select all the files and folders.
11. To empty the folder, press the ‘Delete‘ key.

Close the File Explorer window.
12. After maximizing the Services window, right-click on the “Print Spooler” service and then click on “Start” to start the service.

Close the Services window.