The Machine Check Exception Error in Windows 10 is a BSOD (Blue Screen of Death) error that has troubled quite a lot of users. Although the error clearly does not specify what could be the reason, it has been found that the issue is usually related to system hardware or their drivers.
In this article, we provide you with a series of solutions that have been reported by users to fix the Machine Check Exception BSOD error in Windows 10.
Update Device Drivers on Your PC
The above error could show up on your PC if the Drivers installed on it are not updated, incompatible, or are malfunctioning. Therefore, it is important to have the drivers on your PC updated to their latest versions. Here are the steps to update the Device Drivers on your PC:
Step 1: Press the Win + X keys on your keyboard to open the Power Menu. Here, select the Device Manager option.

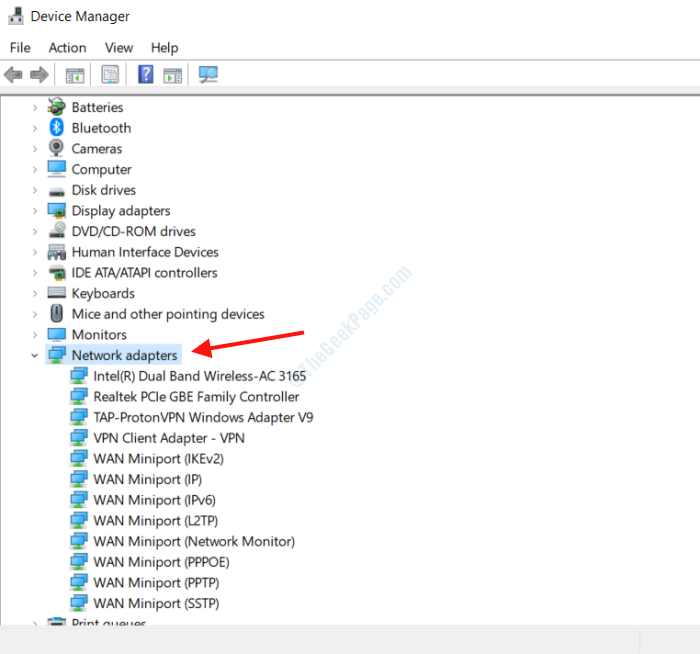
Step 2: In the Device Manager window, you will find a list of hardware devices connected to your PC. Click on any device from the list to expand it and view that device’s drivers.

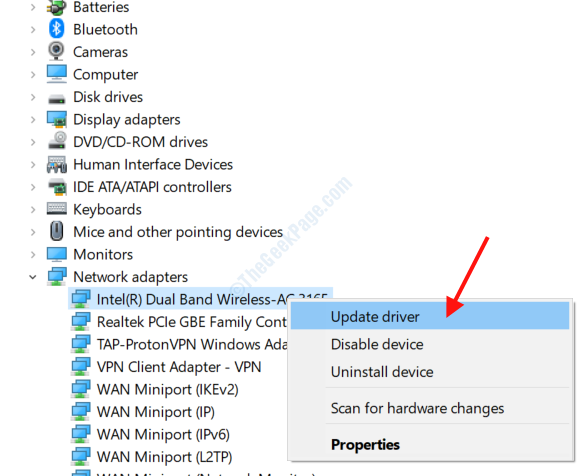
Step 3: In order to update a driver, right-click on it, then from the menu, select the Update Driver option.

Step 4: In the new window that opens, click on the Search automatically for updated driver software option. Now, Windows will search your PC and the internet for the latest version of the driver and install it if found.

Step 5: In case the latest version is already installed, you will get the screen shown below. If a newer version of the driver is found, follow the on-screen instructions.
Once you are done with a single driver, you will need to carry out the same process for the other drivers as well.
The above process to update all the drivers manually may seem lengthy; in such case, we suggest you use any of these Driver Update Software for Windows.
By Running BSOD Troubleshooter
The in-built Windows 10 Troubleshooter is capable of scanning your PC for various issues and fixing them. The Machine Check Exception error is among the issues that can be fixed using the Troubleshooter too.
Step 1: Open the Settings window on your PC by pressing the Win + I keys together. There, scroll down and click on the Update & Security option.

Step 2: The Update & Security settings window will open now. From the left pane of the window, select the Troubleshoot option. Then, from the right pane, scroll down and after selecting the Blue Screen option, click on the Run the Troubleshooter button.

Now, a new window will open where you will need to follow the on-screen instructions to successfully carry out the process. If any problem is detected and fixed by the troubleshooter, reboot your PC and see if you are still getting the error message.
Perform an SFC Scan
The Machine Check Exception error in Windows 10 could be troubling you because of corrupt or faulty files related to your PC’s hardware or drivers. In order to perform a check for such files, it is suggested to run an SFC scan on your PC.
Step 1: Go to the Start menu search box and type cmd. You will now see Command Prompt in the search result; right-click on it, then select the Run as administrator option.

Step 2: This will open the Command Prompt in Admin mode. There, type sfc/ scannow and hit the Enter button.

The SFC scan will begin and look for files that are faulty and need to be repaired. Once the scan and repair processes are complete, close the Command Prompt window and restart your PC.
If the issue is still not fixed, try the next method.
Run DISM Scan
DISM is a powerful repair tool in Windows that can fix various issues including BSOD issues. DISM can be run in two ways; the standard way, and with Windows Installation Media. It is suggested to run the standard DISM scan first, and if it does not work, try the other method.
Let us begin with the Standard DISM scan:
Step 1: Open Command Prompt in Administrator mode by using the Step 1 of the above method.
Step 2: When the Command Prompt opens, type the command given below and press the Enter button:
DISM /Online /Cleanup-Image /RestoreHealth

Let the DISM scan run and restart your PC when it is complete. If the issue was not fixed, you should try the next method.
Run DISM Scan with Windows Installation Media:
Step 1: Get the Windows Installation Media (Flash Drive or CD) and mount it on your PC.
Step 2: Now, open Command Prompt in Admin Mode by following the steps given in the above solution.
Step 3: On the Command Prompt screen type the commands given below and press Enter:
dism /online /cleanup-image /scanhealth
Type the next command and press Enter:
dism /online /cleanup-image /restorehealth
Now, type the next command and replace the X in it with the name of the Drive on which the Windows Installation Media is mounted, then press Enter.
DISM /Online /Cleanup-Image /RestoreHealth /source:WIM:X:SourcesInstall.wim:1 /LimitAccess
Wait for the scan to complete (it may take a while) and restart your PC when done.
Check Your PC’s Hardware
It is recommended to give your PC’s hardware a quick check every once in a while whether you are facing any issues or not. In this case, we recommend you to check the hardware components like RAM, Processor, GPU, Network Adapter, cables, etc. on your PC. See if the RAM is seated properly in its slots. Make sure the CPU and GPU fans are running properly. If you have installed new hardware or switched some components lately, give them a check as well. Also, look for loose connections, especially around network adapter, media cards, etc.
It is also important to clean up the dust build up every now and then inside your PC’s cabinet. While you are checking the Hardware and connections, clean up the dust, especially from the Fan area.
Run Chkdsk Scan
The Chkdsk or Check Disk scan is an in-built Windows tool that scans your PC’s hard disc for issues and fixes them when found. Follow the steps given below:
Step 1: Open Command Prompt in Admin Mode by following Step 1 in the SFC Scan method given above.
Step 2: In Command Prompt, type the following code and press Enter:
chkdsk C: /f /r /x

Let the scan run till it is complete. It is a time taking process as it carries out the recovery of bad sectors, fixing errors, and various other processes to make sure that the issues with your PC’s hard disc are fixed if any. Once the scan is complete, reboot your PC. Follow the next solution in case the issue is not fixed.
Disable the LAN Adapter
The Machine Check Exception BSOD error in Windows 10 is closely associated with Network or LAN Adapters. Thus, you need to make sure if the Network Adapter drivers and device are working properly.
Step 1: Open the Power User menu by pressing the Win + X keys simultaneously. Now, click on the Device Manager option.

Step 2: In the Device Manager window, locate and click on the Network adapters option.

Step 3: Now, right-click on the device drivers and click on the Disable device option.

Step 4: After disabling all the network drivers, restart your PC.
If this fixes the issue, there is a problem with the drivers. In that case, open Device Manager again, and update the network drivers. If the issue persists even after disabling the drivers, then the issue is with the network adapter hardware. In that case, you will need to change it.
Update BIOS
One of the solutions to fix BSOD errors like this one is to update the BIOS of your PC. Let me remind you that updating BIOS is not just a usual workaround and is only suggested if you know what you are doing. If not done properly or carefully, it may irreversibly damage your PC and also may render it useless.
We recommend you to take a look carefully at the user manual of your PC’s motherboard before updating the BIOS.
By Disconnecting DVD and other Hard Drives
Some of the users reported that they got the MACHINE CHECK EXCEPTION error while installing Windows 10 on their PC. One of the solutions to this problem is disconnecting the DVD drive as well as other Hard Drives connected to the PC, except the one which is the installation media. Make sure that you disconnect the drives before you begin the installation process.
By Disabling Fast Boot and CMS in BIOS
One of the ways to fix the issue as reported by users is by disabling Fast Boot and CMS in the BIOS settings of your PC. The BIOS settings differ in PCs, so it is suggested to check out the motherboard manual to know how to disable these features in BIOS.
By Setting SATA Fast boot for All Devices
Another way to fix the Machine Check Exception BSOD Error in Windows 10 is by going to the BIOS settings and setting SATA Fast Boot to All Devices. Again, in order to carry out this process, follow instructions carefully as mentioned in the manual of your PC’s motherboard.
Turn Off the Intel SpeedStep Technology
One more BIOS setting that you can change in order to fix the Machine Check Exception issue is disabling the Intel SpeedStep Technology. Being a BIOS setting, the instructions need to be followed carefully from the manual of your computer’s motherboard.