So you spend a lot of your time on a PowerPoint presentation, finally gets it to completion, and you just want to mail it and be done with it. That’s when you realize that the size of your PowerPoint presentation is too much for it to be mailed. Obviously, you don’t want to spend any more time on your document and reduce its size by cutting down on its content. You also might be hesitant about using a third-party software for size reduction as it might compromise the security of your data. So, is that a dead-end? Well, since when have we started thinking about dead-ends when Geek Page is here to help?
In this article, we explain in detail how you can easily and considerably reduce the size of your PowerPoint document right from your MS PowerPoint with the help of some simple tricks. Hope you find the article helpful.
Solution
Step 1: Double click on the document, that you want to reduce the size of, to open it.
Note: The following screenshot shows the size of the document before we compressed it.
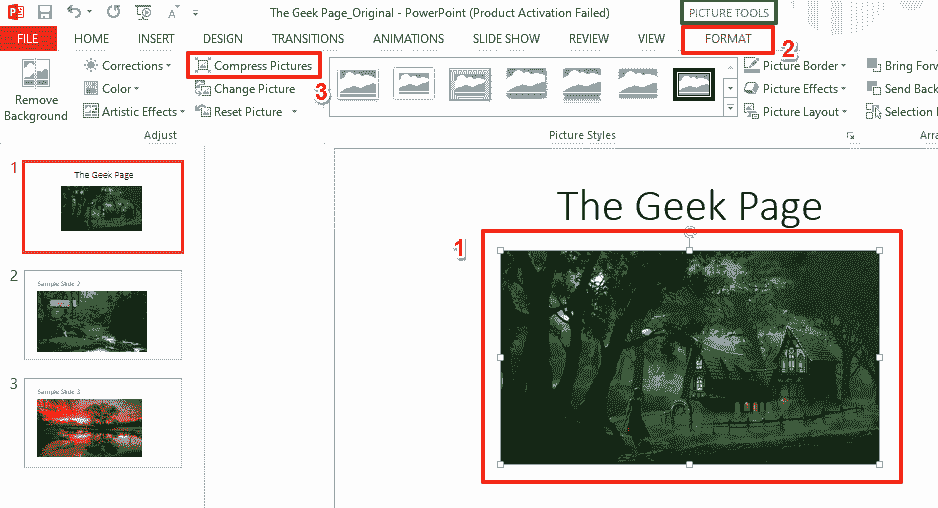
Step 2: When the document opens, click on any picture inside the PowerPoint document.
When you click on any image, a new contextual tab named PICTURE TOOLS will appear at the very top. Under the PICTURE TOOLS contextual tab, there will be a sub-tab named FORMAT. Click on it.
Under FORMAT options, there will be a group named Adjust. Under this group, click on the button that says Compress Pictures.
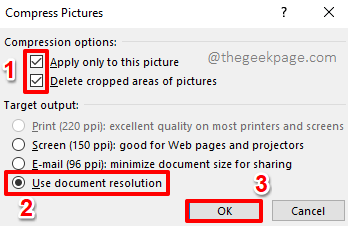
Step 3: When the Compress Pictures window opens up, under the section Compression options, make sure the checkboxes are checked for the options Apply only to this picture and Delete cropped areas of pictures.
Also, under the Target output section, select the radio button corresponding to the Use document resolution option.
Hit the OK button when you are all done.
Step 4: When you are back at the PowerPoint presentation, click on the FILE tab at the top.
Step 5: On the left pane of the window, click on the Options tab.
Step 6: In the PowerPoint Options window, on the left side, click on the Advanced tab.
Now on the right side, scroll down and locate the section named Image Size and Quality.
Under the Image Size and Quality section, check the checkbox corresponding to the option Discard editing data.
Also, set a lower value for target resolution using the dropdown button corresponding to the option Set default target output to. For example, earlier my target resolution was 220 ppi, but I reduced it to 150 ppi.
Hit the OK button.
Step 7: That’s it. Save the document and you can see that the size has reduced considerably. Time to party!
Please tell us in the comments section how easy it was for you to get your PowerPoint document’s size reduced. Also, we are excited to hear how much reduction in the size you could bring about. Jump into the comments section to tell us all about it!
Stay tuned for more amazing tricks, tips, how-tos, and hacks!


