You might have a huge Excel sheet that has the DOBs of all the students in a school. You might need to create a new column named Age that should have the age of each student inside it. Doing this manually is not even thinkable. Or let’s say you have an Excel sheet that has dates of joining of all the employees of a company and you need to find their years of service and put the results in another column. Both the scenarios mentioned here require some calculations to be done on the date you have, to create values for another column.
In this article, we explain in some simple steps how you can easily find the difference between 2 dates and populate the values for another column from the results you obtain. Hope you enjoy reading the article.
Solution
Step 1: Open the Excel sheet first that has the dates that you want to find the differences of.
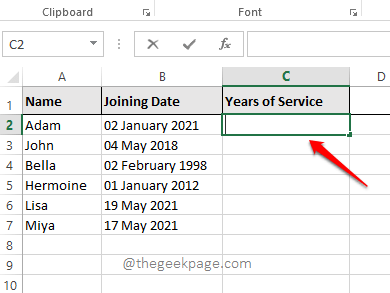
In the example below, I have an Excel sheet that has a list of employees whose joining dates are available. From the joining date, I need to find their years of service. For that, what I’ll do here is, I will take the current date and subtract the joining date from the current date. Let’s see how we can instruct Excel to do the same.
For that, firstly, double click on the first cell of the Years of Service column to edit its value.
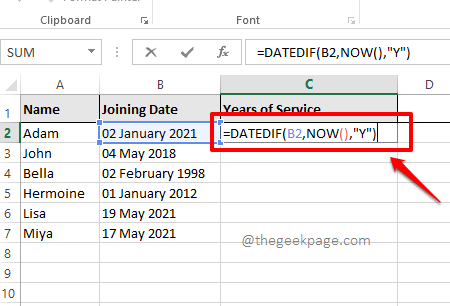
Step 2: As next, copy and paste the following formula into the cell as shown below.
=DATEDIF(B2,NOW(),"Y")
Here, if your date is not in cell B2, you need to give the exact cell id of the date inside the formula.
NOW() function returns the system date, which will be used to find the difference.
Y is for years. This parameter is used to find the difference in dates, in years. The other options in the place of this parameter are M and D, respectively for the difference in months and for the difference in days.
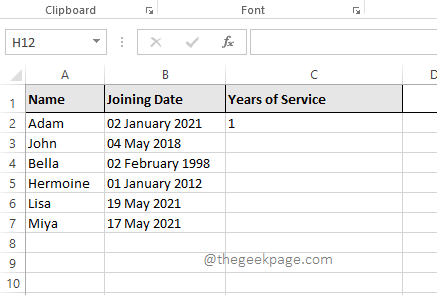
Step 3: Once you have entered the formula, simply click elsewhere and you will be able to see that the cell you selected is populated with the difference value between the selected joining date and the current date. In the example below, it is 1.
Note: If your formula is not working, you need to make sure that the format of the date in the cell you have entered is correct. That is, in the example above, if the dates in the column named Joining Date are not in Date format, then your formula will not work.
Step 4: Now, click on the cell once again. This time, look for a small square icon at the bottom right corner of the cell borders. Click on it and drag it down to apply the same formula to all the cells in the same column.
Step 5: Once you drag the formula down, all the cells will be populated with the difference in years values.
Step 6: Just like finding the difference in years, you can find the difference in months too. For that, you have to replace Y in the formula =DATEDIF(B2,NOW(),”Y”) with M. So the final formula would be as below.
=DATEDIF(B2,NOW(),"M")
Step 7: Another option is to replace M with D. And this would find the difference between dates, in days. The final formula, in that case, would be as follows.
=DATEDIF(B2,NOW(),"D")
Step 8: Just like in Step 5, you can select and drag the formula down to apply it across the column as shown in the screenshot below.
Extra Cookie: If you have 2 dates explicitly in your Excel sheet and you want to find the difference between them, instead of using the NOW() function to find the current date, you can just give the cell id of the cell that contains the second date. For example, if you have your first date in cell B2 and your second date in cell C2, and you want to find the difference between these 2 dates in Days format, then your formula would be as follows.
=DATEDIF(B2,C2,"D")
Please let us know if you have any concerns over any of the steps detailed. We are more than happy to help. Stay tuned for more tips, tricks, and how-to articles.


