Usually, when the system detects a new Wi-Fi connection, the Action needed for the Wi-Fi prompt shows up. However, it becomes quite annoying when the Action need for Wi-Fi prompt shows up every now and then for the old trusted networks in the system.
Generally, when you click on Action needed for the Wi-Fi prompt, the browser window opens and takes you to Microsoft Connection Test Page. This issue of seeing the prompt for the trusted network occurs after a system upgrade.
In this article, let us discuss two different ways of disabling the Action needed for the Wi-Fi prompt.
NOTE:
It is not advised to disable the Action needed prompt as this is a security feature from Windows and helps to identify the malicious network connections. However, if it is a network you trust, then, it is safe to disable the prompt.
Method 1: Using Registry Tweak
First of all, let us try to understand what we will be achieving from the registry tweak. Windows uses the Network Location Awareness(NLA) service to identify a network and any changes to it. Within this service, there is a component called NCSI(Network Connectivity Status Indicator) which determines if the system has connected to the network properly and the kind of network(like internet or intranet, etc) the system is connected to. When any changes in the network interfaces of the system are detected, the Action needed prompt will show up. With this registry tweak, we will be disabling the Active Probing property of the NCSI component.
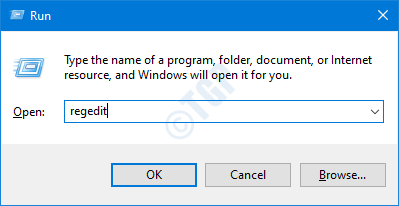
Step 1: Open the Run window by pressing the buttons Win Key+r from your keyboard
Step 2: Type regedit and press OK

Step 3: In the UAC window that asks for permission, just click on the Yes button.
NOTE: Registry editing can have an adverse effect on the system even with the slightest mistake. It is advised to take the backup of the registry before proceeding. To take a backup, In the Registry Editor–> Go to File –> Export –> Save your Backup file.
Step 4: In the Editor window, in the top bar, copy-paste the below location
HKEY_LOCAL_MACHINE\SYSTEM\CurrentControlSet\Services\NlaSvc\Parameters\Internet
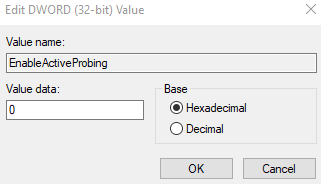
Step 5: From the right-hand side pane, double click on EnableActiveProbing

Step 6: In the Edit DWORD window that opens, edit the Value to 0 and Click on the OK button

Step 7: Now, Navigate to the below location,
HKEY_LOCAL_MACHINE\Software\Policies\Microsoft\Windows\NetworkConnectivityStatusIndicator
Step 9: On the right side, Right-click on empty space and choose New–> DWORD(32-bit) Value

Step 10: Name the newly created DWORD as NoActiveProbe

Step 11: Double-click on NoActiveProbe and set the Value to 1 and click on OK

Step 12: Within the registry key NetworkConnectivityStatusIndicator, create one more key named DisablePassivePolling.
Step 13: Double click on the DisablePassivePolling and modify its value to 1
Step 14: Finally, click on OK to save the value.

That’s All
We hope this article has been informative. Thank you for Reading.
Please don’t forget to comment and let us know which of the above fixes worked in your case.
Method 2: Using Group Policy editor
1- Search gpedit.msc in windows search box.

2 -Navigate to the following path:-
Computer Configuration > Administrative Templates > System
3 -In the right side Double click on Internet Communication Management.

4 – Now, Click on Internet Communication settings

5 – Now, Double Click on Turn off Windows Network Connectivity Status Indicator active tests
6 – Choose enabled.
7 -Click on Apply.

8 – Similarly Go to the following path in Group policy
Computer Configuration -> Administrative Templates -> Network
9 – In right side , Double click on Network Connectivity Status Indicator
10 – Now, Double click on Specify passive polling status.
11 – Choose Enabled option.
12 – Click Apply and OK
Method 3: Disconnect and reconnect to the Wi-Fi
Step 1: Click on Wifi Icon located in the Taskbar.
Step 2: Click on the Wi-Fi connection that you are connected to.
Step 3: Click on the Disconnect button

Step 4: Again, right-click on the connection and choose to Forget

Step 5: Once again, click on the Wi-Fi Connection and choose Connect

Step 6: Once you are connected to the network, click on the Properties located below your connected wifi name.

Step 7: Change Network Profile from Public to Private.

Check if this helps. If not, try the next method listed.