You want to view the complete list of network devices using the terminal and so, you execute the command “net view/all” in the Command Prompt and bang comes the error message, “System error 6118 has occurred“. This prevents the list to be pulled up and you see a message saying, “The list of servers for this workgroup is unavailable“. Which means you see no devices at all.
So, what causes this error to come up? It can appear either due to interference from a 3rd party antivirus/ firewall configuration blocking it, may be because the Function Discovery service is turned off, or when the computer browser service is turned off. However, there are a couple of workaround that can help you continue to manage file sharing, or sharing sessions and printers.
So, here’s how to fix the “System error 6118 has occurred” issue in Windows 10.
Workaround: – Instead of using net view you can use the commands given below.
- Get-SmbShare -Name “computername”
- Get-SmbShare -Name “computername” | Format-List
- Get-SmbShare -Name “computername” | Format-List -Property *
Method 1: By Enabling Function Discovery Service
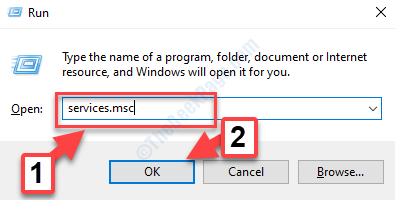
Step 1: Press the Window key + R to open the Run command.
Step 2: Now, in the search box, type services.msc. Press OK to open the Services window.

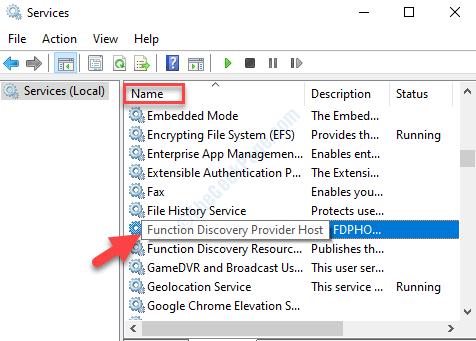
Step 3: In the Services window, go to the right side and under the Names column, find Function Discovery Provider Host.

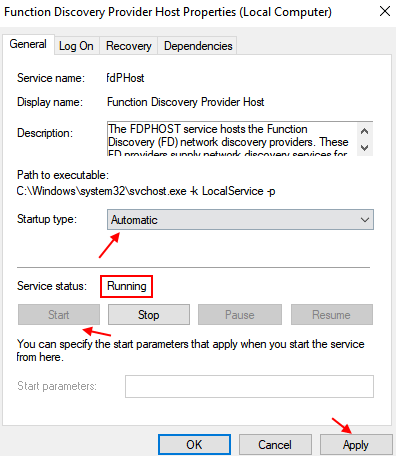
Step 4: Now, double-click on its Properties dialogue box. Under the General tab, navigate to the Startup type section and select Automatic from the drop-down.
Make sure the Service status is Running. If it is not, then Click on start to start the service

Step 5: Press Apply and then OK to save the changes and exit.
Now, go back to Command Prompt and try running the “net view/all” command and it should successfully pull up all the network devices. If not, then try the 3rd method.
Method 2: By Enabling SMB feature and Starting Computer Browser service
1 – Search Turn Windows features on or off in search box and click on it

2 – Now, enable SMB 1.0/ CIFS File sharing support and click OK

3 – Restart Computer
4 – Now, Search services in Windows search box and click on it

5 – Now, Locate computer browser service and double click on it

6 – Set startup type to automatic and click on start to start the service

Now, try again.
Method 3: By doing Network Reset
1. Press Windows key + R key together to open run.
2. Write CMD in it and Press CTRL + SHIFT + Enter key together to open elevated cmd window.

3. Now, run the commands given below , one by one in command prompt.
ipconfig /release

ipconfig /flushdns

ipconfig /renew

netsh winsock reset

netsh interface ipv4 reset

netsh interface ipv6 reset

netsh winsock reset catalog

netsh int ipv4 reset reset.log

netsh int ipv6 reset reset.log

netsh advfirewall reset
After this close the command prompt window.
Method 4: Turning ON Network discovery
Step 1: Go to the Start button on your desktop (Windows icon on bottom left of the screen) and in the search box type Control Panel.

Step 2: Left-click on the result to open the Control Panel Home window.

Step 3: In the Control Panel Home window, go to View by on the top right and select Large icons from the drop-down next to it.
Then go to Network and Sharing Centre option and left-click to open it.

Step 4: In the Network and Sharing Centre window, go to the left side of the pane and click on Change advanced sharing settings.

Step 5: In the Advanced sharing settings window, under Change sharing options for different network profiles, go to Private and then to the Guest or Public (current profile) section.
Navigate to Network discovery section below it, select the radio button next to Turn on network discovery.

Step 6: Now, scroll down and expand All Networks. Under File sharing connections section, make sure Use 128-bit encryption to help protect file sharing connections (recommended) is enabled.
Also under, Password-protected sharing section, make sure if the Turn on password-protected sharing option is enabled.

If they are not enabled, select the radio buttons next to each of them to turn them on. Once all that is done, click on Save changes at the bottom to save the changes and exit.
Method 5: By Turning Of 3rd Party Antivirus/Firewall
Apparently, one of the most common reasons behind the System error 6118 error in the Command Prompt is an over-active firewall that keeps preventing the Server Message Block (SMB) from interacting with other devices. Most users found that the issue was being caused by their 3rd party antivirus software.
In such cases, you would need to try troubleshooting on your own to check if it works and if the error is gone. The 1st thing you can try is to turn off the real-time protection and reboot your PC to see if the error is gone. Alternatively, you can also try uninstalling the 3rd part antivirus suite temporarily. You can go to Control Panel => Programs & Features => 3rd party software => Uninstall
To turn off the firewall:-
1. Search windows firewall in windows 10 search box.

2. Click on Turn windows firewall ON or OFF

3. Now, Turn off Windows defender Firewall

If this doesn’t work, try the 2nd method.
That’s about it. You can now relaunch Command Prompt and try pulling up the list of network devices and it should display all of them without any error.
Method 2 worked like a charm
All i done still having same issue