The best experience of streaming videos on YouTube can be done while you are connected to the Wi-Fi. But, what if the YouTube stops playing videos on the Wi-Fi? There are some comprehensible reasons why the YouTube can’t stream video on the cellular mode, but things are not the same when you are on Wi-Fi. In that case, these solutions will troubleshoot the issue.
Fix 1 – Switch on the Flight mode and check
For the starters, you should set the iPhone to airplane mode and later, disable that and check whether the YouTube is working or not.
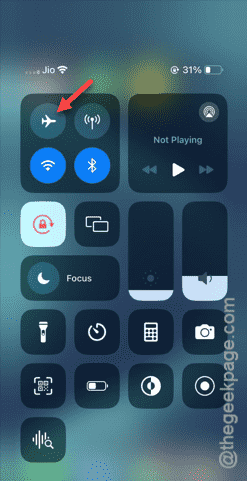
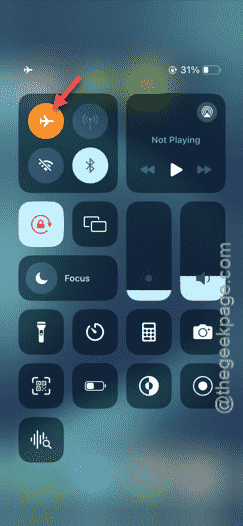
Step 1 – Just swipe down using your finger. Later, touch the Flight Mode button to enable it.
You will notice all the networks (Wi-Fi, Carrier settings and Bluetooth) are turned off.
Wait for 15–20 seconds.
Step 2 – Then, open the Control Center same way. Disable the Airplane mode.
All the networks, Wi-Fi connections will be restored within a few seconds. If your iPhone doesn’t connect to the Wi-Fi automatically, you have to connect to it manually.
Give the YouTube app a try.
Fix 2 – Restart the router and test
There is a procedure that you can enact to check whether the router is causing the problem or not.
Step 1 – Disconnect the iPhone from the Wi-Fi.
Step 2 – Next, switch off the router. Disconnect it from the power socket.
Step 3 – Then, wait for at least half a minute.
Step 4 – Later, you can plug the router to the power outlet and switch it On.
Go back to your iPhone and turn on the Wi-Fi. When the Wi-Fi gets online, and you have connected to the Wi-Fi, try playing any video from the home feed.
Fix 3 – Change the video quality preferences
The current video quality preferences can influence the video on the YouTube app.
Step 1 – Open the YouTube app. Ignore, even if the videos are not playing.
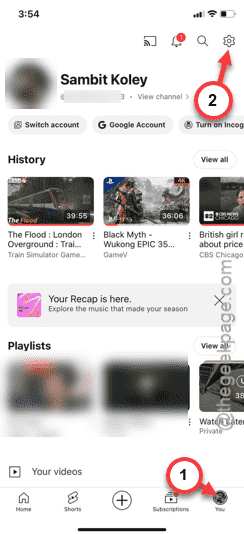
Step 2 – Next, tap your account image in the bottom-right corner.
Step 3 – On the new page, touch the ⚙button to open the YouTube settings.
Step 4 – Tap to open the “Video quality preferences“.
Step 5 – Inside you will find two settings, but you have to open the “On Wi-Fi” option.
Step 6 – Set the ‘Video quality on Wi-Fi’ to “Auto (recommended)” mode.
After altering the video quality preference in the Wi-Fi settings, try streaming a video.
Check if this helps.
Fix 3 – Forget the Wi-Fi network and reconnect
Forget the Wi-Fi network and reconnect to the same network.
Step 1 – Go to iPhone’s Settings and open the “Wi-Fi” settings.
Step 2 – There will be a small blue ℹ button there. Tap to open its settings.
Step 3 – Tap the “Forget This Network” option.
Step 4 – Touch the “Forget” option to forget the network.
This means, the saved up password will be removed for that specific SSID. So, you must connect to the Wi-Fi once again.
Step 5 – Go back to the main Wi-Fi page.
Step 6 – Tap that SSID to connect to it.
Step 7 – You have to provide the Wi-Fi password, next and tap the “Join” button to connect to that Wi-Fi.
Once you have connected to the Wi-Fi, you can stream the videos again.
Fix 4 – Reset the internet configuration
Reset the iPhone’s configuration completely.
Step 1 – You may start this approach from the Settings home page.
Step 2 – Next, follow this path –
General > Transfer or reset iPhone
Step 3 – There, in the following page, tap “Reset” button”.
Step 4 – You will notice a number of resetting choices in there. Tap the “Reset Network Settings” option.
Once you have adjusted the network configuration on your iPhone, your device will be restarted. This is the standard process. So, don’t worry.
Reconnect to the Wi-Fi using proper password. You can now enjoy the YouTube videos on Wi-Fi without any more issues.


