Imaging a life without the Wi-Fi is not an easy task. So, if the Wi-Fi connection is not working on your iPhone, you can become frustrated easily. This can leave you offline, when your cellular data has reached the limit. But, fixing the Wi-Fi issue is not that hard. Try these approaches to fix the problem.
Fix 1 – Reset the network settings
Clean up the entire network configuration on your iPhone.
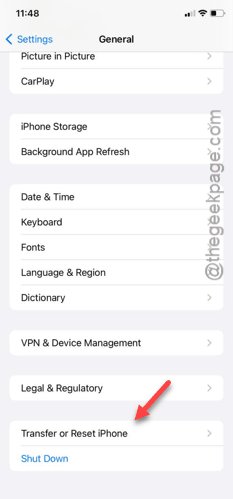
Step 1 – You can do the entire process from the Settings page.
Step 2 – So, go to the Settings and open the “General” tab.
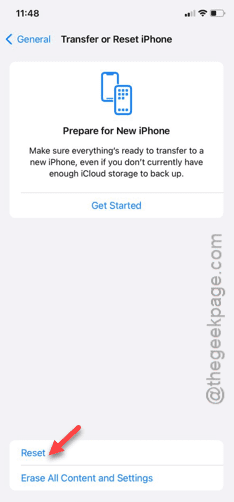
Step 3 – Later, get to the “Transfer or reset iPhone” feature.
Step 4 – There will be two options. You have to use the “Reset” option, here.
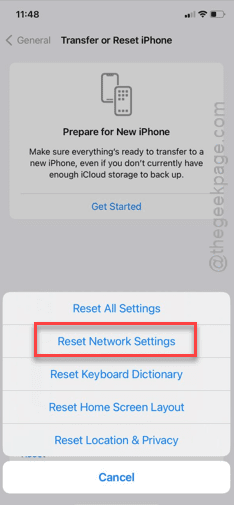
Step 5 – Next, tap the “Reset Network Settings” button.
Step 6 – Input your Apple password there and go through the security check.
This way, complete the network resetting process. Unlock your iPhone and, later, connect to the Wi-Fi.
As you have reset iPhone’s network, you have to use the Wi-Fi password to log in. Wi-Fi will be working properly on your iPhone.
Fix 2 – Permit the Networking & Wireless permission
Permit the Networking & Wireless permissions on your iPhone Settings.
Step 1 – In the iPhone Settings, load up the “Privacy & Security” settings.
Step 2 – Next, open the “Location Services” panel.
Step 3 – There, you will see the “System Services” tab. Open it up.
Step 4 – Later, you will find the “Networking & Wireless” services. Make sure this feature is turned on.
After enabling this service, try to play a song or browse something while you are connected to the Wi-Fi.
This time, Wi-Fi will function normally.


