Is your computer keep waking up from sleep mode automatically? Some Windows 10 & Windows 11 users are complaining about this kind of problem in the forum. If you are facing the same issue at your end, don’t worry. Just follow these fixes on your computer and the problem will be solved in no time. But, before moving ahead, attempt these workarounds on your computer to try out some easier fixes for your problem.
Initial Workarounds–
1. Eject out any kind of unnecessary peripherals (such as- external storage, headphones) from your computer before putting it to sleep mode.
2. Check if there is any update is pending on your computer. Sometime Windows installs the upgrade overnight and restarts the system to complete the process. So it may breach the sleep mode. You can arrange the active hours (when not to install the updates) from Settings to avoid this.
If any of these didn’t work out, try these fixes-
Fix-1 Disable Wake Timers-
Disabling wake timers may fix this problem on your computer.
1. Click on the Search box beside the Windows icon and type “Edit power plan“. Now, click on “Edit power plan” to open the Edit Plan Settings window.

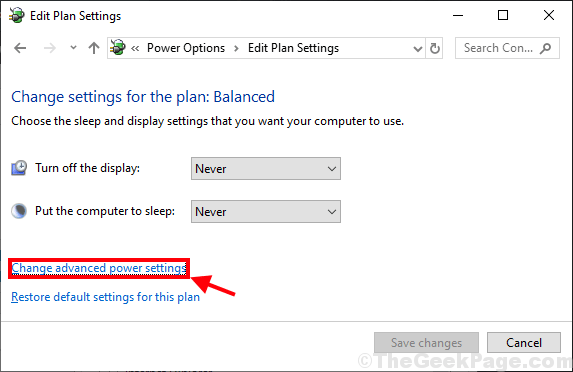
2. In Edit Plan Settings window, click on “Change advanced power settings“.

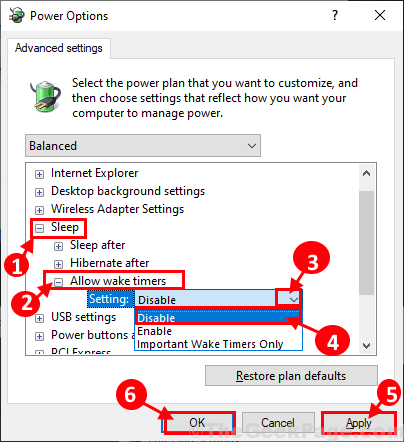
3. In Power Options window, expand “Sleep” and then expand “Allow wake timers“. Now click on “Settings:” and then from the drop-down select “Disable” to disable it on your computer. Finally click on “Apply” and “OK” to save the changes on your computer.

4. Don’t forget to click on “Save changes” in Edit Plan Settings window to save the changes on your computer.

Reboot your computer to save the changes. Check if your computer is still waking up in sleep mode or not.
Fix-2 Check Power Options of your network adapters
1. Search Device manager in windows search box.
2. Now, Click on device manager to open it.

3. Now, double click on network adapters to expand it.
4. Now, locate your network adapter and right click on it and choose properties.

5. Click on Power Management Tab.
6. Uncheck Allow the computer to turn off this device option
7. Also, uncheck Allow this device to wake this computer option.

8. Click on OK.
Similarly, repeat these steps for all the items listed under network adapters.
Also, try to uncheck This option in external devices connected to your system like Webcam, USB, Mouse, Keyboard etc. also.
Fix-3 Use Waketimers to locate the culprit
Using Waketimers you will be able to detect the applications which are keeping your computer awake.
1. Press Windows key+R to open Run window on your computer and type “cmd” and press Ctrl+Shift+Enter. Click on “Yes” to grant access to the User Account Control. Command Prompt window will be opened with administrative rights.

2. Copy and paste this command in Command Prompt window and hit Enter to execute it.
powercfg /lastwake

You will be able to notice the application which is causing your computer to wake up. If any of the application is a third party application, you can uninstall it from your computer.
Note: – For more information about your PC’s sleep and wake , you can try running few more commands given below.
- powercfg /waketimers
- powercfg /lastwake
- powercfg /sleepstudy
- powercfg /systemsleepdiagnostics
- powercfg /systempowerreport
Fix 4 – View Event viewer to find the culprit
1- Search Event Viewer in Windows search and click on it to open event viewer.

2 – Now, go to Windows Logs > System from the left menu.
3 – Now, in the right most menu, click on Filter current Log.

4 – Now, select Power troubleshooter from Event sources:
5: Click Ok.

6. Now, One by One double click on recent logs in Middle window and find the culprit who wakes up the PC.

Also read: – Sleep Mode not working
Fix-5 Disable Reboot in Task Scheduler-
1. Right click on desktop and then click on “New>” and then click on “Folder“. Rename the folder to “PsTools“.

2. Download PsTools on your computer.
3. After downloading PsTools on your computer, extract the “PsTools.zip” in “PsTools” folder on your desktop.

4. Now, press Windows key+R to open Run window on your computer and type “cmd” and press Ctrl+Shift+Enter. Click on “Yes” to grant access to the User Account Control. Command Prompt window will be opened with administrative rights.

5. Copy and paste this command on Command Prompt and hit Enter.
cd C:\Users\Username\Desktop\Pstools
[ Note- Replace the “Username” with your account username.
Example – For our computer, after replacing the user name, the command is-
cd C:\Users\Sambit\Desktop\Pstools ]

6. Now, copy and paste this below mentioned command in Command Prompt window and hit Enter to execute it.
psexec.exe -i -s %windir%\system32\mmc.exe /s taskschd.msc

Once the command is executed, close Command Prompt window.
7. Now press Windows key+R to launch Run window and type “taskschd.msc” and hit Enter.

8. On the left pane of Task Scheduler, navigate to this location-
Task Scheduler Library -> Microsoft -> Windows -> UpdateOrchestrator
On the right pane of the same window, you will be able to notice list of tasks. Make sure “Reboot_AC” and “Reboot_Battery” is disabled on your computer. Otherwise, right click on both of them and then click on “Disable” to disable them on your computer.

Close Task Scheduler window.
Reboot your computer to save the changes. After rebooting your computer, check if your computer is still waking up from sleep mode automatically or not.
Fix-6 Change condition of Universal Orchestrator Start-
Changing the conditions of Universal Orchestrator Start may help you resolve this issue on your computer.
1. Press Windows key+R to launch Run window and type “taskschd.msc” and hit Enter.

2. On the left pane of Task Scheduler, navigate to this location-
Task Scheduler Library -> Microsoft -> Windows -> UpdateOrchestrator
Now, on the right pane, find and double click on “Universal Orchestrator Start” to open its properties.

3. In Universal Orchestrator Start Properties window, go to the “Conditions” tab and uncheck the “Wake the computer to run this task“. Now, finally click on “OK” to save the changes.

Close Task Scheduler window. Reboot your computer to save the changes.
After rebooting, put your computer to sleep mode. Check if it is waking up or not.
Fix-7 Disable UvoSvc service-
If this problem is happening due to UvoSvc service, disabling it may help your problem.
1. Press Windows key+R to open Run window on your computer and type “cmd” and press Ctrl+Shift+Enter. Click on “Yes” to grant access to the User Account Control. Command Prompt window will be opened with administrative rights.

2. Type or copy-paste this command in Command Prompt window and press Enter to execute it.
sc stop “UsoSvc”

3. Copy-paste this command in Command Prompt window and press Enter to execute it.
sc config “UsoSvc” start= disabled

Reboot your computer to save the changes. After rebooting, check if your computer is still keep waking up from sleep mode.
Fix-8 Change the value of a particular key-
1. Press Windows key+R to launch Run window. Type “regedit” and hit Enter to open Registry Editor on your computer.

2. In Registry Editor window, navigate to this location on the left pane-
HKEY_LOCAL_MACHINE\SOFTWARE\Microsoft\Windows NT\CurrentVersion\Winlogon
Now, on the right pane of Registry Editor window, find and double click on “PowerdownAfterShutdown” to edit and change the value of it.

3. Change the Value Data to “1” and then click on “OK“.

Reboot your computer to save the changes on your computer. After rebooting your computer, put your computer in sleep mode. Your problem should be solved.