The ERR_BAD_SSL_CLIENT_AUTH_CERT error is one common error reported by many Google Chrome users. Google Chrome fails to validate your login certificate at times because of various issues and that is the reason why you get this error. We have listed out all the major causes why this error occurs and the easiest solutions for these problems. Please read on, to learn how to tackle this issue in no time.
Method 1: Disable SSL / TLS Protocol Filtering in Third Party Antivirus Software Settings
Another solution that you can try is turning off the SSL /TLS protocol filtering in your antivirus settings. To do that, open your antivirus software and try to find the advanced settings section. In it, look for something similar to SSL / TLS filtering. If you find it, keep it disabled. Once you’re all set, check if the issue has been resolved.
Most of the users facing this error are having ESET antivirus on their PC.
If you are also having ESET on your PC, Just go to
advanced setup/web > email/(ssl/tls) and disable this
or Go to
ESET > Setup > Internet Protection > edit “Web Access Protection” > expand “Web Protocols” > disable “Enable HTTPS Checking
Method 2: Make Sure Windows Date and Time are Correct
If you are getting the error ERR_BAD_SSL_CLIENT_AUTH_CERT from Google Chrome and your Windows data and time is out of sync, search nowhere, you have already found the culprit. Follow the simple steps listed below to correct your Windows date and time.
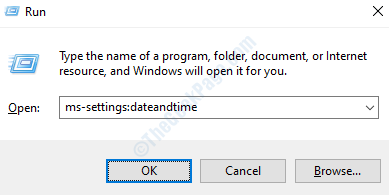
1. Launch the Run dialog box by pressing the WIN + R keys together. Once it opens up, in the Run command box, copy paste the following and hit Enter key.
ms-settings:dateandtime
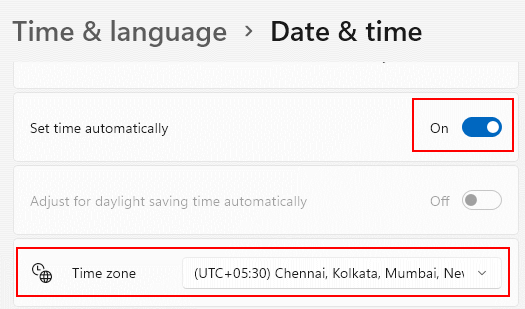
2. The windows Settings app will now open up before you, with the Date & Time settings page. Toggle ON the buttons that say Set time automatically and Set time zone automatically as shown below.
If they are not correct Make sure Time Zone is correct .

Once the date and time are correctly set in your machine, restart your PC and check if the issue has been resolved.
Method 3: Clear Google Chrome Browsing Data and Cache
Sometimes the reason could be caused because of some random cookies or because of some data conflicts in Google Chrome. In that case, clearing Google Chrome browsing data should easily fix your issue.
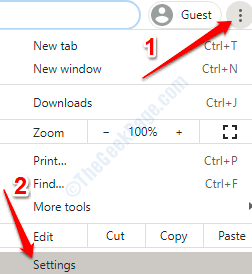
1. Open Google Chrome web browser and then click on the three dots icon at the very top right corner of the page. Once the menu expands out, click on the Settings option.
2. Now in the Google Chrome settings search bar, type in Clear browsing data. Click on the same from the results that get listed.
3. A new window named Clear browsing data will now be opened before you. Click on the Advanced tab first. Then from the drop down menu associated with the option Time range, click on the All time option. Now select all the checkboxes:
- Browsing history
- Download history
- Cookies and other site data
- Cached images and files
- Passwords and other sign-in data (If you do not want your passwords to be cleared, leave this option)
- Autofill form data
- Site Settings
- Hosted app data
Once you have selected everything, click on the Clear data button at the bottom.
Once the whole process is done, restart your machine and see if the issue is resolved.
Method 4: Update Google Chrome
Google Chrome is constantly fixing bugs and your bug could be one of those fixed bugs. Update your Google Chrome to get the latest version and check if the issue is present in the new version or not.
1. Open Google Chrome and click on the 3 vertical dots icon at the top right corner of the page. Now click on the arrow associated with the option Help and then click on About Google Chrome.
2. Upon opening the About Chrome page, you will see that Chrome is already checking for any updates available for you.
If there are any updates, Chrome will now update itself and you will be shown a message indicating the same. Once everything is done, restart your Google Chrome and check if your problem is gone.
Method 5: Turn Off Third Party Antivirus Web Protection
Third party antivirus software could also sometimes cause this error. If the antivirus considers the webpage you are visiting as malicious, then it might be blocked by your antivirus. Try to turn off or disable the web protection section in your antivirus software for a little while and check if your problem is still present or not.
Method 6: Update Your Windows Operating System
An outdated system always behaves strange. If your system hasn’t been updated in a long time, it could very well be the reason why you are getting the Google Chrome error as well. Follow the steps below to update your Windows.
1. First of all, open Windows Settings app. For that, press the keys WIN + I together. Once it launches, click on the tab that says Update & Security.
2. Under Windows Update section, click on the Check for updates button.
Windows will now check for available updates as shown in the screenshot below:

3. If Windows could find some new updates that your system didn’t have already, you will now get a button that says Restart now. Click on it and let your machine restart. Once the system boots back up, check if your issue is still present or not.
Hope you found a fix for your problem in one of the above methods listed.

